• Welcome Visitor! Please take a few seconds and Register for our forum. Even if you don't want to post, you can still 'Like' and react to posts.

Early Christmas for project " OUTRANGEROUS"


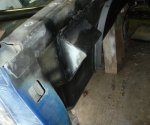
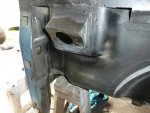
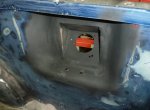
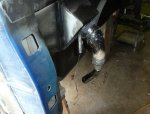
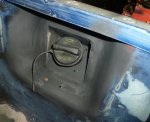
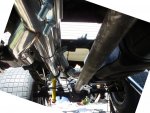
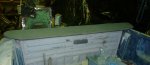
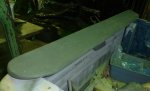
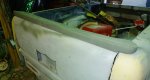
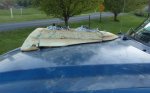
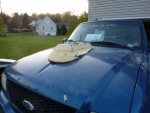
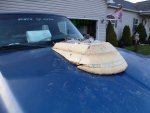
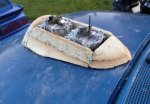
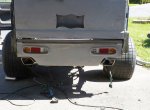
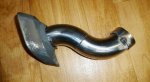
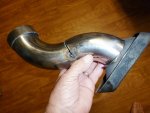
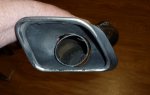
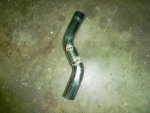
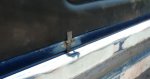
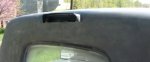
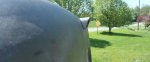
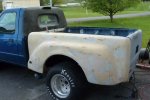
Finished up the install of the gas filler today. Flipped it around into the bed and used the pocket used for the tie down. fabed a new bracket and welded it in cut the hole for the filler pipe. old filler pipe had to be modified to fit in the reversed position. Sticks out to far and hits the inside of the fender. Ruined original filler pipe when welding on it and found out the inside filler that holds the gas cap is plastic. Received new filler tube and used JB weld to hold the modified tube wrapped a little fiberglass clothe around it for added strength. Looks like it should be ok will need some new longer rubber hose and vent tube.
 

Attachments

  • gf1.JPG
    gf1.JPG
    166 KB · Views: 126
  • gf2.JPG
    gf2.JPG
    174.2 KB · Views: 134
  • gf3.JPG
    gf3.JPG
    146.8 KB · Views: 135
  • gf4.JPG
    gf4.JPG
    159.6 KB · Views: 127
  • gf5.JPG
    gf5.JPG
    158.3 KB · Views: 138
Started on new exhaust today. The way the exhaust manifolds dump down the drivers side manifold pipe drops down inside the frame and to mess things up I installed the small cats from the original 3.0 with the guts knocked out. ( I did this because the junkyard would not give me the original cats for the 4.6 when I bought it and ( I thought I should have something in there if the pa. inspection looked for a converter) Even though we don't do emissions, Pa. does require yearly inspections.
So I don't have any room here to work with, the pipe leaving the cat is pretty low already and now I need to put a 2 1/2" - 90 degree pipe on it. I had to make a 90 degree fitting that would turn very sharp out of some 2" pipe. Its not going to be the freest flowing pipe but I did manage to keep a full 2' inside diameter and did it all in 4". I was able to cross over in front of the transmission behind the flywheel and turned toward the rear on the passenger side. The passenger side has the manifold pipe falling outside the frame rail, this pipe came dowm at an angle and II was able to turn this pipe with a 45 degree fitting, piped down past the torsion bar end and used a pair of 45's to create an offset that rolled up inside the frame. Finally was able to get both pipes headed towards the rear. Now to find room for 2 mufflers which I think I will put last just before the tail pipe ends. I also have a set of electric cutouts that have to go in the middle somewhere ?
There is a lot of getting up and down from under the car which I have sitting up on 8' blocks but at 71 it's not as easy as it used to be. This is not one of the fun parts but it has to be done. I bought a 2 1\2" exhaust pipe kit off of ebay and the pipe is really nice heavy wall tubing, the bends are all very clean and nice. It shines like stainless but I bought the mild steel. It fits good and welds nice.
 
alright finished 90% of the exhaust today. Not quite how I had envisioned it but it came out pretty nice. Wound up running both pipes one over top the other back to the rear axle. I bought a set of remote controlled exhaust cutouts and I guess you get whst you pay for. When I started the truck up I can hear a slight leaking sound that comes from around the butterfly valve, no seal just snug fit inside pipe (apparently not tight enough) hope it will get through Pa's annual inspection.
the cut outs are under the rear of the cab and the mufflers are in the space where the spare tire was. still need to add the final exhaust tips but I will have to put the bed back on to get the correct location,
I had purchased some used mufflers from a guy on face book, no names on them but they are pretty new never installed, all the piping was just tacked together. They don't sound to bad.
The pipe kit I purchased from Blackhorse industries were really nice, smooth bends, easy fit and heavy gauge. They welded up nice with arc welder set on 40 amps with 1/8" rod. I'm not a very good welder but got better as I went on. The grinder made the other welds look good under a coat of high temp. paint/
 

Attachments

  • ex1.JPG
    ex1.JPG
    99.3 KB · Views: 141
  • ex2.JPG
    ex2.JPG
    81.2 KB · Views: 141
  • ex4.JPG
    ex4.JPG
    97.1 KB · Views: 151
  • ex5.JPG
    ex5.JPG
    157.8 KB · Views: 136
It's been a little chilly here in south central Pa. so I've been getting some detail things done in the garage.
I had to take some time off to get the riding mower up and running and had to cut the grass twice already with all the rain we've had.
So I fabricated my own rear spoiler that will mount on top of the tailgate. I shaped up a plug out of some 2" thick urethane foam I had fiberglassed over it, a little filler and sand it down, spray so primmer and it's ready for paint
 

Attachments

  • wg1.JPG
    wg1.JPG
    78.4 KB · Views: 115
  • wg2.JPG
    wg2.JPG
    105 KB · Views: 123
  • wg3.JPG
    wg3.JPG
    97.6 KB · Views: 128
Still not very nice here so more projects in the garage.
I needed to make a faring to go around the 2 -4 barrel carbs on the hood so I used the same 2" foam to rough out a plug that I will cover with fiberglass and latter also fiberglass it down on the hood. Should be functional to direct air around carbs. Looks good with the scoop installed.
I removed the the seats, head liner and trim inside and pulled the rear window to get some measurements for new window install. It looks like I should be able to cut the the new (old) window to fit just inside the lip of the original window. The metal arounld the new window is not wide enough to cover the whole opening so I;ll have to use some filler panels there. I bought some smaller wire for my mig so I'm hoping it will be ok. Actually all you do is tack weld around the whole thing anyway.
Been awaiting for 3 week for some material, this lock down is a bummer but I've had plenty to do. Stay safe and well
 

Attachments

  • hd1.JPG
    hd1.JPG
    132.6 KB · Views: 134
  • hd2.JPG
    hd2.JPG
    134.2 KB · Views: 131
  • hd3.JPG
    hd3.JPG
    145.9 KB · Views: 131
  • hd4.JPG
    hd4.JPG
    167.3 KB · Views: 131
Ok, had a few nice days here and got a few things worked on,
For one thing I finished up the exhaust with the tips on which was no small task ( actually left side was small that's why it was so difficult).
I believe the tips were from a Maxima, so they had like an 1 1/4" pipe connection on the back that had to be cut off and opened up for the 2 1\2" pipes, then I cramped myself by placing the drivers side muffler only 10" from the tip location and I needed to offset the pipe about 4". So after mush grinding and testing I finally got it to fit. The other side was 16" long so I had plenty of space to offset and roll the pipe into place. The tips worked out well since I had already completed the rear valance.
Exhaust sounds good, not sure what mufflers these are, bought they from a guy who had them on his Foxbody.
 

Attachments

  • exh5.JPG
    exh5.JPG
    106.6 KB · Views: 135
  • exh6.JPG
    exh6.JPG
    163.9 KB · Views: 118
  • exh7.JPG
    exh7.JPG
    132.2 KB · Views: 121
  • exh8.JPG
    exh8.JPG
    146.6 KB · Views: 135
  • exh9.JPG
    exh9.JPG
    104 KB · Views: 133
  • exh10.JPG
    exh10.JPG
    195.8 KB · Views: 122
Finally started work on replacing the rear window. pulled the original window out to check measurements, straightened up the lower cut on the replacement window and then squared up the sides as wide as I could. sanded down the old sheet metal to bare metal and gave it a coat of self etching primer.
The original window fit in a little set back which fit the gasket, so I welded on a couple of small tabs on the bottom edge to hold the sheet metal back in the set back just far enough to be flush and put a few tack welds on the bottom to hold it in place. It couldn't have worked out better. I painted the inside top edge of the new window with some flat black paint before I set the new window in place and centered it up. Then I bent up a sharpened welding rod so that I was able to go inside the truck and scribe a line around the upper opening of the window. It worked out great, I cut outside the line and then set it back in place and tacked the bottom again. I only had to go around the top edges with a grinder until the top edge and corners fit flush. I started stitch welding the edges. The window looks great in place, I have a couple of small panels to fit in on the outside edges since my new window sheet metal was a little to short.
Shouldn't be a problem to weld them in.
Just a little info for you guys not used to using a mig welder. I bought a central tool 70A mig welder at a yard sale a couple years ago. I have a Lincoln a/c stick welder for the big stuff. I had never used a mig before and I am using flux core wire. Never could get a nice looking bead out of the mig but never used it to much. So while anticipating this full exhaust job and the sheet metal work on the window I started messing around with it more and started watching some you tube videos. I learned quite a bit from these videos but still didn't seem to be doing something right. I'm not a welder but I can make a nice looking pass with the stick welder.
So I was watching a video the other night about how to weld with flux core mig. The very first thing this guy said was "SWAP YOUR LEADS AROUND" reverse your connections in the welder.
I flipped mine around and I couldn't believe the difference, you have got to try it.
I'm still no great welder but boy this sure made it easier to stitch weld this panel.A little grinding and filler and it will look factory.
I'm going to pull the old glass before I paint and then have new glass installed.
 

Attachments

  • bw1.JPG
    bw1.JPG
    79.3 KB · Views: 133
  • bw2.JPG
    bw2.JPG
    108.9 KB · Views: 130
  • bw4.JPG
    bw4.JPG
    144.3 KB · Views: 127
  • bw5.JPG
    bw5.JPG
    78.1 KB · Views: 118
  • bw6.JPG
    bw6.JPG
    212.6 KB · Views: 142
  • bw7.JPG
    bw7.JPG
    171 KB · Views: 130
  • bw8.JPG
    bw8.JPG
    127.5 KB · Views: 126
  • bw9.JPG
    bw9.JPG
    155.3 KB · Views: 127
Ok., got the rear window all welded up and looking good. Everything went well for a change. Still have a little touch up to do before primer. I think it looks great. Ordered the new carpet, some gray headliner to finishoff the area around the window and some material for making a new console. I'm going to start on the hood next and fitment of the new seats. Be careful out there.
 

Attachments

  • bw10.JPG
    bw10.JPG
    137.1 KB · Views: 124
  • bw11.JPG
    bw11.JPG
    139.1 KB · Views: 126
  • bw12.JPG
    bw12.JPG
    268 KB · Views: 129
  • bw13.JPG
    bw13.JPG
    105.2 KB · Views: 129
While looking at the semi complete rear window my eye was drawnto the lonely third brake light so I gave it a little extra attention, a mini sun shade of sorts.
Also started install of new bucket seats. Had to make up some custom mounting brackets so they will bolt down through the original mounting hold down bolt holes. Seat color matched pretty close to my interior.
 

Attachments

  • tbl1.JPG
    tbl1.JPG
    77.3 KB · Views: 115
  • tbl2.JPG
    tbl2.JPG
    73.1 KB · Views: 136
  • tbl3.JPG
    tbl3.JPG
    95 KB · Views: 125
  • seATS1.JPG
    seATS1.JPG
    126.7 KB · Views: 120
  • SEATS2.JPG
    SEATS2.JPG
    219.4 KB · Views: 129
  • TRKREAR1.JPG
    TRKREAR1.JPG
    125.1 KB · Views: 261
index.php


woe.....!!!!!!
 
dooooooooooddd...!!! i says woe...
 
What a nice day here in south central Pa. Great day to get outside.
I was looking at the front of my truck and was trying to figure out what I could do. Not much can be done since most of it is rubber / plastic. So I had some metal in my garage that originally was a heat shied around the side pipe on my truck. I cleaned them up and polished them and they cleaned up very good, so I straightened the material out to see how big the 2 pieces were.
When I measured the grill area it looked like I had enough material to fit the grill opening. I removed the grill and trim from the car just held in by a few screws and clips, after removing the grill from the trim I took a hot knife and cut the middle of the grill out and just kept the frame. used a dremel to smooth the cuts and trim the edges some more. I laid the frame on the new metal and traced the opening and cut it to size. Still have some trimming and mounting to do before its done but I like the look.
 

Attachments

  • grill1.JPG
    grill1.JPG
    172.4 KB · Views: 106
  • grill2.JPG
    grill2.JPG
    138 KB · Views: 121
  • grill3.JPG
    grill3.JPG
    147.4 KB · Views: 120
  • grill4.JPG
    grill4.JPG
    152 KB · Views: 118
  • grill5.JPG
    grill5.JPG
    197.9 KB · Views: 117
What a nice day here in south central Pa. Great day to get outside.
I was looking at the front of my truck and was trying to figure out what I could do. Not much can be done since most of it is rubber / plastic. So I had some metal in my garage that originally was a heat shied around the side pipe on my truck. I cleaned them up and polished them and they cleaned up very good, so I straightened the material out to see how big the 2 pieces were.
When I measured the grill area it looked like I had enough material to fit the grill opening. I removed the grill and trim from the car just held in by a few screws and clips, after removing the grill from the trim I took a hot knife and cut the middle of the grill out and just kept the frame. used a dremel to smooth the cuts and trim the edges some more. I laid the frame on the new metal and traced the opening and cut it to size. Still have some trimming and mounting to do before its done but I like the look.
That's going to cut a lot of airflow. Watch your temps.
 
Yea, I thought about that but there is still plenty of open space for airflow and I've never had any overheating problems and I don't have A/C. We'll see, I can always change the material. Thanks for looking.
I think slow speed and in town will be fine. Hiway speeds might be the problem. Good looking tho.
 

Sponsored Ad


Sponsored Ad

TRS Events

Member & Vendor Upgrades

For a small yearly donation, you can support this forum and receive a 'Supporting Member' banner, or become a 'Supporting Vendor' and promote your products here. Click the banner to find out how.

Recently Featured

Want to see your truck here? Share your photos and details in the forum.

Ranger Adventure Video

TRS Merchandise

Follow TRS On Instagram

TRS Sponsors


Sponsored Ad


Sponsored Ad


Amazon Deals

Sponsored Ad

Back
Top