• Welcome Visitor! Please take a few seconds and Register for our forum. Even if you don't want to post, you can still 'Like' and react to posts.

1993 Splash in SC


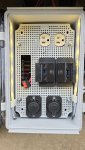
Well, not much to see. I finished welding the cage for the house batteries and that got painted today. I'm trying to finish up whatever steel welding I need to do before I put the spool gun on the welder and convert to aluminum welding for a while. The frames and brackets to hold the solar panels will all be aluminum.

My other project today, was to straighten and weld the upright hoop on the bed. I had hit the driver side on a tree a while back. A few minutes with the Hi-Lift jack and some ingenuity bent that back into position. I welded the crack. Then added some plate over the wekened section. Then I welded in a gusset on each side to give some extra support. I'm almost ready to get out the Rustoleum to touch up the bed.

Tomorrow, maybe the house batteries will get installed.


Paint it and send it.
20250508_140844.jpg
 
Well, the house batteries are installed. I have one solar panel temporarily hooked up and made the whole system live. Everything seems to be working as planned. I need to download and activate a couple apps to monitor battery conditions and the solar panel controller. All that's really left of that project is to finish making a gaurd to cover all the live electrical stuff behind my seats and to fabricate the frames and brackets to mount the solar panels on the roof. I also made some brackets to mount my first aid kit between the seats.

Floor jack to lift the battery frame into place.
20250509_134254.jpg


All connected
20250509_141607.jpg


20250509_141611.jpg


Bolted in place, nice and neat.
20250509_143642.jpg


120volt ac work light energized from the inverter. Led strips lit up in the power station where I have 12volt charging ports, USB charging stations and the 120vac receptacle.
20250509_152156.jpg


First aid kit mounted.
20250509_152557.jpg
 

Attachments

  • 20250509_152416.jpg
    20250509_152416.jpg
    170.8 KB · Views: 28
Last edited:
Nice work.

The floor of your battery tray looks a lot like robot cell caging.
 
Nice work.

The floor of your battery tray looks a lot like robot cell caging.
That's the bottom of the batteries. The tray bottom is just simple angle iron around the edges of each battery.
 
Oh hell that’s a nice mod. 🫡
 
Well, Started making the frames for the solar panels today. That started out with setting up the off-brand spool gun I bought for my MIG welder.

The main cable assembly didn't want to fit into the socket on the welder. My calipers told me the brass male section of the cable assembly was out of round. So, I filed on that until it was round and fit the socket properly. Also damaged one of the O-rings. I substituted one from the normal cable assembly. It's a slightly different size. But is working temporarily. Then, I had to reverse the polarity for the drive motor on the spool gun. It's a genetic gun and works with different welders. I was expecting that. Just took the handle apart and swapped the motor leads.

Then, it was time to weld. I made up a practice project using the same angle that my solar panel frames will be made of. I was trying to use all the automatic settings on my welder, which work great for steel. But no go. After ruining 3 of the little screw-on feed tips, I set the machine manually, using the quick reference chart inside the hinged cover. Eureka!!!!! It worked. A little fine tuning from there and it seems to be going well.

After that, I cut parts and started welding together the lower solar panel frame. This one is tricky, because it has to mount to the roof somehow. On the front end, I'm screwing it to the brackets for my light bar, which I found out is not mounted square. At the rear, I'll attach some feet that can bolt through the roof. I got the front mounting points worked out and have the 4 sides of the frame tacked together. But I need to cut a couple joints loose to square it up better. The 2 sides have to be parallel so the top panel can swing to the rear properly. Don't worry. You'll see what I'm talking about next week.

Spool gun cart attached to the welder and ready for use.
20250517_133649.jpg


Side view. The blocks of wood have the back end of the frame lifted to the height it needs to be.
20250517_160922.jpg


The panel fits. It will be bolted to the frame later.
20250517_161003.jpg


The empty frame in place.
20250517_161113.jpg
 
Last edited:
So far today, I got the rest of the mounting worked out for the lower solar panel frame. That's not as easy as it sounds. Everything on the truck cab is rounded and angled. It's difficult to get accurate measurements to make sure everything is straight and symmetrical. Drilling holes in the roof is almost scary. But it's done and I think ot worked out alright. The upper frame is built and square and matches the lower, which is important for the way the upper is going to swing up and back when I want to use both panels. I can do a little more welding. But at this point I'm waiting for some parts that are in transit.

Lower frame fully mounted.
20250519_143131.jpg


Upper frame lying in place on top.
20250519_150603.jpg
 
What about having the top slide back instead of flip? That way, one panel can provide power all the time and you don't have to worry about the wind catching and flipping the top panel back while under way?

Or is that not a consideration since the alternator will provide power while driving?
 
I think that's the plan. That's just the frame for the top panel to sit in. I assume you thought that was the bottom of the 2nd panel. I know I did at first glance haha. It's gonna be a sweet setup for sure. Should provide plenty of charge, out west above the tree lines 😉
 
What about having the top slide back instead of flip? That way, one panel can provide power all the time and you don't have to worry about the wind catching and flipping the top panel back while under way?

Or is that not a consideration since the alternator will provide power while driving?
Like Robbie said, it's not upside down and not going to flip. It will swing up and back on cantilevered arms like the upper trays in a tackle box. Justin got the cantilever arms laser cut where he works. They should be arriving tomorrow.
Messenger_creation_7C1FBC7B-FB64-493E-82CE-43D51B373B77.jpeg
 
Turned my attention to making guards over the exposed electrical stuff behind my seats. This should work and still allow good airflow for the inverter which has fans to pull air through.

Speaking of the inverter, I used it to charge my Milwaukee drill battery while I was working this morning.

Kind of tricky building something that would allow me to have the seat all the way back. I enjoy the maneuverability of my single cab short bed truck. But, legroom is not it's strong point. The 2 lexan panels have room to slide out of the brackets without removing any fasteners. So I can get to the circuit breakers quickly.
20250520_133543.jpg


View between the seats
20250520_133705.jpg


And, with the first aid kit in place.
20250520_133920.jpg
 
I love it when a plan comes together. Especially when the plan was simple in concept but complicated to work out the details. I have a few things to do yet. But, it's 90% complete. Still needs latches, some secondary support arms for the far rear edge, screw the panels into the ftames and clean up the wiring. It will also get some LED strips on the back end to light up the cargo area at night.

Travel position.
20250522_171923.jpg


Full 200watts "soak up that sunshine" position.
20250522_171749.jpg
 
I just have to point out a worry, you might want to have a latch/retainer for the travel position so that the panel suddenly doesn't become the "soak up that sunshine" mode while driving on the highway or any road with high enough wind haha. Sick build tho
 
I just have to point out a worry, you might want to have a latch/retainer for the travel position so that the panel suddenly doesn't become the "soak up that sunshine" mode while driving on the highway or any road with high enough wind haha. Sick build tho
In the text above, I mentioned latches as one of the unfinished details. I definitely don't want things flying around at the wrong time. I have them. They just aren't installed yet.

The nice thing is that these upper panel remains parallel to the lower when it is being deployed. So, even if I forget to latch it shut, if it begins to take flight, it can not flip into "sail mode" and catch a lot of wind.
 
Last edited:
Ok. Latches are installed. That will keep everything in place while I'm driving. Plus, I riveted the solar panels into their frames. I also mounted the LED light strips on the rear edge of the upper/rear solar panel. This will give light in the truck bed when I need it. Still need to clean up wiring. I don't like the solar panel wiring. The bulky plugs and fuse holders end up at wierd places and make it difficult to tidy things up. I may eventually make a completely new solar wiring harness from scratch. But not this year. I also put the "Velcro loop material" on the sound insulation inside the cab roof. It's not perfect. But I like the way it turned out. That's enough for today. It's dry enough to mow the lawn and that needs to ne done.

Latches rear
20250531_151821.jpg


Latches front
20250531_151811.jpg


LED lights on rear edge of solar panel.
20250531_130311.jpg


Velcro roof.
20250531_145652.jpg


20250531_145716.jpg
 
Last edited:

Sponsored Ad


Sponsored Ad

TRS Events

Member & Vendor Upgrades

For a small yearly donation, you can support this forum and receive a 'Supporting Member' banner, or become a 'Supporting Vendor' and promote your products here. Click the banner to find out how.

Recently Featured

Want to see your truck here? Share your photos and details in the forum.

Ranger Adventure Video

TRS Merchandise

Follow TRS On Instagram

TRS Sponsors


Sponsored Ad


Sponsored Ad


Amazon Deals

Sponsored Ad

Back
Top