• Welcome Visitor! Please take a few seconds and Register for our forum. Even if you don't want to post, you can still 'Like' and react to posts.

The Road Ranger. 1997 SEMI


Rick W

Lil Big Rig
Supporting Member
TRS Event Participant
TRS 25th Anniversary
Joined
May 15, 2020
Messages
2,771
Reaction score
4,670
Age
69
Location
Atlanta
Vehicle Year
1997 1987
Make / Model
Ranger XLT x2
Engine Type
4.0 V6
Engine Size
4.0 & 2.9
Transmission
Manual
2WD / 4WD
4WD
Total Lift
97 stock, 3” on 87
Total Drop
N/A
Tire Size
235/75-15
My credo
Never put off ‘til tomorrow what you can put off indefinitely
Last edited:


Rick W

Lil Big Rig
Supporting Member
TRS Event Participant
TRS 25th Anniversary
Joined
May 15, 2020
Messages
2,771
Reaction score
4,670
Age
69
Location
Atlanta
Vehicle Year
1997 1987
Make / Model
Ranger XLT x2
Engine Type
4.0 V6
Engine Size
4.0 & 2.9
Transmission
Manual
2WD / 4WD
4WD
Total Lift
97 stock, 3” on 87
Total Drop
N/A
Tire Size
235/75-15
My credo
Never put off ‘til tomorrow what you can put off indefinitely
I’ve been misted/rained out for a few days, so no progress in the driveway. The next step is to trim the carpet around the stick shift and around the edges and put all the trim back in.

The front holes in the cup holder/shift boot were all torn out on the bottom side. So today I drilled them through at 3/8 inch, and I used super glue gel to glue in some 3/8”furniture dowels, the ones that are soft wood with the fluted sides. I’ve done it before, they stick like iron.

When the glue was dry, I drilled out the center the same diameter as the back holes, and used a little semi gloss black (yep) Rustoleum to make them disappear.

IMG_0688.jpeg
IMG_0689.jpeg
 

Rick W

Lil Big Rig
Supporting Member
TRS Event Participant
TRS 25th Anniversary
Joined
May 15, 2020
Messages
2,771
Reaction score
4,670
Age
69
Location
Atlanta
Vehicle Year
1997 1987
Make / Model
Ranger XLT x2
Engine Type
4.0 V6
Engine Size
4.0 & 2.9
Transmission
Manual
2WD / 4WD
4WD
Total Lift
97 stock, 3” on 87
Total Drop
N/A
Tire Size
235/75-15
My credo
Never put off ‘til tomorrow what you can put off indefinitely
After fixing the front end on the 87, I again started to tackle the carpet in the 97.

I’ve been so excited about the new stereo, that I checked all the speakers, and the drivers door was dead. My $50 stereo came with two 5 x 7/6 x 8 speakers, so I put one of those in the drivers door.

Then I made a precision template of the stick shift/cup holder piece (accurate to within 1 inch in any direction).

IMG_0701.jpeg


Ok, maybe one and a half inches.

Then I started to cut out the carpet around the stick shift. Biggest challenge I had was to find something to cut the carpet (without cutting off my fingers). I ended up with a regular utility knife with a new blade in it.

The next step would be to set the seats. Positioning the seats, and then bolting through a new carpet, has always been a headache. I came up with this. I used an ice pick to locate the bolt hole underneath the carpet. Then it’s easy enough to mark both sides of the front of one seat. My plan was to then take a small hole saw, but run it in the drill backwards, to basically burn a hole through the carpet without pulling on the threads. I tested it with a scrap, and I was amazed to find out that I could just go slow in the correct direction. This will give me holes small enough to mostly disappear under the seat brackets, which are under the seats anyway, but still big enough to pull the carpet into the right place before I do the final tightening.

IMG_0702.jpeg


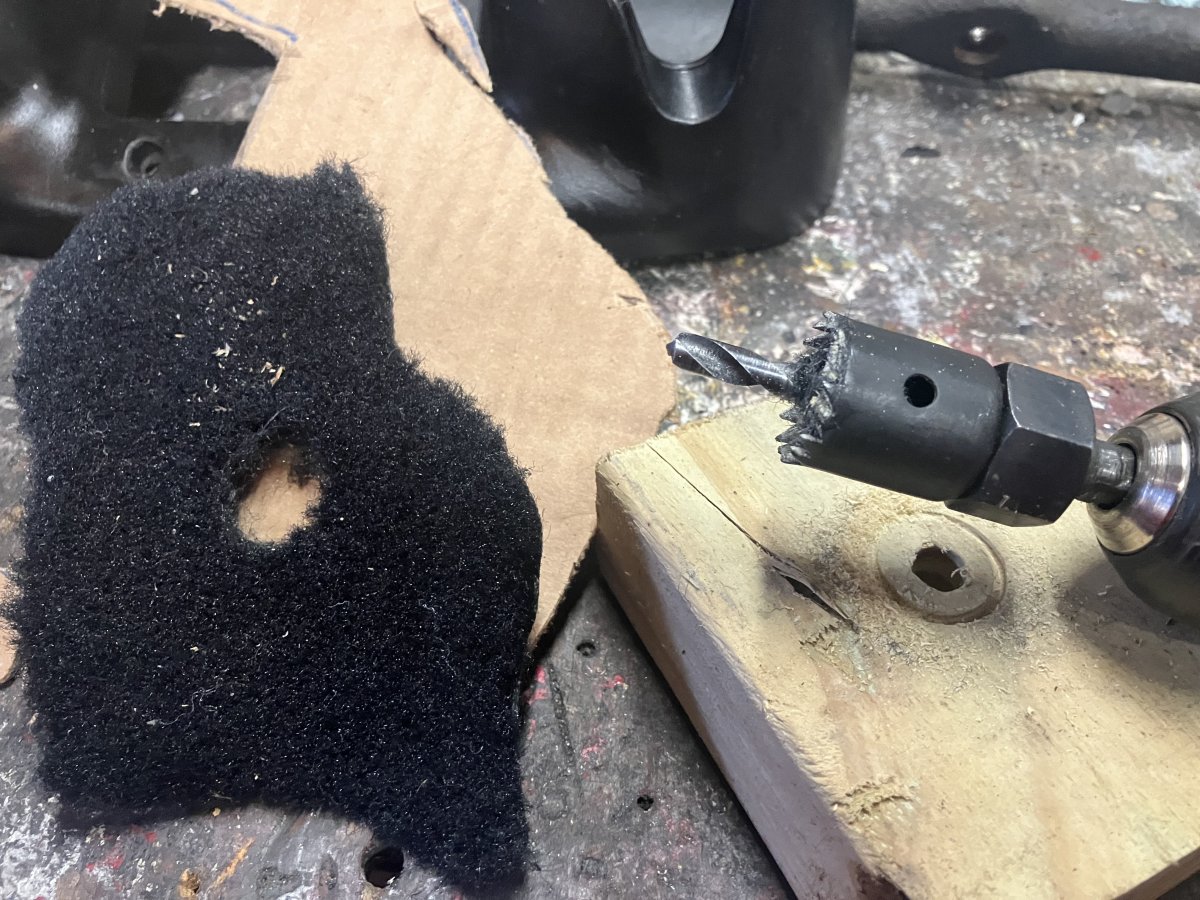
I drilled a bigger diameter hole in a piece of 2 x 4, and then went slow with the hole saw. The plan is to do the same thing in the truck. Mark the hole with the ice pick, then a piece of chalk, then slide the 2 x 4 underneath, and then cut the hole. Put loose bolts through the two brackets in the front, and then use the ice pick to locate the holes in the back and do the same thing. It’ll take a little while, but every time I’ve done this (actually years ago) I always ended up with a couple of wild cuts. I guess a little patience has come with my old age.
 

ericbphoto

Overlander in development
TRS Event Staff
TRS Forum Moderator
Supporting Member
U.S. Military - Veteran
TRS 20th Anniversary
VAGABOND
TRS Event Participant
GMRS Radio License
TRS 25th Anniversary
Joined
Feb 7, 2016
Messages
15,714
Reaction score
17,364
Age
60
Location
Wellford, SC
Vehicle Year
1993
Make / Model
Ford Ranger
Engine Type
3.0 V6
Engine Size
3.0L
Transmission
Manual
2WD / 4WD
4WD
Total Lift
6"
Tire Size
35"
My credo
In theory, theory and practice are the same. In practice, they are different.
Didn't know there was supposed to be a cutout for the cupholder doohickey. I just screwed mine down on top of the carpet.
 

Rick W

Lil Big Rig
Supporting Member
TRS Event Participant
TRS 25th Anniversary
Joined
May 15, 2020
Messages
2,771
Reaction score
4,670
Age
69
Location
Atlanta
Vehicle Year
1997 1987
Make / Model
Ranger XLT x2
Engine Type
4.0 V6
Engine Size
4.0 & 2.9
Transmission
Manual
2WD / 4WD
4WD
Total Lift
97 stock, 3” on 87
Total Drop
N/A
Tire Size
235/75-15
My credo
Never put off ‘til tomorrow what you can put off indefinitely
Didn't know there was supposed to be a cutout for the cupholder doohickey. I just screwed mine down on top of the carpet.
Yes, the cup holder Doohickey actually sits on top of the carpet. The reason I made a template: if you look at that center square on mine, there is an elevated round rubber gasket dome thingamajig around the stick shift on the hump. The reason I wanted to mark it all with chalk was because I was having such a hard time cutting the carpet, I wanted to make sure I didn’t make any cuts that wouldn’t be concealed by the cupholder Doohickey.
 

Rick W

Lil Big Rig
Supporting Member
TRS Event Participant
TRS 25th Anniversary
Joined
May 15, 2020
Messages
2,771
Reaction score
4,670
Age
69
Location
Atlanta
Vehicle Year
1997 1987
Make / Model
Ranger XLT x2
Engine Type
4.0 V6
Engine Size
4.0 & 2.9
Transmission
Manual
2WD / 4WD
4WD
Total Lift
97 stock, 3” on 87
Total Drop
N/A
Tire Size
235/75-15
My credo
Never put off ‘til tomorrow what you can put off indefinitely
Carpet installation, good info.

Lincoln was flipping channels while I was trying to nap, and ended up on “all girls garage” on MotorTrend. The episode had a very good section on replacing carpet, mostly on how you cut the bolt and wire holes so they look good and don’t fray, showing several different techniques. Maybe my luck is changing, but it was exactly what I needed to know. S12 E12:

IMG_0734.jpeg


EDIT: season 12, episode 12
 
Last edited:

Rick W

Lil Big Rig
Supporting Member
TRS Event Participant
TRS 25th Anniversary
Joined
May 15, 2020
Messages
2,771
Reaction score
4,670
Age
69
Location
Atlanta
Vehicle Year
1997 1987
Make / Model
Ranger XLT x2
Engine Type
4.0 V6
Engine Size
4.0 & 2.9
Transmission
Manual
2WD / 4WD
4WD
Total Lift
97 stock, 3” on 87
Total Drop
N/A
Tire Size
235/75-15
My credo
Never put off ‘til tomorrow what you can put off indefinitely
Early on Christmas Eve, before all the honey dos, I finally got the shift column drink holder thingy installed.

IMG_0888.jpeg


I patched up the drink holder with the baking powder/super glue trick a little while ago. Cutting the carpet proved more tedious than I thought, mostly because I couldn’t find a sharp enough knife to cut it easily. Once I solved that problem, the four holes through the sheet metal were so hogged out, I would’ve had to use lag bolts (Maybe a slight exaggeration).

On three of them, I used larger screws, but I had to drill out the drink holder thingy, and then also drill down from the top a little bit, where the screw head sits, so the bigger screws would sit right.

Those three were plenty snug, so on the big hole, I used the trick where I take a sharp point nail set, and I worked around the four corners of the round hole to drive the metal in a little bit. I gently put the screw in and it held, but it probably would not have held long if the other three didn’t hold it so firmly.

One of those silly little jobs that took 10 times as long as it should, but very happy it’s done. Now I have to do a serious search in the shed of miracles for the door saddles, glue some more foam on the seats and cover them, and I may actually drive the thing again someday!
 

Rick W

Lil Big Rig
Supporting Member
TRS Event Participant
TRS 25th Anniversary
Joined
May 15, 2020
Messages
2,771
Reaction score
4,670
Age
69
Location
Atlanta
Vehicle Year
1997 1987
Make / Model
Ranger XLT x2
Engine Type
4.0 V6
Engine Size
4.0 & 2.9
Transmission
Manual
2WD / 4WD
4WD
Total Lift
97 stock, 3” on 87
Total Drop
N/A
Tire Size
235/75-15
My credo
Never put off ‘til tomorrow what you can put off indefinitely
Oh, and when I was doing it, the carpet under the steering wheel was wet. I punched all kinds of holes through the roof, putting on the lights, and light bar, etc. up there. I’m going to have to pop them off one by one and use some RTV.
 
Last edited:

Rick W

Lil Big Rig
Supporting Member
TRS Event Participant
TRS 25th Anniversary
Joined
May 15, 2020
Messages
2,771
Reaction score
4,670
Age
69
Location
Atlanta
Vehicle Year
1997 1987
Make / Model
Ranger XLT x2
Engine Type
4.0 V6
Engine Size
4.0 & 2.9
Transmission
Manual
2WD / 4WD
4WD
Total Lift
97 stock, 3” on 87
Total Drop
N/A
Tire Size
235/75-15
My credo
Never put off ‘til tomorrow what you can put off indefinitely
I posted it under that link, but I think I’m done with the Missing Linc’s Town Cart, so, with just a few hours left today, I shifted back to the Road Ranger. I had the overhead console finished, got all the dash lights and the dash cleaned up, and I’m about halfway done putting in the carpet. I had the shifter all in and squared away.

Today was more thinking what I was going to do next, but I took the seats and put them on the work table and checked them out. The passenger seat is an excellent condition.

The driver seat mechanically is in great condition. It had a little bad spot on the outside of the bottom cushion, and there was a chunk out of the bolster on the vertical cushion about the size of a pack of cigarettes.

I got a few pieces of high density foam from the shed of miracles, and used my bandsaw to shave them into oversized plugs, the same shape as the holes, after I cleaned up all of the rough edges in the holes. Then I used some of my highly sophisticated upholstery equipment to hold them in place after I glued them.

IMG_1218.jpeg


The hole in the seat was about the size of a half dollar, so I just used the anvil to hold it down until the glue sets. I used the E 6000 stuff, and I have a couple of pieces of fabric similar to the seat fabric that I’m going to glue over the holes before I put the seat covers on. Hopefully that will be tomorrow.

I took the plastic caps off both seats, and I painted them with satin black Rustoleum. The carpet is black, and the sides of the seat covers are black, so that seemed to make sense.
 
Last edited:

Rick W

Lil Big Rig
Supporting Member
TRS Event Participant
TRS 25th Anniversary
Joined
May 15, 2020
Messages
2,771
Reaction score
4,670
Age
69
Location
Atlanta
Vehicle Year
1997 1987
Make / Model
Ranger XLT x2
Engine Type
4.0 V6
Engine Size
4.0 & 2.9
Transmission
Manual
2WD / 4WD
4WD
Total Lift
97 stock, 3” on 87
Total Drop
N/A
Tire Size
235/75-15
My credo
Never put off ‘til tomorrow what you can put off indefinitely
Patching and plugging came out okay.

IMG_1222.jpeg


Then I focused in on the recliner mechanism, and that bar that keeps the seatbelt right if you move the seat back-and-forth. Driver side was fine with just a little bit of WD-40 and white lube.

On the passenger side, I had to take it all apart, fix/straighten some things that have been creatively engineered in the past, and put it back together. You never know, but I think he was a skinny dude, and she was a fat girl. I thought it was going to be a one hour job to put the seat covers on, and like everything, it turned into four. But…

IMG_1224.jpeg


It looked great when I got it together. The suicide seat even looks better than the driver seat.

I also spent some time on the brake controller for the trailer. I can’t find a good spot where I’m comfortable using it, while I’m driving a stick shift. I even thought about mounting it on the shift handle, but I can’t figure out how to do it so it would be at my fingertips, which is what I want.

In that 97, there is a fold-out 12 V socket next to the pull-out ashtray. I’m thinking of putting the brake controller there, upside down, tied into that 12 V power source. I would love to hear ideas and suggestions from anyone who’s done it.

Before I could put my thoughts together, Sweet Pea called with a really important emergency, something with the grandkids’ table and chair, and I had to run….
 

sgtsandman

Aircraft Fuel Tank Diver
TRS Forum Moderator
U.S. Military - Active
TRS 20th Anniversary
TRS Event Participant
Ham Radio Operator
GMRS Radio License
TRS 25th Anniversary
Joined
Mar 11, 2017
Messages
13,325
Reaction score
13,525
Location
Aliquippa, PA
Vehicle Year
2011/2019
Make / Model
Ranger XLT/FX4
Engine Size
4.0 SOHC/2.3 Ecoboost
2WD / 4WD
4WD
Total Lift
Pre-2008 lift/Stock
Tire Size
31X10.5R15/265/65R17
Depending on how your center dash is setup, could you mount it on the bottom in front of the stick shift? There was room enough to mount my GMRS radio there but that area changed a lot over the years.
 

Rick W

Lil Big Rig
Supporting Member
TRS Event Participant
TRS 25th Anniversary
Joined
May 15, 2020
Messages
2,771
Reaction score
4,670
Age
69
Location
Atlanta
Vehicle Year
1997 1987
Make / Model
Ranger XLT x2
Engine Type
4.0 V6
Engine Size
4.0 & 2.9
Transmission
Manual
2WD / 4WD
4WD
Total Lift
97 stock, 3” on 87
Total Drop
N/A
Tire Size
235/75-15
My credo
Never put off ‘til tomorrow what you can put off indefinitely
Depending on how your center dash is setup, could you mount it on the bottom in front of the stick shift? There was room enough to mount my GMRS radio there but that area changed a lot over the years.
Great idea, I’ll check that
 

Rick W

Lil Big Rig
Supporting Member
TRS Event Participant
TRS 25th Anniversary
Joined
May 15, 2020
Messages
2,771
Reaction score
4,670
Age
69
Location
Atlanta
Vehicle Year
1997 1987
Make / Model
Ranger XLT x2
Engine Type
4.0 V6
Engine Size
4.0 & 2.9
Transmission
Manual
2WD / 4WD
4WD
Total Lift
97 stock, 3” on 87
Total Drop
N/A
Tire Size
235/75-15
My credo
Never put off ‘til tomorrow what you can put off indefinitely
Oh wise ones, question about trailer brakes.

My brake axles were used and they weren’t connected when I got them. On the wiring coming out of the hub, is there a positive and a negative? Or doesn’t it matter?

I’m thinking it doesn’t matter because the coil is independent of any metal part, but I’d like to know from somebody who knows what they’re doing…
 

scotts90ranger

Well-Known Member
RBV's on Boost
Joined
Feb 28, 2001
Messages
8,386
Reaction score
4,906
Location
Dayton Oregon
Vehicle Year
1990, 1997
Make / Model
Ford
Engine Type
2.3 (4 Cylinder)
Engine Size
2.3 Turbo
Transmission
Manual
2WD / 4WD
4WD
Total Lift
6
Tire Size
35"
Polarity shouldn't matter
 

Rick W

Lil Big Rig
Supporting Member
TRS Event Participant
TRS 25th Anniversary
Joined
May 15, 2020
Messages
2,771
Reaction score
4,670
Age
69
Location
Atlanta
Vehicle Year
1997 1987
Make / Model
Ranger XLT x2
Engine Type
4.0 V6
Engine Size
4.0 & 2.9
Transmission
Manual
2WD / 4WD
4WD
Total Lift
97 stock, 3” on 87
Total Drop
N/A
Tire Size
235/75-15
My credo
Never put off ‘til tomorrow what you can put off indefinitely
Depending on how your center dash is setup, could you mount it on the bottom in front of the stick shift? There was room enough to mount my GMRS radio there but that area changed a lot over the years.
The judges have voted, and Rick W and Lincoln are in third and second place, respectively, and the highest award, the blue ribbon goes to

@sgtsandman !!!!!!

1709145533505.gif


for outstanding achievement, in assisting the design of the brake controller bracket!

IMG_1233.jpeg
IMG_1230.jpeg
IMG_1225.jpeg


I still have to adjust it a little bit. I want to make it just clear the shift boot when I’m in second, fourth or reverse, but it’s exactly what I wanted. I have to bend it a hair, and paint it black, otherwise a done deal.

THANK YOU SIR!!

EDIT: and I got the driver seat put back in, and I probably 90% done with the carpet. I already cut the holes for the passenger seat.

I was pretty disappointed in the carpet, it’s about four or 5 inches short in the back, but I’ll do something
 
Last edited:

Sponsored Ad


Sponsored Ad

Members online

No members online now.

Today's birthdays

Member & Vendor Upgrades

For a small yearly donation, you can support this forum and receive a 'Supporting Member' banner, or become a 'Supporting Vendor' and promote your products here. Click the banner to find out how.

Truck of The Month


TexasDuck66
July Truck of The Month

Recently Featured

Want to see your truck here? Share your photos and details in the forum.

Follow TRS On Instagram

TRS Events

25th Anniversary Sponsors

Check Out The TRS Store


Sponsored Ad


Sponsored Ad

Sponsored Ad


Amazon Deals

Top