TxRanger2618
New Member
- Joined
- Sep 26, 2021
- Messages
- 6
- Reaction score
- 5
- Points
- 3
- Location
- Idaho
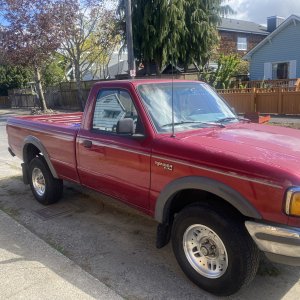
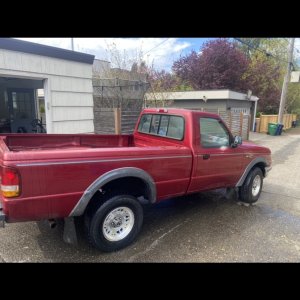
- Vehicle Year
- 2001
- Make / Model
- Ford Ranger
- Transmission
- Automatic
2001 Ford Ranger Manual swap
Time spent with 2 people working on it approx. 19hrs (rain slowed us down)
Parts: cost $1300
This was done on a 2001 ford ranger. This model year ford ranger has the wiring already in place for the clutch pedal sensor.
This is a rough outline of what to do following a previous person who has done this as well.
https://www.ranger-forums.com/project-logs-82/trepauls-auto-manual-swap-82820/
Steps:
To make easier I recommend getting this vehicle as high off the ground as possible. The higher it is the easier to work with. Make sure vehicle is in neutral.
Time spent with 2 people working on it approx. 19hrs (rain slowed us down)
Parts: cost $1300
- M5R1HD used $700
- Transfer case $100 mine was broken
- Clutch and brake pedal assembly $70
- Shift cane 20
- Plate with hole to run the cane to the transmission $5 (the body of the ranger has a removable plate right above the transmission that can be swapped out with the plate from a manual one. You will need to do some carpet work to remove it but it is there)
- Molding and cupholders $10
- Clutch master and slave cylinder assembly 126.79
- Clutch kit 165.99
- Flywheel 73.79
- Pressure plate bolt #6 M8 1.25x20 5.99
- U joint 270 Qt. 2 29.04
- U joint 280 12.91
- Rear main seal 14.57
- 3 Qt of Mobil One synthetic ATF Mercon $29.56
- Medium Threadlocker 10.99
- PCM from 03 ranger manual trans
- Back up light switch connector 5.99
- VSS connector 5.99
This was done on a 2001 ford ranger. This model year ford ranger has the wiring already in place for the clutch pedal sensor.
This is a rough outline of what to do following a previous person who has done this as well.
https://www.ranger-forums.com/project-logs-82/trepauls-auto-manual-swap-82820/
Steps:
To make easier I recommend getting this vehicle as high off the ground as possible. The higher it is the easier to work with. Make sure vehicle is in neutral.
- Drain Auto transmission of as much fluid as possible. The less fluid the lighter it is and easier to move around
- Remove/disconnect all sensors
- Remove Exhaust and upstream O2 sensors
- Remove cat and downstream O2 sensor
- Disconnect front and rear drive shaft
- To make it easier to get to bellhousing remove the wheel well molding
- Remove the starter completely, it’s a bit difficult but after repositing a few times it will come out the bottom
- DO NOT Remove transfer case, or be prepared to catch more fluid.
- You’ll need to take a big flat head or a pry bar of some sorts to turn the flex plate. This can be accessed from the starter hole. There are 4 bolts holding the torque converter in place. Manually turn the flex plate and take out each bolt
- It’s easier and makes less of a mess to take out the torque converter with the entire transmission
- Remove the transmission support
- Remove trans lines from Radiator to tranny (Be prepared to catch fluid)
- Disconnect trans shifter cabling
- The weight of the transmission is important since there are only 2 engine mounts the weight will cause the engine to pivot and make it easier to access the bolts at the top of the bellhousing
- Remove all the bolts around the bellhousing anywhere between 9-10 bolts. Support the transmission with a jack
- Drop the transmission and move it away
- Next remove all 8 bolts from the flax plate and remove it
- Remove rear main seal and replace
- Take flywheel and press in pilot bearing
- Bolt in flywheel
- Bolt pressure plate to flywheel
- Replace slave cylinder on manual transmission
- Putting the manual trans in is 10 times easier than taking the auto out. The slim profile of the manual makes accessing the bolts easier to get to.
- There are 2 guide pins to help you line up the transmission. Have 3 people makes this easy to do
- Make sure to line up the driveshaft and the clutch plate. DON’T FORCE TRANSMISSION IN YOULL KNOW WHEN IT LINES UP
- After lining it up get it centered on the guide pins and push it in as much as possible the bellhousing will get within ½ inch of the engine before stopping this is where the driveshaft will get caught up on the pilot bearing. Use the tranny bolts to slowly close the gap. If lined up correctly there should be no problems tightening the bolts and sealing the gap.
- Perform everything in reverse order
- Fill up manual trans with approx. 2.7 Qts of tranny fluid
- After everything back in there is some wiring issues to fix. 90% of the harness will be cut away
- This is from trepauls post concerning the wiring
- Ok so don't mind the wiring mess, it's just temp until friday when I can cut out all the old wiring and run clean wiring with heat shrink tubing and new wire loom.... But here's the how it works and what it looks like:
Cut the VT/OG and BK/PK wires on the DTR harness and connect them to the reverse sensor pigtail (I grabbed mine from a 05 STX out at the junk yard and pulled the loom back and cut far enough on the wiring to allow me to connect it to my harness).
Do the same for the OSS since they're the same coloring on the Manual PCM harness as they are the Automatic PCM harness. The colors are GY/RD and BL/YE... You just have to cut the harness for the auto since they're a different plug. Did the same for the OSS as the reverse by using the 05 STX wiring for the OSS and cut far enough back on the wiring to allow me to connect it to my OSS that is already there. Only thing is with the auto PCM, it has OSS and ISS sensors which determine your speed. Once the manual PCM is in it will read the correct speed, hence why I don't have it plugged in right now. That's happening on Friday.
- When working on the inside it is a PITA to get the brake pedal out
- Before removing brake pedal pull out pin holding the pedal to the plunger and remove plunger. there are 2 bolts at the very top of the assembly that will need to be removed there worst bolts in the world to get to. I recommend removing the driver seat to make it easier to lay down and work on it
- There is a line that it connecting the column shifter to the auto trans. This line needs to be removed before you can get the clutch pedal in. the reason is that the hole the line runs through is the same hole you run then master cylinder through
- After having replaced the cutch pedal assembly reconnect everything and run the master cylinder through the hole in the fire wall
- Most of the truck is done by this point. The biggest issue is the PATs on the new PCM. After much calling and searching the ford dealership by my house said they could reprogram the pats to the vehicle for $150.