WARNING: This is a LONG post, but I felt it needed to be written so that others can learn how to find this leak, fix it right, and not have to worry about their truck leaking an longer. Sadly, I never really found a good front-to-back discussion of this issue that provided a detailed narrative on exactly how to tackle this problem that has persisted across decades of Ford Ranger production. So, here's my contribution to the effort.
I have a 2010 Ford Ranger 4x4, 4-door with 259,000 miles, but I've also had a 1990 Ranger for 14 years, then a 2004 Ranger for 12 years. I've had the current truck for just over 2 years now. The previous owner mentioned NOTHING about this leak, but he had to know about it, which is aggravating, but buyer beware, right? It's worth noting that my prior efforts over the last 12 months or so had me thinking that this was a windshield issue until that didn't solve the problem. But hey, I have a nice new shiny windshield that needed to be replaced anyway...
To the issue at hand, the dreaded DRIVER SIDE FLOORBOARD LEAK WITH THE ASSOCIATED SOAKED CARPET, RUSTING PANELS, AND A SMELL THAT JUST NEVER SEEMS TO GO AWAY. If you're going to dive into this problem, you need to prepare yourself for a VERY difficult repair. The area where the seam(s) fail for the driver side leak is at the very top and left of the portion of the firewall that is exposed in the cab. The repair requires the removal of some items and the detachment of others, none of which are much fun, especially the parking brake.. I'll try to make this as short as I can but there is just so much. I've also put together 25+ photos with notes, and I'll walk you through this as best I can.
Overview of the process:
In the engine bay and wheelwell, you'll want to move all items out of the way that will hinder access to the seams on the upper firewall.
Inside the cab, you're going to remove as much as you can (and feel comfortable with) to get to the seam that runs from the upper firewall where it meets the left side panel/assembly where the doors attach. You want to expose this seam from the top all the way down to the floorboard. It's basically the LF corner of the interior of cab shell.
Once all of that is exposed, you should have a good look at the problem area, and it's WAY up high under the dash.
From there, you're going to start removing old seam sealer. My experience with this truck is that Ford didn't do much in the way of quality control where seam sealer is concerned, most of it looking like a blind man applied it. Remove the sealer on both sides of the firewall and in ANY location where it has lost its integrity. HINT: If it's cracking, it's failing. If it's stained, it's already failed. It should look smooth, uniform, and consistent in color if still doing its job.
Once you have all of this cleaned out, it's time to wire brush all the exposed metal/rust that was under the seam sealer and treat for rust. Once the rust inhibitor is cured, it's time to prime the affected areas. When that has dried according to the can instructions, seam sealer is applied. The final steps are spray the basecoat of paint per your trucks paint code, then finish with clearcoat.
Once dried for a few hours, you can reassemble the truck in the reverse order that you took it apart.
The materials I used in this were some of the best available, the stuff auto restoration companies use to get lasting results, and I want lasting results because I expect to have this truck for another 10 years. They also match up with one another nearly perfectly. With the exception of the base rust inhibitor I used first on the rust and metal, the epoxy primer is formulated to work well with the seam sealer and both work well under the paint basecoat and clearcoat. As for the rust inhibitor, it will take any topcoat you want to lay on it AFTER it cures, so I'm good there. I researched these products for days to come up with the correct mix of items needed to make this a seamless (no pun intended) repair.
Tools you'll need:
- utility knife
- metric sockets and extension bars
- long handled screwdrivers and pry bars (for getting into the seams to remove the seam sealer)
- door panel tools to get the kickpanel rivet out
- small screwdriver to help press locking tabs on various wiring connectors
- scraping tools of various sizes and shapes
- wire brush for removing loose scale and bits of old sealer
- Shop-Vac to control aerosol chemicals and paint overspray and to remove the fine rust dust and old seam sealer
- coarse and medium small brushes for cleaning up the cowl area seams and cleaning out the cowl itself inside and out
- an old metal chisel, some pry bars are good if shaped correctly with a good and manageable edge.
- hammers in various sizes
- needle-nose pliers, and other tools as needed
- some sort of foam to lie on while you're in awkward positions and/or on the truck cab's metal floor
Supplies you'll need:
- Permatex brush-on or spray-on rust neutralize available about everywhere.
- Spraymax 3680033 (gray) epoxy primer. There are different colors of this primer, so get the one that more closely matches your basecoat.
- 3M urethane seam sealer (p/n: 08365), but there are other numbers in different colors - I used the beige color because it matched my old seam sealer.
- Duplicolor PerfectMatch PRO basecoat in my truck's factory paint code (YZ).
- Duplicolor PerfectMatch PRO clearcoat.
- Face mask or respirator and safety glasses.
- Disposable rubber gloves
- Brake Clean
- Masking tape (you will be spraying PRIMER and PAINT inside your truck's cab).
Detailed Process (photos follow after their description in the narrative):
In the engine bay and under the truck:
- disconnect the negative lead from the battery as you are going to be moving the fusebox (the big one) and disconnecting a very large
wiring harness under the dash.
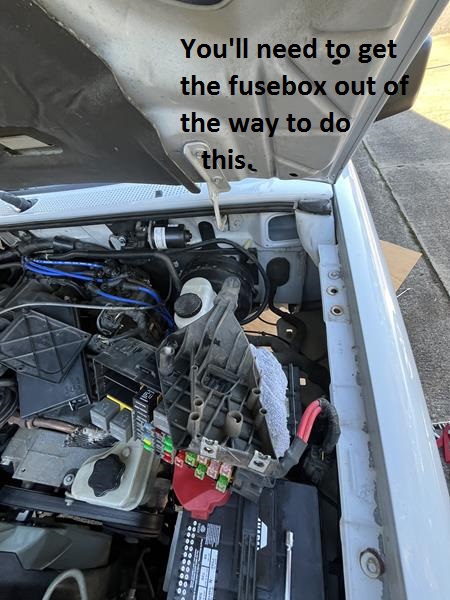
- unbolt the fuse block and move it out of the way - I tied mine to something on the other side of the brake hydraulic unit.
- remove the access cover for the cowl to clean it out and flush it with some water to remove the crud if any - use the brushes...
Next,
- diconnect and release the fasteners holding various cables and wire looms to the inner fender.
- remove the plastic inner fender (mostly for inspection of the extent of the damage), but it's also easier to look at the bottom of the cowl seam from below. You'll also want to dump the "cup" at the trailing edge of the inner fender and put several 3/4" to 1" holes in the bottom of the "cup" so that you don't rust out the bottom of your fender and its mounting location. Those are covered by this cup that fills with dirt and debris and stays wet all the time.
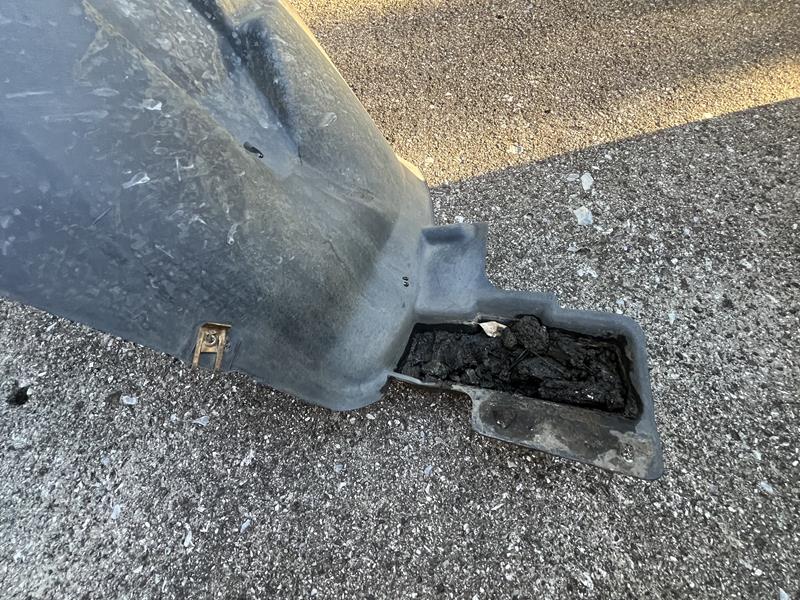
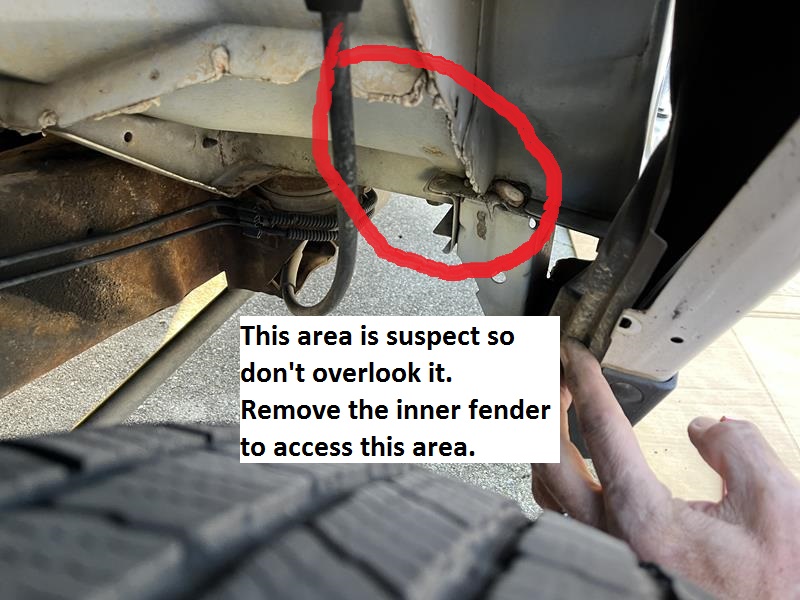
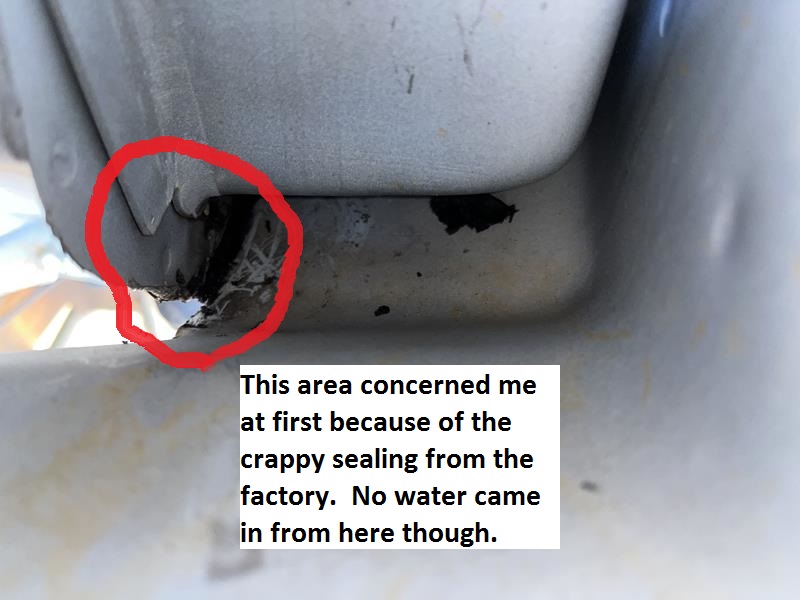
This will give you a good look at the seams behind the fender liner too. Don't forget to check those for possible sources
of water intrusion.
Inside the cab:
- remove the driver's side seat as it's easier to work above your head if you're lying on your back. Remove BOTH seats
if you really want room to move and do other maintenance, like cleaning the carpet with a brush with laundry detergent and water.
- remove the door sill trim starting at either end.
- remove the kickpanel pushpin and remove the kickpanel from the truck.
- pull the carpet back as far as you can (or remove both seats, the console tray, and the take all the carpet out to clean it).
Mine smells better than it has in probably 10 years.
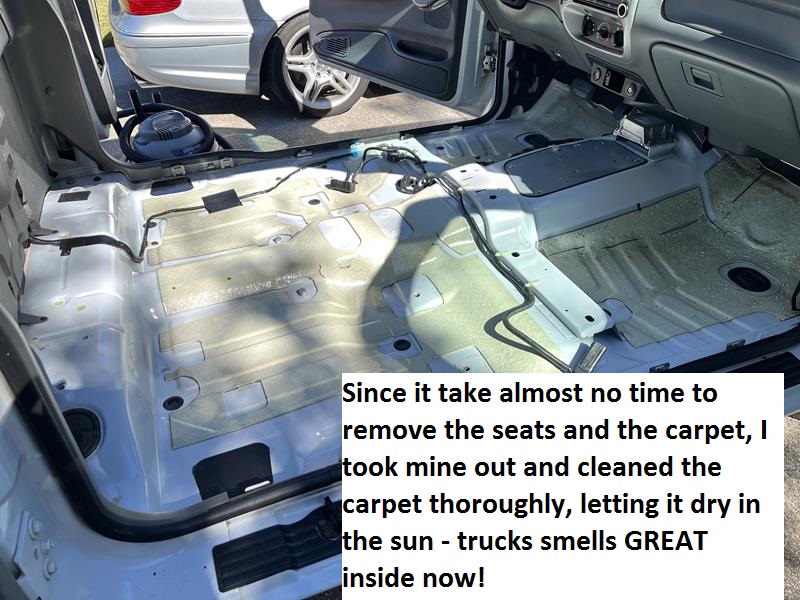
- remove the push-pin fasteners (two of them) for the stop-light switch wiring from the top of the parking brake frame and disconnect the plug at the switch itself.
- unbolt the parking brake from the side panel with a 10m socket. It will hang there on the very rigid brake cable unless you're really adventurous and
want to disconnect it at the split above the rear axle. I found just enough room with it in place but kinda dangling or tied to the brake pedal arm. Your choice.
- disconnect the large electrical harness and move both ends out of the way as best you can. I find zip-tying them to something helps a LOT.
- remove the black rubber insulator/bellows-like piece that runs up the kickpanel frame. NOTE: It' has a single push-pin holding it in place at the very top of it that you'll want to remove before snaking it out from behind the parking brake.
- now you must decide how to handle the sound-deadening panel that covers the firewall. It's the black, cloth-like panel that's about
1/4" thick and it runs from up behind the dash all the way down to just behind the pedals and fully side to side of the inside firewall. It's quite rigid too. I decided to cut mine in a way that would allow me to remove what I needed to be able to get to my repair and re-install it so it still functioned mostly as it should and looked right.
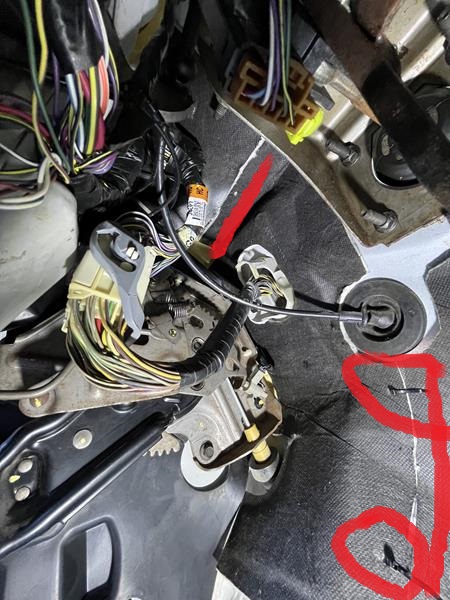
I had to cut this piece from L to R at the top as far rearward as I could just under the dashboard itself. Then, I cut it vertically toward the bottom to free it up to remove it from the truck to continue onward to the leak area. Once cut and the electrical connector apart, it slipped right out. This is the piece after I had reinstalled it in the truck, but you can see the white seam where I cut it up top next to the red line in the upper center of the photo. The vertical white line next to the red line in the lower right of the photo is where I cut it vertically. Circled are the zip-ties I used to tie it back together after reinstallation.
- with the sound deadening panel out of the way, this is what we see up in that far top left recess of cab:
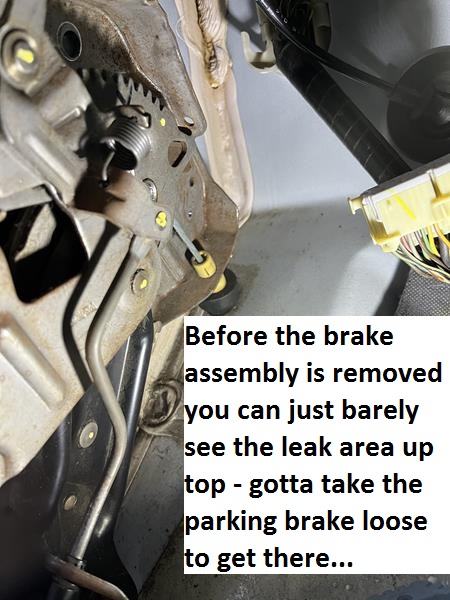
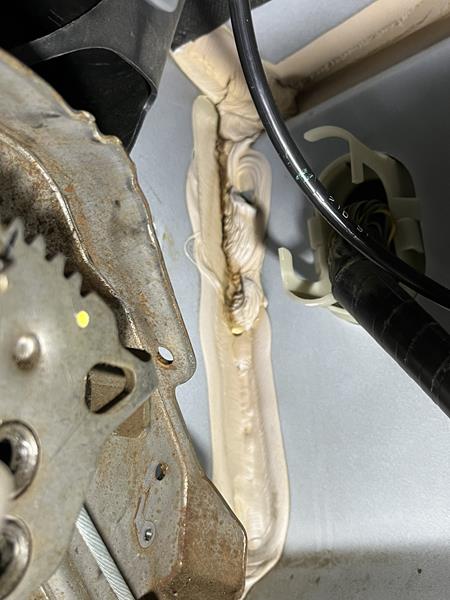
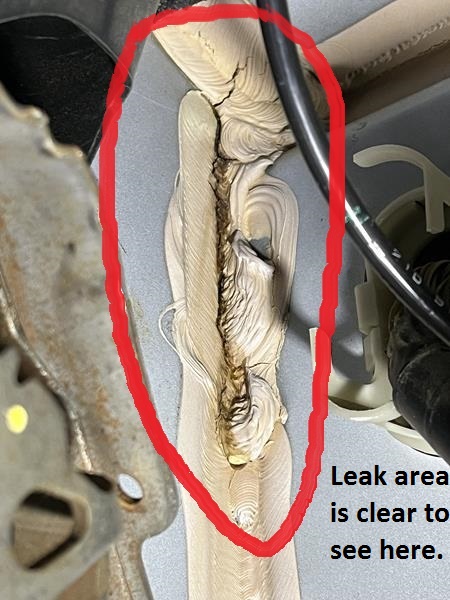
That is clearly the problem. Now the hard part begins, getting the old sealer out of that tiny area. I resigned myself to the fact that it was going to take me several hours to do that and it was going to hurt my 59 year-old frame. So be it. I've worked on cars for close to 45 years and this isn't going to slow me down. Also,
I'M SICK AND TIRED OF HAVING A WET CARPET IN MY TRUCK AND HAVING TO SMELL IT AS IT DRIES.
NOTE: As I get into the next part, cleaning the old out to prepare for the new, keep in mind that some of the following actions can damage the metal framework of the truck, so do the following at your comfort level of aggressiveness. I don't like to damage much, so I go slowly and more gently, but it takes longer. Here's what you'll need to do:
- grind, cut, chisel, scrape, pry, push, pull, cuss, fuss and whatever else it takes to start breaking up this old sealer. Some will fall as dust while other pieces the size of a tube of chapstick will fall out. I filed one broad side of a long pry bar to give me a chisel type edge that I could tap with a hammer to remove some of this. Use what have, and make tools if you can. Whatever gets that stuff out is what you need to use.
I went back and forth between tools as there are lots of little ang les up there that one tool wouldn't fit, but another would. Patience is
the key here.
Once you're done, it should look something like this:
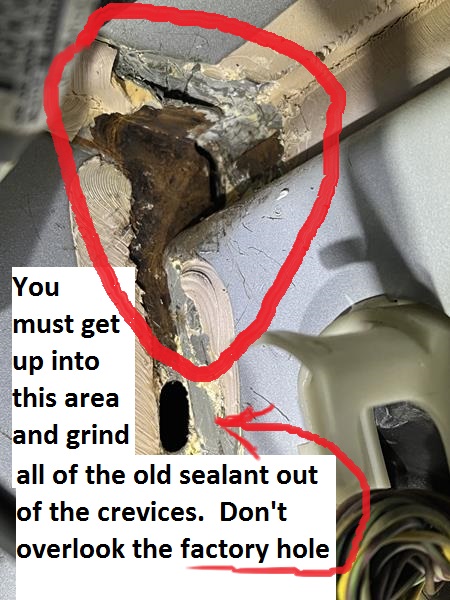
The engine bay side looked like this:
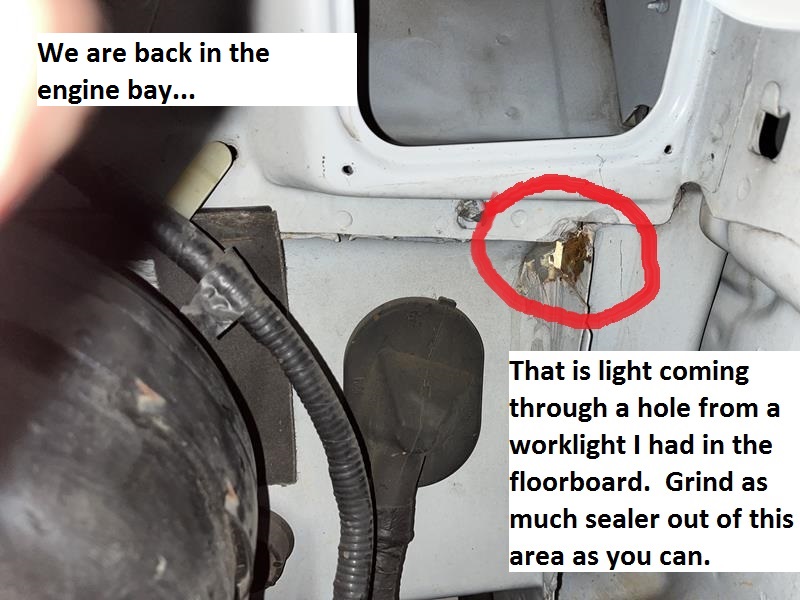
Next Steps (rust inhibitor):
- wire brush the affected areas as much as you can. You want all the loose dust, scale, and sealer off as you can get.
- vacuum the area heavily to remove that dust and scale.
- brush or spray on your rust inhibitor following the directions on the bottle for re-coating and cure times before top-coating
(meaning putting ANYTHING on top of it). If you cover it and it hasn't cured, the water-based formula will get trapped, and
you'll have a bonding problem, so LET IT CURE.
Next Step (primer):
Get your breathing cover and safety glasses on, and I kept my shop-vac running close to me with the wand in one hand and my spray cans in the other. You'll blow quite a bit of wet aerosol bits out of the can in a VERY tight spot with the next step and breathing it is not great. You also don't want primer overspray all over your interior...
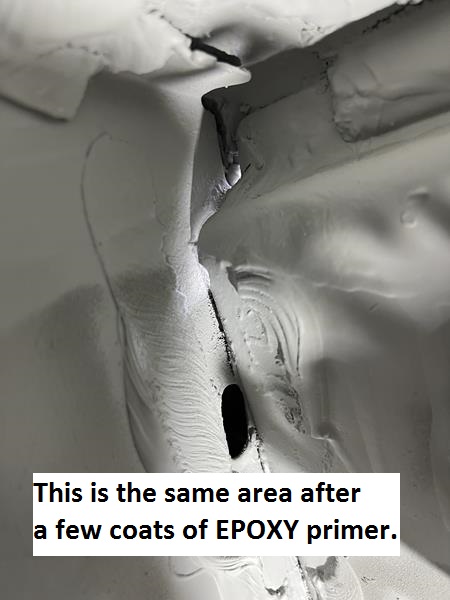
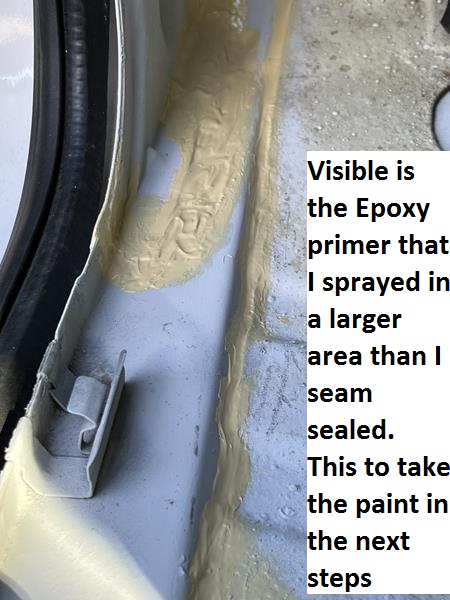
- Spray your epoxy primer carefully onto the affected areas. Follow the instructions on the can for thickness of coats and number of coats.
Another NOTE: don't use any primer other than EPOXY PRIMER as they will not bond correctly to either the rust inhibitor or to the seam sealer.
These are the areas after being primed:
Here's the engine bay:
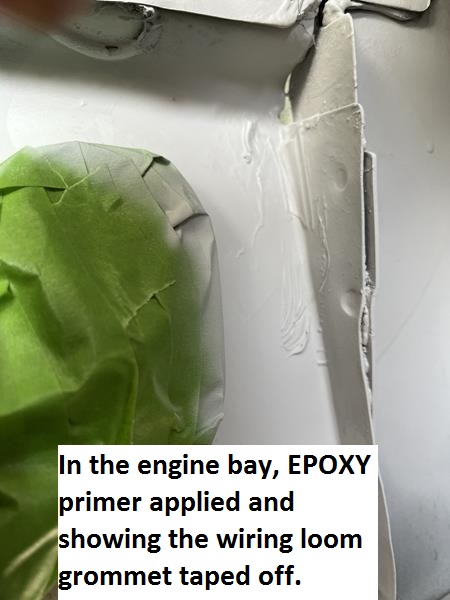
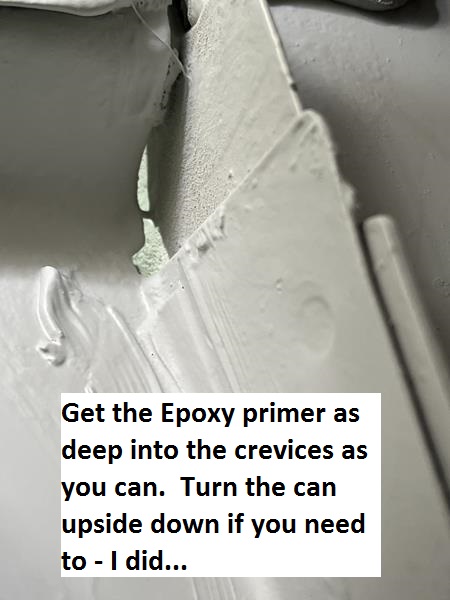
Let that dry according to the instructions (think I had to wait just over 30 minutes before I could put the 3M Seam Sealer over it.
Next Steps (seam sealer):
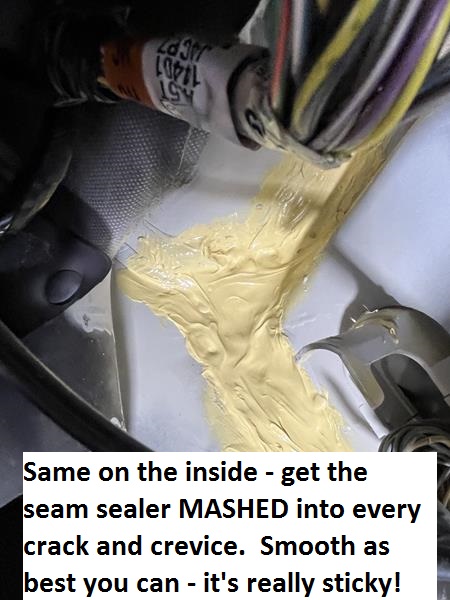
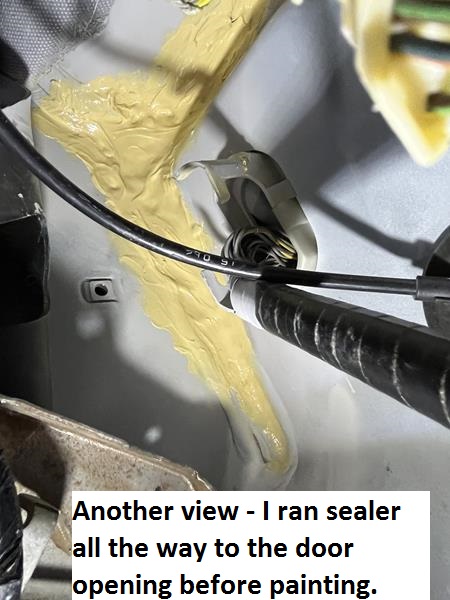
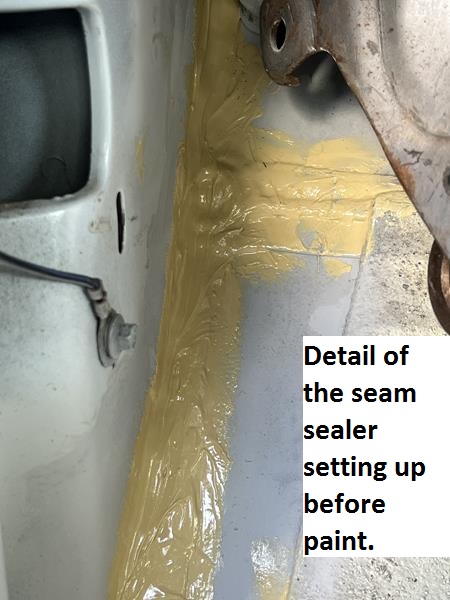
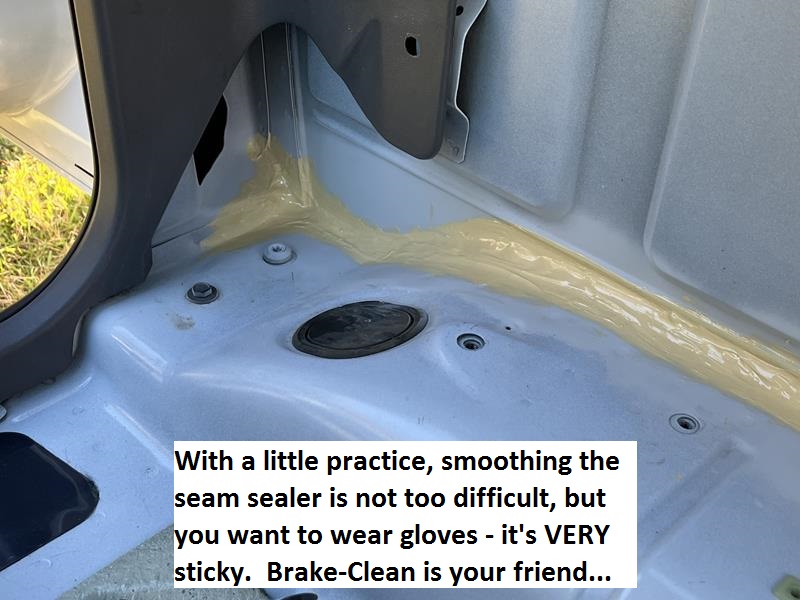
- get your gloves on and cut your sealer tube to give you about a 5/16" to 3/8" bead - yeah, it's big but you're trying to FILL holes and seams, not create a nice baseboard joint that will get paint and be visible in your home. YOU ARE TRYING TO KEEP WATER OUT OF YOUR TRUCK.
- put the tube in your caulking gun and start filling the holes. I kept a roll of paper towels and a can of brake clean close by during this step.
You'll make a mess on the gloves, but don't take them off. Just spray some Brake Clean on a paper towel and wipe the sealer off, and keep working.
- feather the sealer into the cavities filling them as full as you can get them. Push the sealer into tight crevices with you finger(s) as necessary.
NOTE: Be careful with the caulk gun if you still have your carpet in your truck! If you get it on the carpet, you'll probably never get it all back off of it.
When you finish with this step, it should look something like this:
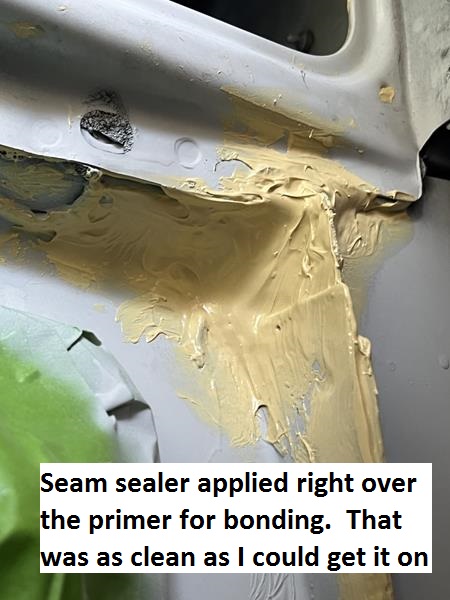
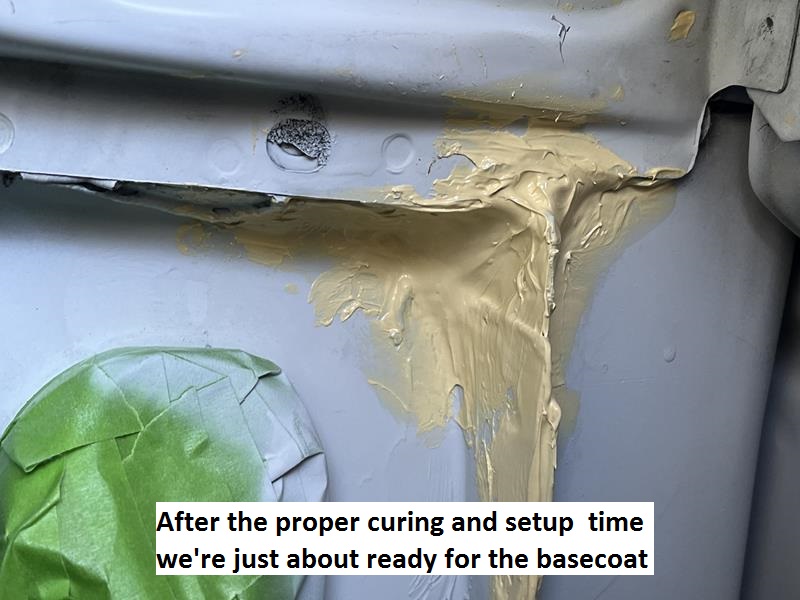
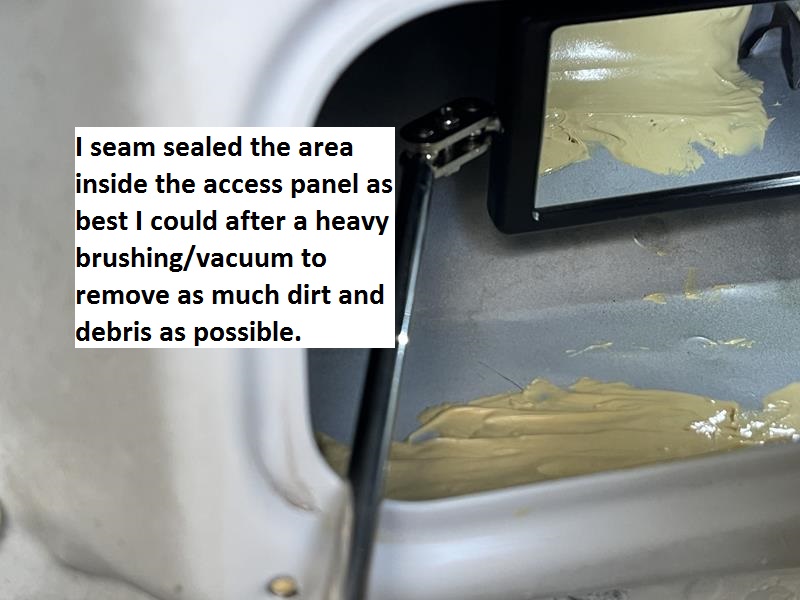
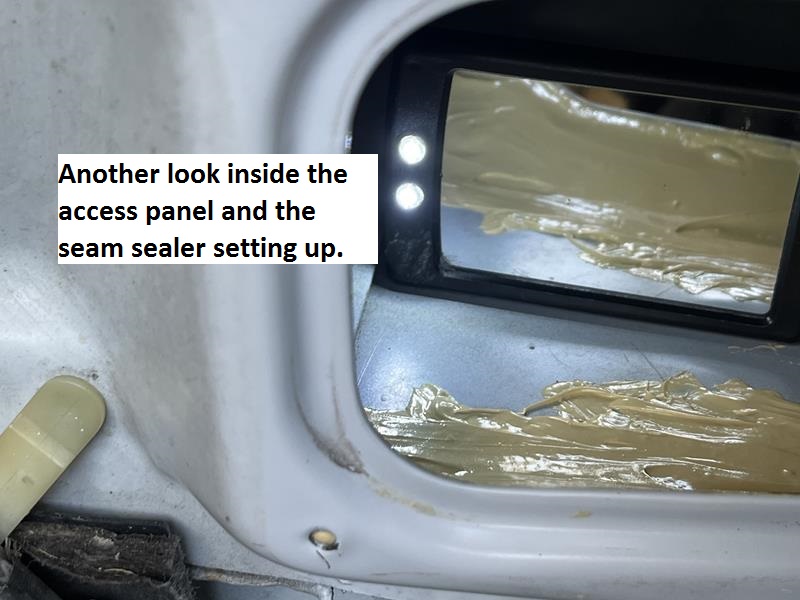
Here is what I did behind the cowl cover:
This got me all ready for the upper firewall, but I needed to treat all the way down this seam edge.
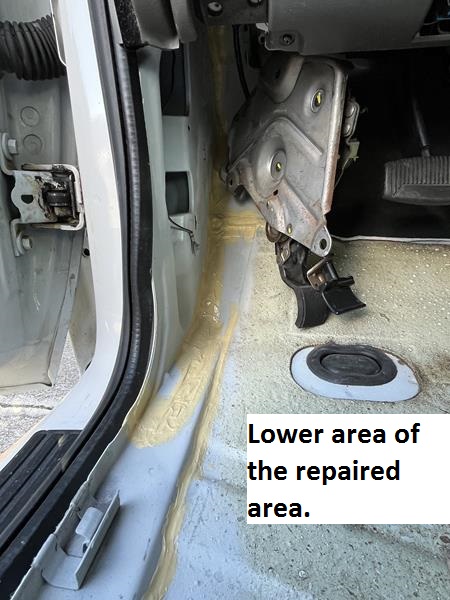
Here are some photos of the rust inhibitor phase on the lower parts of the seam:
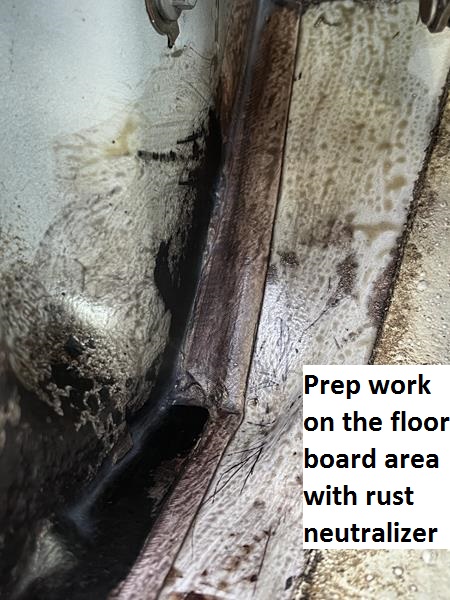
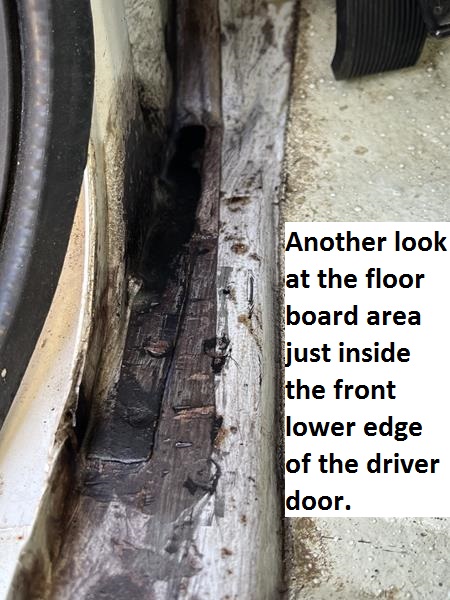
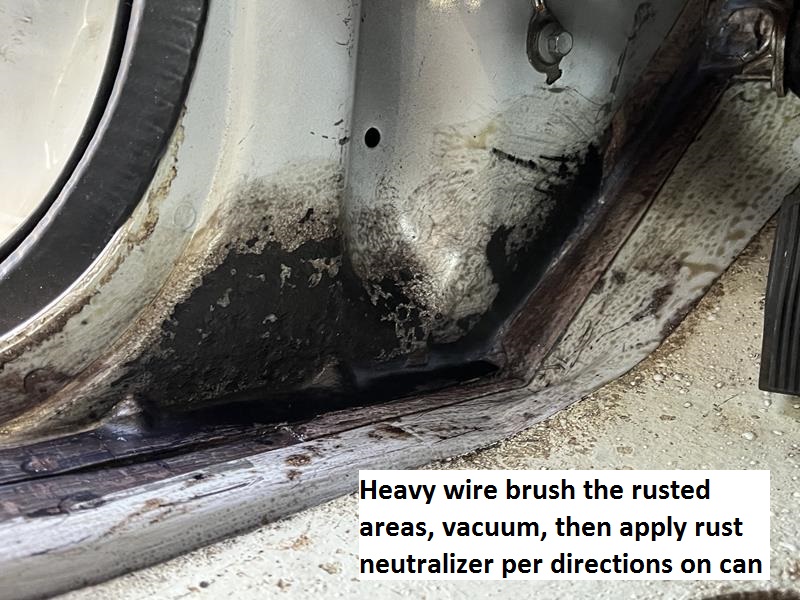
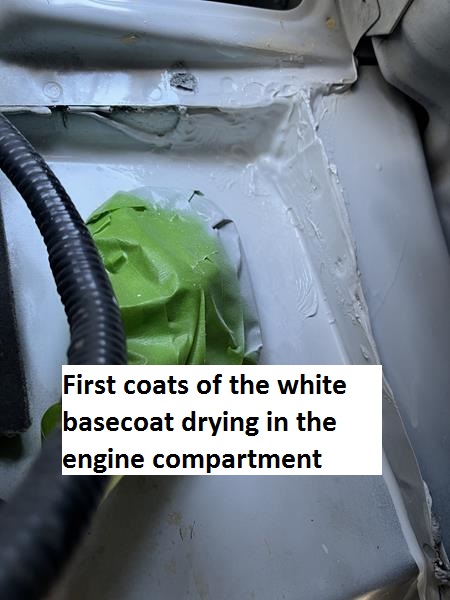
At this point, I shot some of the basecoat in the engine bay while the floor area cured. Photo of the first coats on the engine side firewall:
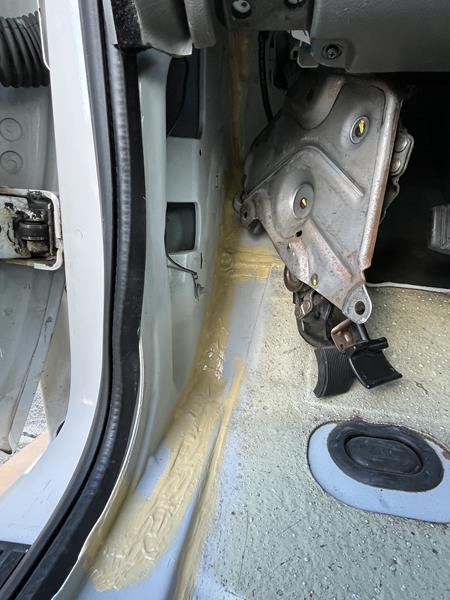
The same process follows here as I move down the seam toward the footwell:
wait 24 hours for the rust inhibitor to cure, then prime (let cure), then apply seam sealer.
Next step(s):
Cure time for the seam sealer can be days depending on how thick it was applied. The beauty of using automotive paint and clearcoat is that it can be applied over the seam sealer after just 30 minutes and the seam sealer will still cure with no outgassing, etc. So...
- apply your basecoat according to the instructions. For the Duplicolor it was 2-3 light coats followed by a heavier final coat with about 10 minutes between coats.
- allow one hour before the clearcoat, then apply the Duplicolor clearcoat the same way the basecoat was applied.
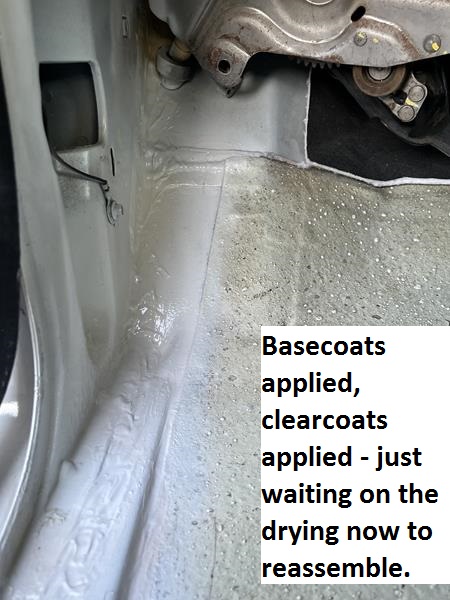
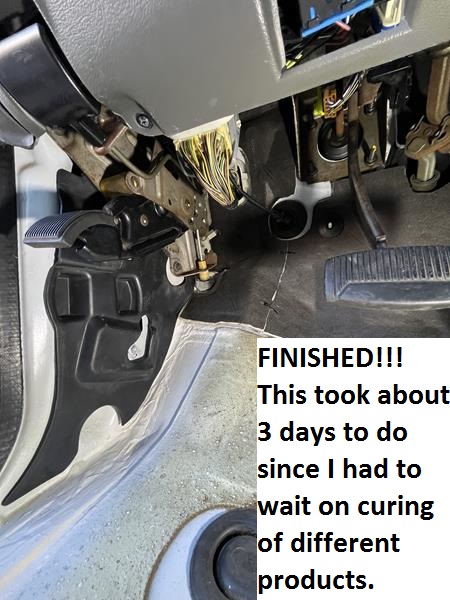
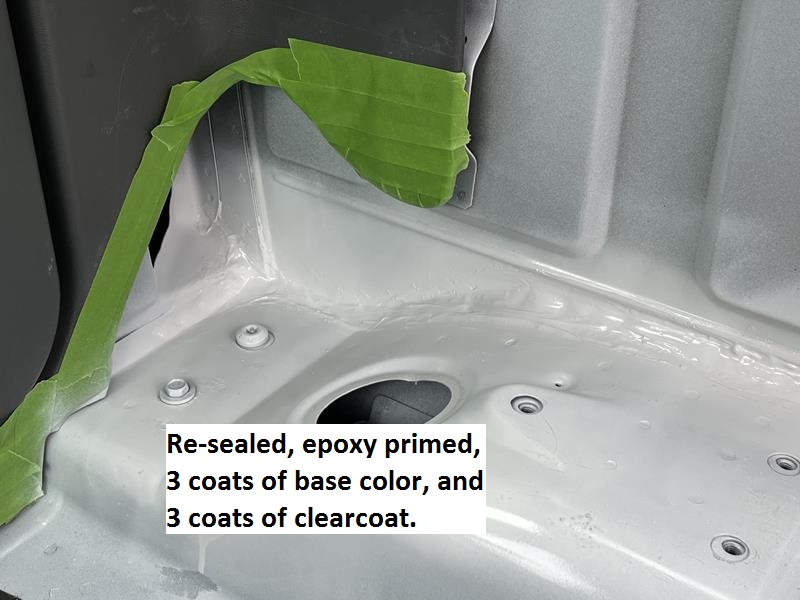
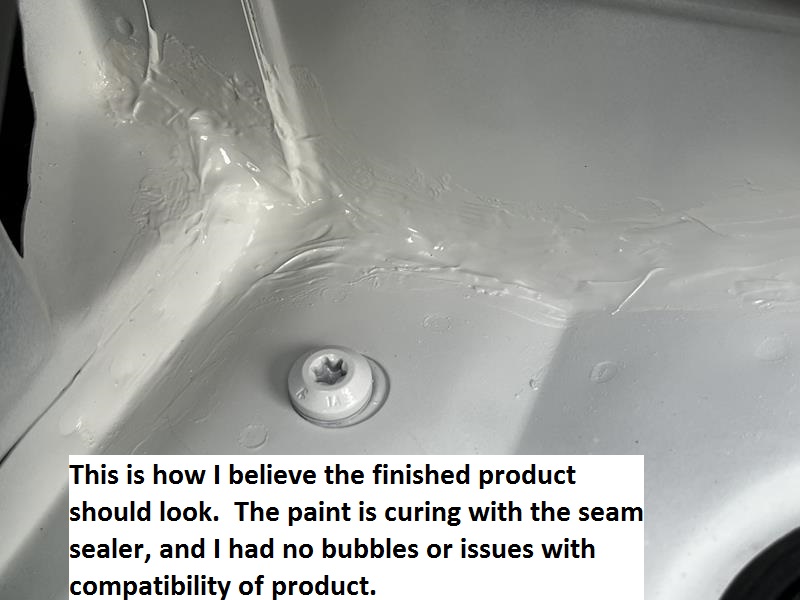
Here are some photos after the painting was done:
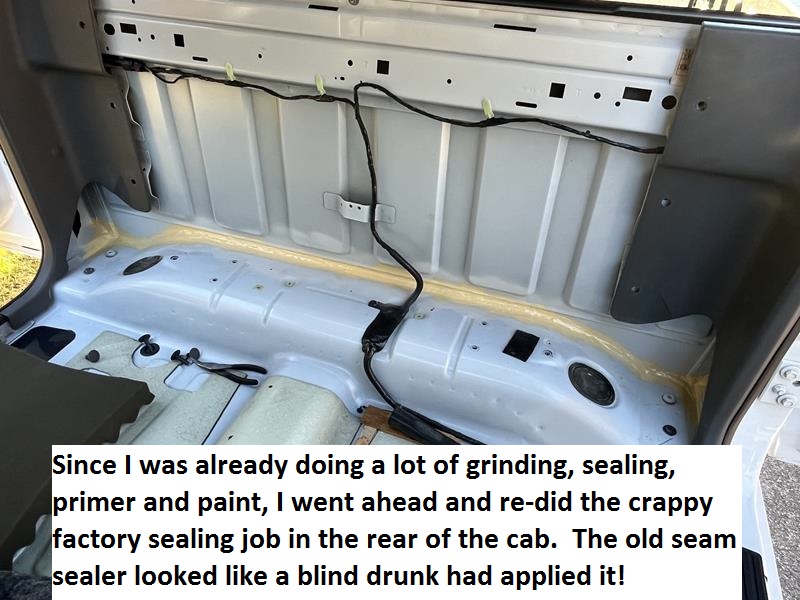
Of course, there were other seams needing attention and I had more seam sealer, epoxy primer, auto paint and clearcoat:
j
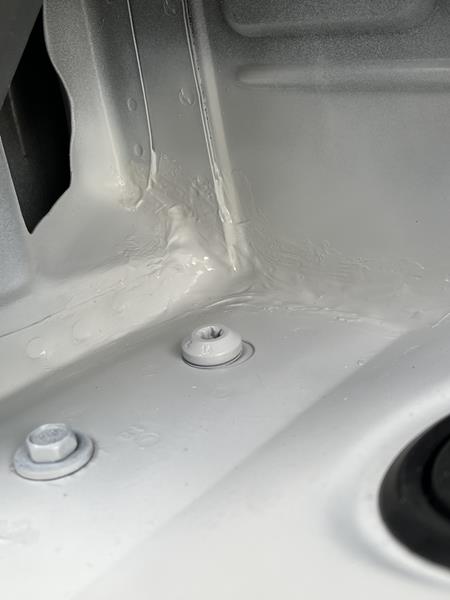
It took me over 3 hours to put this post together. I hope you find it helpful and useful.
Sam
I have a 2010 Ford Ranger 4x4, 4-door with 259,000 miles, but I've also had a 1990 Ranger for 14 years, then a 2004 Ranger for 12 years. I've had the current truck for just over 2 years now. The previous owner mentioned NOTHING about this leak, but he had to know about it, which is aggravating, but buyer beware, right? It's worth noting that my prior efforts over the last 12 months or so had me thinking that this was a windshield issue until that didn't solve the problem. But hey, I have a nice new shiny windshield that needed to be replaced anyway...
To the issue at hand, the dreaded DRIVER SIDE FLOORBOARD LEAK WITH THE ASSOCIATED SOAKED CARPET, RUSTING PANELS, AND A SMELL THAT JUST NEVER SEEMS TO GO AWAY. If you're going to dive into this problem, you need to prepare yourself for a VERY difficult repair. The area where the seam(s) fail for the driver side leak is at the very top and left of the portion of the firewall that is exposed in the cab. The repair requires the removal of some items and the detachment of others, none of which are much fun, especially the parking brake.. I'll try to make this as short as I can but there is just so much. I've also put together 25+ photos with notes, and I'll walk you through this as best I can.
Overview of the process:
In the engine bay and wheelwell, you'll want to move all items out of the way that will hinder access to the seams on the upper firewall.
Inside the cab, you're going to remove as much as you can (and feel comfortable with) to get to the seam that runs from the upper firewall where it meets the left side panel/assembly where the doors attach. You want to expose this seam from the top all the way down to the floorboard. It's basically the LF corner of the interior of cab shell.
Once all of that is exposed, you should have a good look at the problem area, and it's WAY up high under the dash.
From there, you're going to start removing old seam sealer. My experience with this truck is that Ford didn't do much in the way of quality control where seam sealer is concerned, most of it looking like a blind man applied it. Remove the sealer on both sides of the firewall and in ANY location where it has lost its integrity. HINT: If it's cracking, it's failing. If it's stained, it's already failed. It should look smooth, uniform, and consistent in color if still doing its job.
Once you have all of this cleaned out, it's time to wire brush all the exposed metal/rust that was under the seam sealer and treat for rust. Once the rust inhibitor is cured, it's time to prime the affected areas. When that has dried according to the can instructions, seam sealer is applied. The final steps are spray the basecoat of paint per your trucks paint code, then finish with clearcoat.
Once dried for a few hours, you can reassemble the truck in the reverse order that you took it apart.
The materials I used in this were some of the best available, the stuff auto restoration companies use to get lasting results, and I want lasting results because I expect to have this truck for another 10 years. They also match up with one another nearly perfectly. With the exception of the base rust inhibitor I used first on the rust and metal, the epoxy primer is formulated to work well with the seam sealer and both work well under the paint basecoat and clearcoat. As for the rust inhibitor, it will take any topcoat you want to lay on it AFTER it cures, so I'm good there. I researched these products for days to come up with the correct mix of items needed to make this a seamless (no pun intended) repair.
Tools you'll need:
- utility knife
- metric sockets and extension bars
- long handled screwdrivers and pry bars (for getting into the seams to remove the seam sealer)
- door panel tools to get the kickpanel rivet out
- small screwdriver to help press locking tabs on various wiring connectors
- scraping tools of various sizes and shapes
- wire brush for removing loose scale and bits of old sealer
- Shop-Vac to control aerosol chemicals and paint overspray and to remove the fine rust dust and old seam sealer
- coarse and medium small brushes for cleaning up the cowl area seams and cleaning out the cowl itself inside and out
- an old metal chisel, some pry bars are good if shaped correctly with a good and manageable edge.
- hammers in various sizes
- needle-nose pliers, and other tools as needed
- some sort of foam to lie on while you're in awkward positions and/or on the truck cab's metal floor
Supplies you'll need:
- Permatex brush-on or spray-on rust neutralize available about everywhere.
- Spraymax 3680033 (gray) epoxy primer. There are different colors of this primer, so get the one that more closely matches your basecoat.
- 3M urethane seam sealer (p/n: 08365), but there are other numbers in different colors - I used the beige color because it matched my old seam sealer.
- Duplicolor PerfectMatch PRO basecoat in my truck's factory paint code (YZ).
- Duplicolor PerfectMatch PRO clearcoat.
- Face mask or respirator and safety glasses.
- Disposable rubber gloves
- Brake Clean
- Masking tape (you will be spraying PRIMER and PAINT inside your truck's cab).
Detailed Process (photos follow after their description in the narrative):
In the engine bay and under the truck:
- disconnect the negative lead from the battery as you are going to be moving the fusebox (the big one) and disconnecting a very large
wiring harness under the dash.
- unbolt the fuse block and move it out of the way - I tied mine to something on the other side of the brake hydraulic unit.
- remove the access cover for the cowl to clean it out and flush it with some water to remove the crud if any - use the brushes...
Next,
- diconnect and release the fasteners holding various cables and wire looms to the inner fender.
- remove the plastic inner fender (mostly for inspection of the extent of the damage), but it's also easier to look at the bottom of the cowl seam from below. You'll also want to dump the "cup" at the trailing edge of the inner fender and put several 3/4" to 1" holes in the bottom of the "cup" so that you don't rust out the bottom of your fender and its mounting location. Those are covered by this cup that fills with dirt and debris and stays wet all the time.
This will give you a good look at the seams behind the fender liner too. Don't forget to check those for possible sources
of water intrusion.
Inside the cab:
- remove the driver's side seat as it's easier to work above your head if you're lying on your back. Remove BOTH seats
if you really want room to move and do other maintenance, like cleaning the carpet with a brush with laundry detergent and water.
- remove the door sill trim starting at either end.
- remove the kickpanel pushpin and remove the kickpanel from the truck.
- pull the carpet back as far as you can (or remove both seats, the console tray, and the take all the carpet out to clean it).
Mine smells better than it has in probably 10 years.
- remove the push-pin fasteners (two of them) for the stop-light switch wiring from the top of the parking brake frame and disconnect the plug at the switch itself.
- unbolt the parking brake from the side panel with a 10m socket. It will hang there on the very rigid brake cable unless you're really adventurous and
want to disconnect it at the split above the rear axle. I found just enough room with it in place but kinda dangling or tied to the brake pedal arm. Your choice.
- disconnect the large electrical harness and move both ends out of the way as best you can. I find zip-tying them to something helps a LOT.
- remove the black rubber insulator/bellows-like piece that runs up the kickpanel frame. NOTE: It' has a single push-pin holding it in place at the very top of it that you'll want to remove before snaking it out from behind the parking brake.
- now you must decide how to handle the sound-deadening panel that covers the firewall. It's the black, cloth-like panel that's about
1/4" thick and it runs from up behind the dash all the way down to just behind the pedals and fully side to side of the inside firewall. It's quite rigid too. I decided to cut mine in a way that would allow me to remove what I needed to be able to get to my repair and re-install it so it still functioned mostly as it should and looked right.
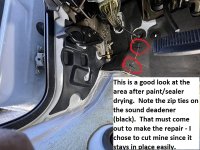
I had to cut this piece from L to R at the top as far rearward as I could just under the dashboard itself. Then, I cut it vertically toward the bottom to free it up to remove it from the truck to continue onward to the leak area. Once cut and the electrical connector apart, it slipped right out. This is the piece after I had reinstalled it in the truck, but you can see the white seam where I cut it up top next to the red line in the upper center of the photo. The vertical white line next to the red line in the lower right of the photo is where I cut it vertically. Circled are the zip-ties I used to tie it back together after reinstallation.
- with the sound deadening panel out of the way, this is what we see up in that far top left recess of cab:
That is clearly the problem. Now the hard part begins, getting the old sealer out of that tiny area. I resigned myself to the fact that it was going to take me several hours to do that and it was going to hurt my 59 year-old frame. So be it. I've worked on cars for close to 45 years and this isn't going to slow me down. Also,
I'M SICK AND TIRED OF HAVING A WET CARPET IN MY TRUCK AND HAVING TO SMELL IT AS IT DRIES.
NOTE: As I get into the next part, cleaning the old out to prepare for the new, keep in mind that some of the following actions can damage the metal framework of the truck, so do the following at your comfort level of aggressiveness. I don't like to damage much, so I go slowly and more gently, but it takes longer. Here's what you'll need to do:
- grind, cut, chisel, scrape, pry, push, pull, cuss, fuss and whatever else it takes to start breaking up this old sealer. Some will fall as dust while other pieces the size of a tube of chapstick will fall out. I filed one broad side of a long pry bar to give me a chisel type edge that I could tap with a hammer to remove some of this. Use what have, and make tools if you can. Whatever gets that stuff out is what you need to use.
I went back and forth between tools as there are lots of little ang les up there that one tool wouldn't fit, but another would. Patience is
the key here.
Once you're done, it should look something like this:
The engine bay side looked like this:
Next Steps (rust inhibitor):
- wire brush the affected areas as much as you can. You want all the loose dust, scale, and sealer off as you can get.
- vacuum the area heavily to remove that dust and scale.
- brush or spray on your rust inhibitor following the directions on the bottle for re-coating and cure times before top-coating
(meaning putting ANYTHING on top of it). If you cover it and it hasn't cured, the water-based formula will get trapped, and
you'll have a bonding problem, so LET IT CURE.
Next Step (primer):
Get your breathing cover and safety glasses on, and I kept my shop-vac running close to me with the wand in one hand and my spray cans in the other. You'll blow quite a bit of wet aerosol bits out of the can in a VERY tight spot with the next step and breathing it is not great. You also don't want primer overspray all over your interior...
- Spray your epoxy primer carefully onto the affected areas. Follow the instructions on the can for thickness of coats and number of coats.
Another NOTE: don't use any primer other than EPOXY PRIMER as they will not bond correctly to either the rust inhibitor or to the seam sealer.
These are the areas after being primed:
Here's the engine bay:
Let that dry according to the instructions (think I had to wait just over 30 minutes before I could put the 3M Seam Sealer over it.
Next Steps (seam sealer):
- get your gloves on and cut your sealer tube to give you about a 5/16" to 3/8" bead - yeah, it's big but you're trying to FILL holes and seams, not create a nice baseboard joint that will get paint and be visible in your home. YOU ARE TRYING TO KEEP WATER OUT OF YOUR TRUCK.
- put the tube in your caulking gun and start filling the holes. I kept a roll of paper towels and a can of brake clean close by during this step.
You'll make a mess on the gloves, but don't take them off. Just spray some Brake Clean on a paper towel and wipe the sealer off, and keep working.
- feather the sealer into the cavities filling them as full as you can get them. Push the sealer into tight crevices with you finger(s) as necessary.
NOTE: Be careful with the caulk gun if you still have your carpet in your truck! If you get it on the carpet, you'll probably never get it all back off of it.
When you finish with this step, it should look something like this:
Here is what I did behind the cowl cover:
This got me all ready for the upper firewall, but I needed to treat all the way down this seam edge.
Here are some photos of the rust inhibitor phase on the lower parts of the seam:
At this point, I shot some of the basecoat in the engine bay while the floor area cured. Photo of the first coats on the engine side firewall:
The same process follows here as I move down the seam toward the footwell:
wait 24 hours for the rust inhibitor to cure, then prime (let cure), then apply seam sealer.
Next step(s):
Cure time for the seam sealer can be days depending on how thick it was applied. The beauty of using automotive paint and clearcoat is that it can be applied over the seam sealer after just 30 minutes and the seam sealer will still cure with no outgassing, etc. So...
- apply your basecoat according to the instructions. For the Duplicolor it was 2-3 light coats followed by a heavier final coat with about 10 minutes between coats.
- allow one hour before the clearcoat, then apply the Duplicolor clearcoat the same way the basecoat was applied.
Here are some photos after the painting was done:
Of course, there were other seams needing attention and I had more seam sealer, epoxy primer, auto paint and clearcoat:
j
It took me over 3 hours to put this post together. I hope you find it helpful and useful.
Sam
Attachments
Last edited: