• Welcome Visitor! Please take a few seconds and Register for our forum. Even if you don't want to post, you can still 'Like' and react to posts.

1993 Splash in SC


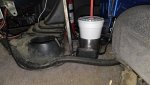
I like that. What size do I need? It doesn't matter.

They look like a "one size fits all". The end just gets cut off to match the opening needed to fit all the wires going through it.
 
In my continuing effort to clean up the cab and prepare for major electrical stuff coming soon...

I finally got the fire extinguisher out from behind my seat and mounted it for easy access. Then, I installed a replacement handle for the seat back adjustment on the driver seat. The original broke off years ago. I've been nervous about that since the fire extinguisher has been living behind that seat and releasing the back to come forward has not been a quick or easy task for all those years.

And I only mildly set fire to the carpeting while doing these things.

20250222_144710.jpg


Before new release handle
20250222_144649.jpg


New handle installed.
20250222_152519.jpg
 
Nice, on the seat release after the stock broke off I cut a couple notches in it and folded it down several degrees and welded it back on and it's stayed since then... my fire extinguisher lives by the seat belt retractor in that corner not strapped down or anything just standing up...
 
I've been considering one of these so I can mount the fire extinguisher in an accessible location in the 2019 instead of under the rear seat like it is now. Theoretically, it would still be out of the way being mounted to the seat rails.


91PFmQS8+QL._AC_SL1500_.jpg
 
I started doing a thing today. As part of my overlanding electrical upgrades, I had to figure out where to put one or more "house batteries". It's kind of an awkward thing because I need as much bed space as possible for camping gear, refrigerator, tools, etc. And single cabs just don't offer much interior space. So, I'm going to put them under the bed. Since my spare tire is gone from under there, there is limited space even though I put my air tank back there.

So, here it is unfinished. A rack that will hold 2 group 24 or group 31 batteries. It will be hinged on one side to make it easy to lower the rack and service the batteries. Still have a few details to finalize before finishing the welding. But proof of concept is a success. Also need to re-route my tail pipe and re-arrange the air system regulator and tubing.

Optima is wrong size and almost dead. Just there as a visual aid.
20250304_154718.jpg

Interior dimensions are just over 13" x 7.5" per battery. I'll make some tie-down brackets to go over the top and fasten with nylock nuts.
20250304_154727.jpg


20250304_154742.jpg


20250304_155427.jpg


It's going to hang about a 1/2" lower than this. I think it should be protected ok for overlanding. But rough-housing on rocks in ORV parks should be moderated more than it has been.
20250304_155438.jpg


View from driver side wheel area. Yes, that shock is close. But I can get a little more clearance.
20250304_155515.jpg
 
Last edited:
Looking good. It's gonna be an awesome setup when your done.
 
You're gonna have to run that rig over a scale with the full loadout.
 
Oh, yeah. I also recently got a functional cup holder installed.

20250304_190805.jpg
 

Attachments

  • 20250304_190824.jpg
    20250304_190824.jpg
    213.1 KB · Views: 24
Just picked up the batteries. I wanted to be able to sit them in the cradle and verify fit before I finish all the welding. Just looking at dimensions on paper, it seemed like they would be small and not extremely heavy. Ha-ha. Let's just say that with these under the bed and a lighter wallet in the driver seat, my center of gravity is being lowered nicely.
20250307_130113.jpg
 
Anyway you can work a manual screw jack mechanism in there to make the raising and lowering easier to the most part? Like one from a vehicle jack? You might not have enough clearance for something like that. So, just spit balling ideas.
 
Anyway you can work a manual screw jack mechanism in there to make the raising and lowering easier to the most part? Like one from a vehicle jack? You might not have enough clearance for something like that. So, just spit balling ideas.
It could probably be done. But I don't think it's worth the effort. I shouldn't have to mess with the batteries but once every few years after I get the whole mess installed. With a piece of 2x4 on the pad of my floor jack, it will do the job nicely. I had originally thought that by hinging the tray to one side of the frame, I would be able to lift the other side up manually. But, no. I haven't tried yet and I'm not going to. Each battery should weigh around 70-80 lbs. So, let's call that 150#. I weighed the carrier today and it's around 16 lbs and still needs the hold-down straps installed. So, all finished, around 166-170lbs plus the cabling.

I finished the brackets this weekend. The battery tray is currently mounted in place even though the welding isn't quite complete. I'm going out to TN this week to see @Robertmangrum.rm to pick up the solar panels, inverter, solar controller, automatic cutout switch to isolate the truck battery during engine starting and a few other little goodies he's been scrounging up for me. But I wanted to be able to show off my progress to him in person.
 
Last edited:
Also had to re-route the tailpipe. That was an entertaining little side project. Ignore the booger welds on the exhaust. I was in a hurry. Besides, the exhaust is getting old and will have to be replaced in a few years anyway and there is no appreciable pressure after the muffler. So, if I have a tiny leak back there, who cares?

20250309_190623.jpg


20250309_190650.jpg


20250309_190659.jpg


20250309_190713.jpg
 
Won't the springs hit that? The pipe looks lower than the bump stop. Or is the shackle long enough that it will eliminate that as a problem?
 
Won't the springs hit that? The pipe looks lower than the bump stop. Or is the shackle long enough that it will eliminate that as a problem?
The pictures are deceiving regarding that. I’m pretty sure It will take a severe reverse bend of those springs before it hits. I’ll find out. I’m also sure that I’ll never hit the rear bump stops.
 

Sponsored Ad


Sponsored Ad

TRS Events

Member & Vendor Upgrades

For a small yearly donation, you can support this forum and receive a 'Supporting Member' banner, or become a 'Supporting Vendor' and promote your products here. Click the banner to find out how.

Recently Featured

Want to see your truck here? Share your photos and details in the forum.

Ranger Adventure Video

TRS Merchandise

Follow TRS On Instagram

TRS Sponsors


Sponsored Ad


Sponsored Ad


Amazon Deals

Sponsored Ad

Back
Top