• Welcome Visitor! Please take a few seconds and Register for our forum. Even if you don't want to post, you can still 'Like' and react to posts.

Please help! Some questions on a 91 4.0L OHV Lower Intake Manifold and Valve Cover Gaskets Job


jcook100

Well-Known Member
Joined
Apr 5, 2019
Messages
88
City
Salt Lake City, UT
Vehicle Year
1991
Transmission
Manual
I am preparing to do the lower intake manifold gaskets, fuel rail gaskets, and valve cover gaskets on my 91 4.0L OHV. I have been referencing this thread, which has been incredibly helpful, but I still have a few questions. My main question is this:

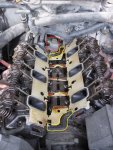
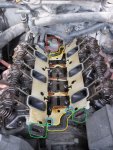
1. Should I try and find a one piece lower intake manifold gasket like the thread I just mentioned suggests? Or can I go with the newer, non-OEM two piece gasket? If I go with the two piece gasket, won't there be issues with leaks around the front and back edges of the engine block in the valley (see yellow circles in pic)? I am confused why the one-piece gasket has a gasket surface on those edges but the two-piece simply doesn't. Is it because RTV is sufficient on those two surfaces with the two-piece? Any advice is appreciated.

Additional questions I have:

2. Any general advice on using RTV sealant. How much do you use? How do you apply it (just with your finger I think)? How long do you wait after putting it down and before joining surfaces?
3. What is the best way to clean gasket surfaces? I have heard of plastic-gasket scrapers. Is that the best way? Acetone?
4. Should I take this opportunity to clean or replace the fuel injectors?
 

Attachments

  • 2gxia1t.jpg
    2gxia1t.jpg
    63.6 KB · Views: 176
The one piece gaskets don't seal either end of valley(so same as 2 piece), you do that with RTV, the black stuff that comes with lower intake gasket set
2 piece or 1 piece doesn't matter, both do the job

You for sure need RTV on both sides of lower intake gaskets coolant ports, the 4 corners
Thin coat but on both sides of gasket, helps hold it in place as well

On the air passages its a judgement call, if surfaces feel rough then use RTV, again thin coat, RTV is just to fill the SLIGHT flaws in the metal surfaces that a gasket can't seal

Plastic or thin metal scraper is fine, as long as its wider than the surface you are scraping you won't gouge anything

1991 injectors will have brittle o-rings, and dirty filters so sure, rebuild them
 
I wipe things down with alcohol based brake clean before using silicone, if you use carb cleaner the silicone won't seal. I personally like the gray Motorcraft silicone best.
 
if/when you place in the fuel injectors, use a small amount of dish soap to lubricate the o-rings and they will slide in easier.
 
The one piece gaskets don't seal either end of valley(so same as 2 piece), you do that with RTV, the black stuff that comes with lower intake gasket set
2 piece or 1 piece doesn't matter, both do the job

You for sure need RTV on both sides of lower intake gaskets coolant ports, the 4 corners
Thin coat but on both sides of gasket, helps hold it in place as well

On the air passages its a judgement call, if surfaces feel rough then use RTV, again thin coat, RTV is just to fill the SLIGHT flaws in the metal surfaces that a gasket can't seal

Plastic or thin metal scraper is fine, as long as its wider than the surface you are scraping you won't gouge anything

1991 injectors will have brittle o-rings, and dirty filters so sure, rebuild them

Thanks, RonD.

Can you help me understand which are the coolant ports and which are the air passages? I circled one set in green and what I think is the other in blue in the attached pic.

What I don't understand is how the rest of the edge (circled in yellow) seals if I only put RTV in the corners. This youtube video seems to suggest that not putting RTV along the length of those two valley edges was the reason for an oil leak. But my Haynes manual says similar to you, to just put it in the corners. I really want to try and understand this before doing it so I don't end up with a leak.
 

Attachments

  • 2gxia1t2.jpg
    2gxia1t2.jpg
    116.3 KB · Views: 153
First, I have never used lower intake gaskets that didn't extend all the way from one end of the head to the other, so gaskets around coolant passages
As seen here for one piece: https://encrypted-tbn0.gstatic.com/...2hEb5yfjmxkPP3BOJrhUGwCVdYTOmY0ZR3oo&usqp=CAc

Has the rectangle water passages at the ends


Yes, the green are the coolant pass thru's, there should be 2 more, 1 at the other end of each head and intake manifold as well has the 4 passages, 2 are blocked off, but can still leak

Yellow are where you run a bead of the black RTV, there is no pressure in the valley, just some oil splashing around, not a vacuum area or any sort of leak point, you are just keeping dust and dirt out

Blue is nothing

Red is the cam sensor for 1995 and up 4.0l, but Calif vehicles had them in 1993/4 as well, maybe 1991 not sure
 
I did mine whilst replacing the cam synchro. After much research, here is what I did.

1) This is highly debated, although slightly leaned towards the 2 piece, which is what I went with. They provide 2 rubber end pieces for the valleys, place them in the trash can. This is what the RTV is for.

2) Use the black RTV that comes in a can "Right Stuff" by Mr. Gasket. Lay it on real thick, like 1/2". I let it get just a little bit tacky. Anywhere from 5-20 mins, depending on conditions. I applied with a well cut tip, and did some finish work work with my finger. I did a thin layer on intake as well, just to "primer" it.

3) I used a red abrasive pad dipped in acetone. for the stuck on stuff, I used a soft wire wheel on a dremel at medium speed.

4) yes, or just have your injectors cleaned, and get new o rings.

I went ahead and cleaned/ polished my upper intake and whatever else intake path I could reach. cleaned out the IAC and EGR paths as well. It might have given me a slight gain in top end.

Hi Eddo Rogue,

Thanks for your thoughts - it is really helpful.

When you say soft wire wheel, do you mean brass? Did you have any worries about scratching the mating surfaces?

How do you have your injectors cleaned? Did you do it yourself or take them somewhere?
 
First, I have never used lower intake gaskets that didn't extend all the way from one end of the head to the other, so gaskets around coolant passages
As seen here for one piece: https://encrypted-tbn0.gstatic.com/...2hEb5yfjmxkPP3BOJrhUGwCVdYTOmY0ZR3oo&usqp=CAc

Has the rectangle water passages at the ends


Yes, the green are the coolant pass thru's, there should be 2 more, 1 at the other end of each head and intake manifold as well has the 4 passages, 2 are blocked off, but can still leak

Yellow are where you run a bead of the black RTV, there is no pressure in the valley, just some oil splashing around, not a vacuum area or any sort of leak point, you are just keeping dust and dirt out

Blue is nothing

Red is the cam sensor for 1995 and up 4.0l, but Calif vehicles had them in 1993/4 as well, maybe 1991 not sure

Thanks, RonD. Very helpful.
 
Hi Eddo Rogue,

Thanks for your thoughts - it is really helpful.

When you say soft wire wheel, do you mean brass? Did you have any worries about scratching the mating surfaces?

How do you have your injectors cleaned? Did you do it yourself or take them somewhere?
I order a wheel kit off ebay that had a variety of them. I started off with brass, but used steel on the stubborn spots. I was concerned about the mating surfaces, so I used low to medium speed on the dremel, and a light touch. Most of it cleaned up with just the abrasive pad. The rough side of a dish sponge will also work with acetone. In the end hit everything with brake cleaner.

Injectors get sent out, there's shops that do em. It's not that expensive either.
 
I am in the middle of this project now and noticed that my valve cover bolts were only about hand tight when I took them off (!). Can I/should I put loctite on them when putting them back on?

Also, I noticed this small wire that connects to the lower intake manifold was exposed. Do you think putting some heat shrink over it will suffice?
 

Attachments

  • IMG_0274.jpg
    IMG_0274.jpg
    204.1 KB · Views: 139
cook, Myself I wouldn't put lock-tight on any bolt in an engine. Valve covers are ok to be tightened down but not tight with force. get a torque ratchet in 3/8 inch drive and apply small pressure to each bolt, not sure off top of head as I don't actually use one for these bolts. (look it up if you are worried) now depends on what type of gaskets used, cork or rubber.

as for the heatshrink question... How are you going to get a piece of heatshrink to work on it? it's not broke, so don't fix it.

cheers
 
Thats just for a sensor, I think coolant temp. if it works, I would leave it alone. Valve cover gaskets loosen up over time. Do not overtighten, you will crush the gasket and leak, you can always cinch em down a little more if need be. I have used both cork and rubber gaskets, either work fine if done right.
 

Sponsored Ad


Sponsored Ad

TRS Events

Member & Vendor Upgrades

For a small yearly donation, you can support this forum and receive a 'Supporting Member' banner, or become a 'Supporting Vendor' and promote your products here. Click the banner to find out how.

Latest posts

Recently Featured

Want to see your truck here? Share your photos and details in the forum.

Ranger Adventure Video

TRS Merchandise

Follow TRS On Instagram

TRS Sponsors


Sponsored Ad


Sponsored Ad


Amazon Deals

Sponsored Ad

Back
Top