- Joined
- Aug 15, 2019
- Messages
- 4,003
- Points
- 601
- City
- Oklahoma
- Vehicle Year
- 1993
- Engine
- 4.0 V6
- Transmission
- Manual

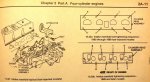
I posted a pic a few hours ago....Is this the one you used? 15-22 ft lb in 2 step sequence.
is the site no longer accepting photos?
I posted a pic a few hours ago....
In the speeding in Texas thread.
You're right, I don't see an option to upload a pic like I would normally from my computer.
@Jim Oaks
Yeah that’s the one I saw but upper plenum is the one that broke ?I wasn't able to post the Haynes diagram but it's basically just a diagonal criss-cross pattern from the center out
Did you find this part? Criss cross would be just going around it like you would the lugs on a wheelYeah that’s the one I saw but upper plenum is the one that broke ?
Well I figured out how to upload finally thanks to Jim but it’s common sense to just do a star pattern to evenly crush the gasket which is what I did but it’s like it was made out of pot metal... super weak stuff ?Did you find this part? Criss cross would be just going around it like you would the lugs on a wheel
Yeah I found a new one off of a different truck for like 30$ and I think that’s cheaper than a new engine if that jb weld gets through lol... anyways thanks for your help and suggestions guys. I’ll be back with a update sometime this week ??It's worth a try, my only question would be can enough be in there after you get it precisely into position. You wouldn't want any excessive amounts inside which might eventually break off and go through the engine, and there couldn't be any excess on top or you couldn't pull it down evenly. That would still leave a spot on the outside on each end of the crack where you could leave some to build it up a bit.
I know that stuff really holds but don't know how it would work in that situation. I also don't recall how it sets up but you should have a small amount of time to use an exacto knife to carve any excess from inside and off the top to smooth it up. Then let it cure for at least a day.
I went back and looked at the torque specs, the fuel rail and upper intake are both 15-22 ft-lb and the throttle body is 12. I'd go the minimums on the intake and TB if you're trying the J-B weld route, and still that'll only buy you some time to find another one
Ok I just finished installing the new one... and it’s still doing the same thing. I have no idea what to do at this stage. Any suggestions????It's worth a try, my only question would be can enough be in there after you get it precisely into position. You wouldn't want any excessive amounts inside which might eventually break off and go through the engine, and there couldn't be any excess on top or you couldn't pull it down evenly. That would still leave a spot on the outside on each end of the crack where you could leave some to build it up a bit.
I know that stuff really holds but don't know how it would work in that situation. I also don't recall how it sets up but you should have a small amount of time to use an exacto knife to carve any excess from inside and off the top to smooth it up. Then let it cure for at least a day.
I went back and looked at the torque specs, the fuel rail and upper intake are both 15-22 ft-lb and the throttle body is 12. I'd go the minimums on the intake and TB if you're trying the J-B weld route, and still that'll only buy you some time to find another one
")