• Welcome Visitor! Please take a few seconds and Register for our forum. Even if you don't want to post, you can still 'Like' and react to posts.

The Green Machine Build


ranger_steve

New Member
Joined
Feb 27, 2011
Messages
71
Reaction score
0
Points
0
Location
From PEI, living in Grande Prairie Alberta
Vehicle Year
1993, 2007
Make / Model
ford
Engine Size
4.0L
Transmission
Automatic
Well today is a snow day so I figured I'd do something productive like start my build thread. A bit of history, I'm a 19 year old electrical apprentice, I like screwing around with wires (duh) and anything mechanical. Both of my grandfathers were ford guys so I got the bug when I was young. One of them was a ford mechanic and also owns a ranger.

I bought "Bessie" in August of 2012 with somewhere around 260 xxx kms, A little high but it was my first rig and at 1800 bucks I was super excited (and broke after I purchased it haha working at a pizza joint for the summers) she now has 298,600 kms. After checking it all out and driving it up the road before buying it, dad and I figured out it needed a radius arm bushing (only to discover it needed the mount too from wearing into the steel). It also wasn't starting 100% so the guy had it checked out and bought a new solenoid for up on the fender well, I installed it when we got home. It was going to need a windshield for safety inspection too. Just before we signed the paperwork the old guy comes out of his shed with a brand new carrier bearing for the rear driveshaft!

Truck info when purchased:
1993 ranger 4x4
4.0L with auto trans
8.8 rear with 3.73LS and drums
dana 35 ttb 3.73 open
Mile marker manual hubs

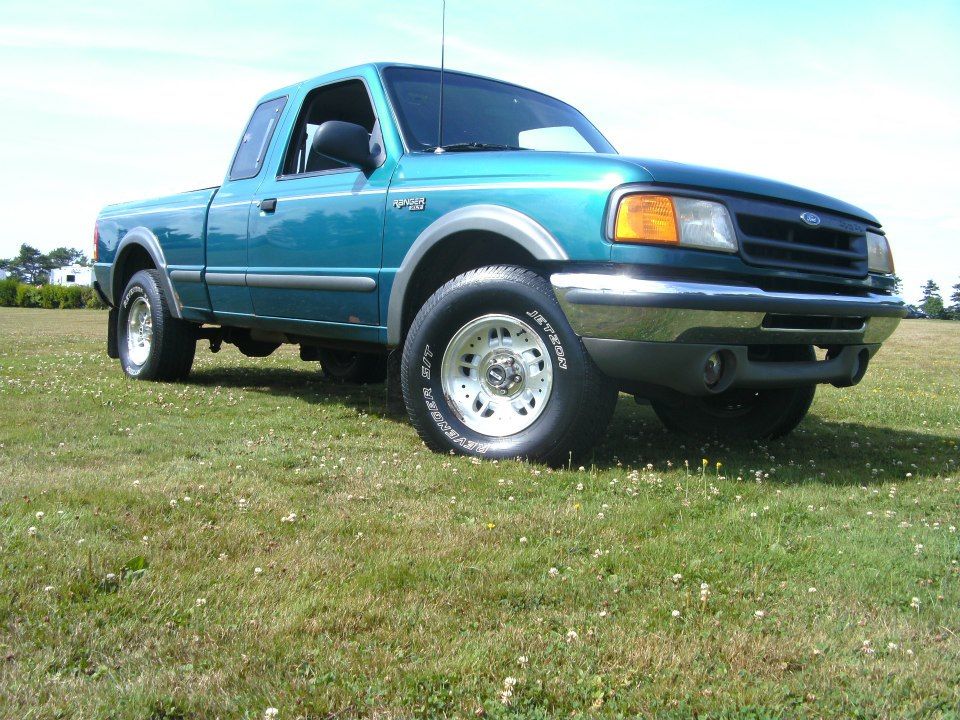
Here she is a few days after I got her home and washed.


Projects Done (stage 1):
Sony deck with ipod dock
Headache rack w/ led signals/reverse and 42" led light bar
toolbox with aux battery/wiring/relays/fuses and isolator solenoid
quick connect booster cables
new body mount bushings and fixed rotten mounts
3" body lift
31" Goodyear Wranglers
Custom rear bumper with shackle mounts
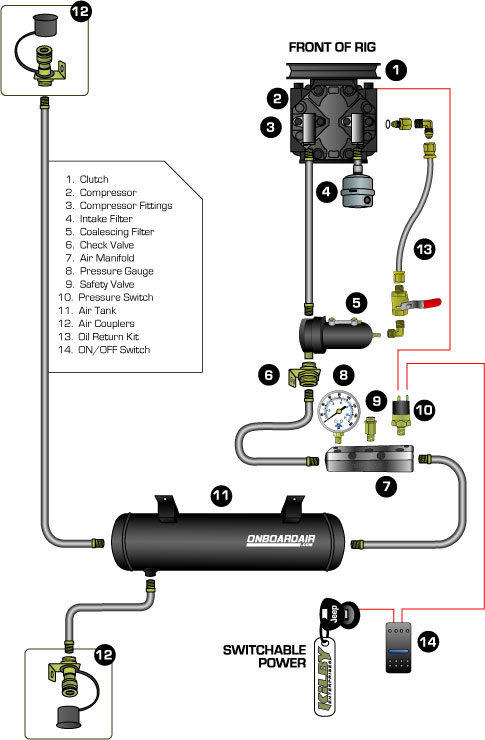
On Board Air from Stock Sanden A/C Compressor, Air tank where spare tire was
Grover dump truck horns
Billet grille with spray tinted large emblem
Switch panel in center console
Thrush welded muffler (was dumped after muffler, now turndown over rear axle)
Replaced rad support
Blue led swap in instrument cluster and dome light
Swapped leaky abs diff cover for chrome plated steel one
Belltech 6400 (on low height until 2" lift on front)

To Do for stage 1.5 (near future):
2" washer coil spacers
33 x 12.5 x 15 cooper all terrains
Replace all u-joints from t-case forward
Weld spider gears in d35
Replace leaky d35 seals
Possibly replace slip joint on front axle shaft
c-clip eliminator
new wheel bearings and balljoints
Install camber bushings
Roll on Box Liner

To do for stage 2 (wayyyy down the road):
Cummins 4bt and zf5 or nv4500 and t-cases to go with whatever trans gets used
EB D44 or Narrow a full width 4.10's or 4.56's
Explorer 8.8 w/ discs and 4.10's or 4.56's
35 or 36" skins on Cragar soft 8 chromies

More pics to post tomorrow. Questions, Comments, tips etc.. feel free to let me know!
 
Last edited:


ranger_steve

New Member
Joined
Feb 27, 2011
Messages
71
Reaction score
0
Points
0
Location
From PEI, living in Grande Prairie Alberta
Vehicle Year
1993, 2007
Make / Model
ford
Engine Size
4.0L
Transmission
Automatic
The first few days that I had the truck home I started transferring my trinkets I had on my grandfathers 98 GMC 1500 2wd that I was driving for 8 months before. I built a box with a fuse panel, relays and remote starter to control all my lights and stuff (http://www.instructables.com/id/Power-Dirstribution-Box/)

here it is in late august after a wash and after I replaced the broken fogs with 100w fogs from princess auto.


First week of college that September we had an orientation day (games, contests and free stuff!) so when that was over my buddy and I decided to try out my 4x4 in a local shale pit where everyone goes to go mudding. Pretty mild as you can see in the pic but I got high centered when we went in, carved my rocker panel on the passenger side and ripped my exhaust off between the cat and y-pipe. She was nice and loud for a couple of weeks!! :icon_twisted:


Some time in October I got one of my other buddies to show me the pit where they take their side by sides and four wheelers, so he did... The spot looked pretty tame until I drove in about 20 feet and sunk up to my axles :annoyed: picture was taken after we got out, should have seen the walls of the carwash after I cleaned her off:icon_rofl:


Then in November I fixed the body mounts, built a new rear crossmember to replace the one just behind the gas tank and got a new windshield to pass safety inspection. Bought a battery disconnect switch on a trip over to Moncton(didn't install that until this year :icon_thumby:)


And I got a few stickers and a Rangerstation Tee for my birthday!


Also picked up a Thrush welded and some pipes with birthday cash


Christmas came and santa left me a nice billet grille and trim pieces!


Heres a pic of my switch panel, I cut out the change holder part of my center console. The safety switch on the left arms the button in the middle for my starter :icon_thumby: the safety switch on the right arms all the small toggles up top so I can kill all them at once.


blah blah blah skip to april and we went mudding again (my phone really likes to pick up the green paint under the mud) in person it was almost all red and dad wouldn't let me wash it in our driveway haha


One of the last days of college in may some of the guys in my class and I went cruising around to beaches and lighthouses. Note the crappy cell phone pic makes it look like the roof and grill are bent.


Got my new tires installed at the end of may


My truck and my grandfathers truck at home after we hauled his 21' fifth wheel out to the campground, both 1993 4.0L autos his is in immaculate condition never winter driven :icon_thumby:
 
Last edited:

ranger_steve

New Member
Joined
Feb 27, 2011
Messages
71
Reaction score
0
Points
0
Location
From PEI, living in Grande Prairie Alberta
Vehicle Year
1993, 2007
Make / Model
ford
Engine Size
4.0L
Transmission
Automatic
Now for the meat n' potatoes...
when I bought the truck the rear bumper was all twisted to hell from god knows what. I think the old guy must have hooked a tree with a trailer he was towing or something like that, the ball was bent away from the truck and the flat parts were bent upwards. So last summer I started making a heavy duty rear bumper!
I had drawn up a couple designs in school a couple months before (when I had no money haha) I knew I wanted a built in receiver tube, shackle mounts, reverse lights and a 7-pin connector (more aesthetically pleasing than a 4 pin dangling in the breeze).

I started with a 2x6 piece of 3/16 tube I think it was 55 ish inches long. Measured to center and marked it, cut out a square hole to fit the receiver tube in so that the hole for the pin would be hidden behind the bumper but still easily accessible. Then I measured, marked and mocked it up to the frame rails so I knew where the shackle mounts would be so I could cut out holes for my lights. If I were to build it over again I would use oval led lights because they fill the holes with a gasket. I also angled the ends to somewhat match the contour of the box and drilled holes to mount my license plate and led light.


I didn't really do much in the summer after that other than Hook up my On board air and truck horns. Ill post pics and explain that in the next post probably along with my core support replacement pics.
 
Last edited:

bigtruck94

New Member
Joined
Mar 23, 2013
Messages
346
Reaction score
2
Points
0
Location
Nebraska
Vehicle Year
1994, 2002
Make / Model
Ford
Engine Size
4.0l v6, 5.4l triton
Transmission
Manual
Hey looks like my truck! I like it! Welcome!
 

ranger_steve

New Member
Joined
Feb 27, 2011
Messages
71
Reaction score
0
Points
0
Location
From PEI, living in Grande Prairie Alberta
Vehicle Year
1993, 2007
Make / Model
ford
Engine Size
4.0L
Transmission
Automatic
yea they look similar! Thanks :icon_thumby:

Ok, for my onboard air I did some reading on lots of jeep forums and a couple on here and it took me a while to figure everything out and get it all 100%.
Parts:
manifold
pressure gauge
pressure switch (on at 90psi off at 120 for me)
safety/pressure release valve
check valve
12v solenoid valve
air oiler
air filter
misc. fittings depending on your install

I followed this diagram from a jeep forum where they used a York 210 I believe.


The intake side of the stock sanden compressor on the 4L is the hose going under the air intake over the evap canister, I sliced the hose right after the metal crimp thing close to the canister and removed the canister. The pressure side goes through some little canister over by the battery then through the condenser/cooler, I decided to use the cooler to my advantage and leave all the high pressure hose intact.

From my air filter box I drilled a hole and used a nipple to connect the oiler, then from the other side of the oiler a 6" 3/8 npt nipple fits perfectly inside the hose.


from the output side of the condenser I used 3/8 air hose to a barb into the filter into the check valve into a tee. On one side of the tee was the manifold and on the other a 1/2 pex connector (they fit nicely into 3/8 hose and seal great). The hose coming off the pex connector goes down the frame rail to where my spare tire used to be and then into a tee on the tank, out the other side of the tee it goes to the quick connect on my rear bumper. Everything else gets mounted off of the 1/4 npt holes in the manifold. I used the miniature manifold that came on the air pig I used for my tank to plug one end of the manifold, it has a built in safety valve so that's why you don't see one in the pics.

Output pipe of condenser cut off with hose connected (2 hose clamps because the end isn't flared)


Manifold mounted with everything connected, the manifold off of my air pig is hidden on the left. Oh and the shrader valve was only put on there because I had the tank and everything hooked up but I wasn't ready to sacrifice my A/C yet.


For the simplest wiring of the pressure switch or if you want to use the ac button on the dash then all you have to do is cut the wires that were going to the sensor on top of the evap canister and extend them to wherever your pressure switch is and bam! It should fire up!

Heres a clip of after I got it roughly hooked up the first time

http://www.youtube.com/watch?v=bGgVK-cOqms
 
Last edited:

cvar

Member
Joined
Apr 27, 2012
Messages
588
Reaction score
19
Points
18
Vehicle Year
1997
Make / Model
Mazda
Engine Size
4.0L V6
Transmission
Automatic
Nice rear bumper fab. I like it. On-board air seems very handy. You don't need any A/C, up there? Down south, I'd be tempted to install a 2nd A/C compressor.
 

escort_gts

02/2012 04/2013 04/2014 OTOTM Winner
OTOTM Winner
Solid Axle Swap
Joined
Oct 27, 2007
Messages
3,387
Reaction score
16
Points
38
Location
Fort Wayne, IN
Vehicle Year
1993, 2001
Make / Model
Ford
Engine Size
4.0, 5.0
Transmission
Manual
Your on board air looks very similar to my setup.

Sent from my NOTE 3 using Tapatalk
 

racsan

Well-Known Member
Supporting Member
TRS 20th Anniversary
TRS Event Participant
Joined
Aug 17, 2007
Messages
4,975
Reaction score
4,450
Points
113
Location
central ohio
Vehicle Year
2009
Make / Model
ford/escape
Engine Type
2.5 (4 Cylinder)
Engine Size
2.5/151 I-4
Transmission
Automatic
2WD / 4WD
2WD
Tire Size
235/70/16
My credo
the grey-t escape
nice! a twin to my truck, and i even call mine the same name! lol. love your rear bumper, i need to do something about mine, its a daily driver and all these salty winters are catching up with it. welcome to TRS!
 

86MUDRCJ

Active Member
Joined
Nov 29, 2009
Messages
1,377
Reaction score
8
Points
38
Location
Sheridan, CA
Vehicle Year
1986
Make / Model
Ford
Engine Size
2.9
Transmission
Manual
I wanna see more of the headache rack
 

ranger_steve

New Member
Joined
Feb 27, 2011
Messages
71
Reaction score
0
Points
0
Location
From PEI, living in Grande Prairie Alberta
Vehicle Year
1993, 2007
Make / Model
ford
Engine Size
4.0L
Transmission
Automatic
Nice rear bumper fab. I like it. On-board air seems very handy. You don't need any A/C, up there? Down south, I'd be tempted to install a 2nd A/C compressor.
Thanks! The only part I would change would be the reverse lights to leds because I don't have lights with a gasket to cover the ugly holes. The OBA has come in handy quite a few times, especially for the horns haha I thought about doing a second compressor but I'm more of a "windows down to hear my exhaust" kind of guy. A lot of people that do a second compressor that I've seen use the York brand just because of their oil sump.

Your on board air looks very similar to my setup.

Sent from my NOTE 3 using Tapatalk
Now that you mentioned it, it was your write up that I followed actually! I couldn't remember where I got most of my info. Mind if I edit in a link to the write up?

nice! a twin to my truck, and i even call mine the same name! lol. love your rear bumper, i need to do something about mine, its a daily driver and all these salty winters are catching up with it. welcome to TRS!
Thank you! Mine has a fair bit of cancer from the salt up here too even though the guy I bought it from had it undercoated every second year.

I wanna see more of the headache rack
Pics will be up soon, I just finished getting it painted and installed last night at 11:30 before we got nailed with a snowstorm today. Damn thing weighs around 65 pounds too.
 

ranger_steve

New Member
Joined
Feb 27, 2011
Messages
71
Reaction score
0
Points
0
Location
From PEI, living in Grande Prairie Alberta
Vehicle Year
1993, 2007
Make / Model
ford
Engine Size
4.0L
Transmission
Automatic
Sorry in advance for all the crappy and blurry cell phone pics, I don't have the steadiest hands to say the least.

The next big thing I did to it was the rad support and body lift. After I fixed the body mounts and got new polyurethane pucks you could still see it had a droop on the driver side, thought about trying to patch the rad support but I figured I might as well do it right once and not have to do it again for a few years. Ordered my body lift, adjustable camber bushings, a chrome diff cover and belltech 6400's!


I started with the diff cover. I bought the chrome one because my old one was leaking, I took it off and cleaned it only to find out it was the plastic one :annoyed: anyway, put new rtv on it and fresh gear oil inside. That lasted about 3 days before it started leaking again I assume it was cracked somewhere. Chrome one has been on for 4 months and so far so good.


You can see the chrome cover in the pic


Redid my exhaust to sit up closer to the box underneath. Its a thrush welded, sounded decent when I had it dumped and it was pretty loud too. It was hanging down the first time I did it and I didn't want it to look goofy with the BL. I read somewhere on the forum here that seems to apply quite often to me, someone said "there's never enough time to do it right the first time, but there's always enough time to do it over again."


Here's a few reasons for fixing the rad support...


This is probably why the driver side was resting on the front bumper... fell out as soon as I undid the bolt.


Found this guy jammed in my rad too


Before:


torn out:


After, welded up and painted welds:


Once that part was done I just followed the instructions for the BL, install was pretty smooth except for fixing anything that we found needed repairs...
needless to say I HATE RUSTY FLOORS :annoyed:


Then after fixing the floor was done it got soaked in rocker guard inside and undercoating underneath. I had a couple buddies come over to help lift the box off. Only had one little surprise on the frame. The crossmember was the one I had to replace last year, we just couldn't get the old one out at the time without pulling the box.


Ground an x in the rivet heads (what was left of them anyway) and hit them with the air chisel. Then I cut this guy out a little more to get thicker metal and patched it up.
 
Last edited:

ranger_steve

New Member
Joined
Feb 27, 2011
Messages
71
Reaction score
0
Points
0
Location
From PEI, living in Grande Prairie Alberta
Vehicle Year
1993, 2007
Make / Model
ford
Engine Size
4.0L
Transmission
Automatic
Now for the rear end! A couple of friends and I lifted the box off after I unbolted it. I removed the crossmember and patched a spot on the frame (previous post). The box needed a little TLC as well. if you stood in the box right behind the wheel wells it was almost like a trampoline. There was also this H sliced into the bed, dad and I think the fuel pump or sending unit was replaced without pulling the box. You can see the H welded back up in the second pic.

The rear box crossmember was rotted so bad it was missing about 3 inches in the middle, I forgot to take a pic of it after we got it off. If you have to replace one, a spot weld cutter and air chisel come in extremely handy. We had the old one off in about 10 minutes.
View attachment 13616

Dad got a new one bent up out of heavier gauge steel. First time they made it it was 3/8" out of square on one end, somebody wasn't paying attention. Got the new one welded on and soaked with undercoating.
View attachment 13617

Installed my belltech shackles on the lower setting, put the box back on and started installing my deezee toolbox.
View attachment 13618

I got the toolbox on a whim one day cause I wanted somewhere to put my box of relays and fuses and eventually a solenoid and second battery for a dual battery setup. We take the battery out of our camper in the winter so I "borrowed" one of them until the summer.
I Bought a couple feet of 1/2" copper oil line to make my own terminals for about 3 bucks and a 25' chunk of 1/0 welding cable that cost about 90 bucks.
View attachment 13619
View attachment 13620

The purple wire in the pics is cat6 Ethernet wire inside an old air hose for mechanical protection. It goes between the switch panel in my center console and the coil of the relays, the relay coils only draw maybe a few hundred miliamps so the little 24 or 26 gauge wires are enough. The other red and yellow wires are for my backup lights and light bar above the roof. Also I still need to get a solenoid to isolate the second battery, I think I'm going to go with a Trombetta Bear DC contactor. They're rated at like 250 amps continuous and 600 surge!! More than enough for anything I'll need.
Backrack is up next!
 

ranger_steve

New Member
Joined
Feb 27, 2011
Messages
71
Reaction score
0
Points
0
Location
From PEI, living in Grande Prairie Alberta
Vehicle Year
1993, 2007
Make / Model
ford
Engine Size
4.0L
Transmission
Automatic
The idea of for my new(est) headache rack came about when I discovered LED light bars online. I started sketching out a couple designs in class, I knew I wanted led stops, turns and reverse lights on the same angle as the side pipes and something to protect the back window a bit. A spider web came to mind for a bit of protection and personal touch.
Here's an early sketch that I just grabbed from under my seat:
View attachment 13658

I started off by selling my old rack when I was pulling the truck apart for body lift install, got 80 bucks for it. Then at Christmas I got another 200 bucks towards it. I bought 2 amber oval led lights, 2 clear red oval led lights and 2 clear white reverse lights all with gaskets and 3 pin harnesses. Cost about 100 dollars, I also picked up a can of vht nightshades to tint the stops and turns with. They turned out pretty nice with 2 coats of nightshades and 3 coats of clear. Here they are after I plasma cut the plates to mount them:
View attachment 13662

The rack is made of 1.5" x 1/8" wall square tube and 1/8" plate for the lights. I picked up the first chunk of metals for around 70 bucks and rented a metal chop saw one Saturday, had to return to town again to get a new blade. Long story short they refunded my rental because I had to go to their supplier to get a blade and only charged my 13 bucks for the blade for a half a day rental! Sweet deal, normally about 40 bucks for a half day!
Mocked up before cutting:
View attachment 13659

Angles cut and laid out:
View attachment 13660

Next I welded all the seams to make the basic shape, I wasn't sure about the top nubs yet and if you read further I ended up changing them. Also, you can see the plates for the lights marked and ready to be plasma cut :icon_welder:
View attachment 13661

You can see the little remote in most of my pics too, I'm 10x more productive when my tunes are on :icon_thumby:

Close up of one of the light plates before cutting. In order to make these half decently round I had to cut a little arc out of 1/4" plywood on the bandsaw. Alternatively, you could take them to a metal shop and have them cut them with a plasma/laser table or whatever. You could probably get away with a bi-metal hole saw and a jigsaw too.
View attachment 13663

and after with lights in:
View attachment 13662

Welded the plates in:
View attachment 13667

Then I tacked the back plates on, they had to be space out another 3/8" or so to make room for the reverse lights. They are way thicker than the stops or turns for some stupid reason. REMEMBER TO DRILL HOLES IN THE PIPES TO RUN YOUR WIRES THROUGH BEFORE YOU WELD THE PLATES ON! I was lucky the head of the plasma cutter still fit between the plates to do so.
View attachment 13665

Hole drilled big enough for grommet to fit the wire to the led bar through:
View attachment 13666
 

ranger_steve

New Member
Joined
Feb 27, 2011
Messages
71
Reaction score
0
Points
0
Location
From PEI, living in Grande Prairie Alberta
Vehicle Year
1993, 2007
Make / Model
ford
Engine Size
4.0L
Transmission
Automatic
Then came the grinding and bodywork stage for this part :bawling: I'm no bodyman but it did end up turning out pretty well. I was really impatient waiting for progress so I primed the sides after the filling.
View attachment 13668

View attachment 13669

I decided to add a little "shelf" type thing on each side for future mounting locations of dual CB whips! You can see them in the pic with the first row of webs in place.

After that I picked up a 20' piece of rebar and a wire wheel for the grinder to clean it off and started on the straight parts of the web, theyre at 30,60 and 90 degrees.
View attachment 13670

Now on to the fun part, bending rebar! I found one thing online on how to make a garden archway out of rebar and they used a 1/2" electrical conduit bender. Im an electrical apprentice so I asked my boss to borrow his bender.. no go, he thought it would damage it so off I go to home depot to rent one. They only SELL half inch benders and at 65 bucks I wasn't about to buy one just for this. The only size the rental shop had was a one inch emt bender. Turns out it makes the perfect radius I was looking for, about 8 to 10 inch radius. And by if you ever need to bend rebar, this works very well and it makes about the same wear and tear on the bender as conduit does.

The process I used was to do one 90 degree bend, cut it off with the grinder and repeat until I had enough pieces to do all the inner web parts. Once that was done I wire wheeled all the 90's and then mocked them in place, made a mark then sliced them up and tacked them in place.
Heres the first row, they turned out way better than I had anticipated:
View attachment 13671

I did the exact same thing for the second "layer" of web pieces
View attachment 13674

The outer parts under the lights looked a little empty too so I added a third row down there too.
View attachment 13675

I forgot to take pictures of the brackets but, I had to notch an inch from one half of each angle iron to get the rack close enough to the rear window. If you look at the box sides the angle iron sits flat on top of the box and the 90 degree bend goes down into the box like a mirrored L flipped upside down on the passenger side, on the driver side just an L flipped upside down looking from the back of the truck. They also have a 1/4" thick gusset coming from the rack about 3" high and 3" long on the bracket to add strength.

Dad and I built a little spray booth by hanging plastic drop sheets from the garage door rails and boxing it in. I shot it with duplicolor primer, ran out of the grey stuff part way through too :annoyed:
View attachment 13676


I was thinking I would spray just the web with rocker guard and then white paint over it, so I masked everything else off.
View attachment 13677

Then changed plans and just went with black rocker guard for the whole thing:
View attachment 13678

Finally installed on March 25th 2014, started it a couple weeks after Christmas:
View attachment 13679

View attachment 13681

The wiring diagram is pretty simple, I got a 6 pin connector from napa and ran a #12 awg separately as a ground. I tapped into the frame harness just by the gas tank when I had the box off doing the BL to get all my signal/running/brake and reverse wires. The ground connects from the frame right by the gas tank to a screw inside the light "housing" on the driver side of the rack and the drivers side lights ground to there as well, the passenger side has a screw in the mirrored location of the first one for the light bar and passenger side lights to ground to. They just use the rack to connect to the other ground.
View attachment 13680
 

RangerDaddy

New Member
Joined
Aug 16, 2012
Messages
5
Reaction score
0
Points
0
Transmission
Automatic
Ranger build ....fantastic job

Great job on the build so far. I guess it is time to confess that I am his Dad...yes....the same one that refused several "great deals" that Steve would show me online. I would say no to even after going to look at many of them and really thinking he or I would not have the skills to fix them. He has proved me wrong many times with his know how and mechanical ability and lack of fear of tackling anything. I will have to admit I have learned a lot while holding things for him or just adding that extra pair of hands to assist in some way. I can actually say it makes me very proud of what he as accomplished so far on the truck and that he continues to have future ideas for the truck. I am sure my garage will eventually become empty when he and his truck move out and I will wish for the day that the old truck and him were still in there so I could watch him work on it. Of course as a father every now and then I would have to add some ...stupid old man...comments every now and then. Thanks for letting me help on occasion with the build Steve....You have done far more than I ever would have even attempted so be proud of what you have accomplished not only on the truck but in other things you are doing as well.
Dad
 

Sponsored Ad


Sponsored Ad

Staff online

Member & Vendor Upgrades

For a small yearly donation, you can support this forum and receive a 'Supporting Member' banner, or become a 'Supporting Vendor' and promote your products here. Click the banner to find out how.

Truck of The Month


Shran
April Truck of The Month

Recently Featured

Want to see your truck here? Share your photos and details in the forum.

Follow TRS On Instagram

TRS Events

25th Anniversary Sponsors

Check Out The TRS Store


Sponsored Ad


Sponsored Ad

Sponsored Ad


Amazon Deals

Top