• Welcome Visitor! Please take a few seconds and Register for our forum. Even if you don't want to post, you can still 'Like' and react to posts.

Rebuilding the First-Gen Swingaway Mirrors


kishy

Active Member
Joined
Jan 9, 2018
Messages
148
Reaction score
58
Points
28
Location
ON, Canada
Vehicle Year
1985
Make / Model
Ranger, RCLB
Engine Size
95 2.3 EFI Swap
Transmission
Manual
2WD / 4WD
2WD
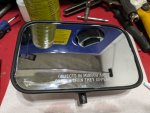
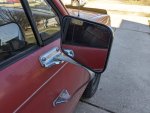
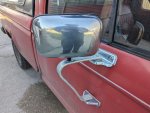
When I bought my '85 in 2015, it had small base model mirrors. After a short time, I found a Bronco II in a junkyard with the big tow mirrors, which the sales brochure refers to as "Bright Western Swingaway Mirrors", and I retrofitted them onto my truck. They were great for several years, but in late 2021, something broke in the right side mirror and it wouldn't hold its position anymore. Fixing this, or even identifying what actually broke, was complicated by the fact that I had previously re-glued the glass into the mirror, and there was no way it was coming free without breaking.

Dorman makes a mirror that is designed to be a replacement for these, part 955180. I put one of these on my truck but I quickly grew to hate it for a couple key reasons:
  • The Dorman mirror is not convex, which is annoying. However, something even worse than that is that it seems to be very very slightly concave and seems to magnify as well, which gives an extremely narrow field of view.
  • The Dorman mirror picks up vehicle vibrations which the stock mirror did not. The mirror glass vibrates at a high frequency when driving, causing headlights in it to have a dazzling effect and making it nearly impossible to get a good sense of what you're looking at in it.
In other words, the Dorman mirror is basically useless as an automotive mirror.

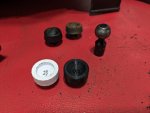
Since that point, I've been hunting for a good convex right-side mirror in junkyards. In February, I was able to collect the pieces I would need for this project:
  • One right-side convex mirror, but with a broken pivot mechanism.
  • In the yard, I disassembled a left-side mirror with a seemingly good pivot mechanism, and removed the pivot mechanism.
There seem to be a few different ways that these mirrors fail:
  • The cage which holds the spring rusts apart and the spring doesn't maintain tension on the ball stud anymore.
  • The entire pivot mechanism rusts off of its fasteners, and the mirror assembly rattles loosely with the pivot mechanism still maintaining tension but no longer holding the mirror.
  • The plastic cup/socket for the ball stud cracks and breaks apart, causing there to be no spring tension on the ball stud.

Last night, I decided to move forward with the mirror surgery. After all, I'm tossing around ideas for replacing the Ranger as it rusts away beneath me, so why not make it better first? /s.

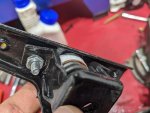
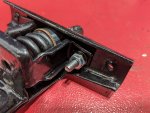
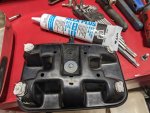
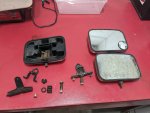
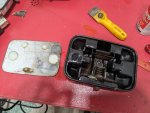
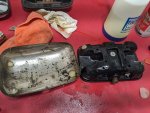
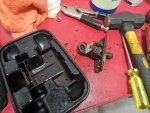
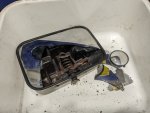
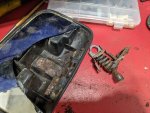
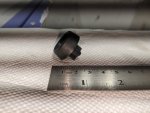
Here's what I started with:
PXL_20231228_030537728.jpg

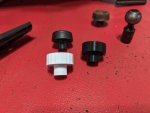
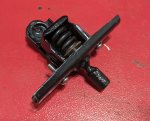
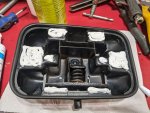
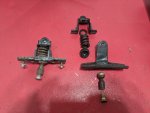
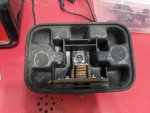
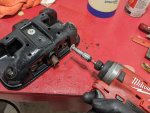
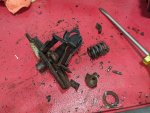
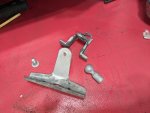
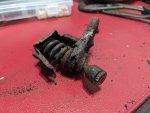
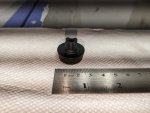
Detail view of the pivot assemblies:
PXL_20231228_030656802.jpg

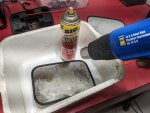
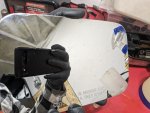
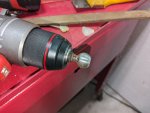
Separating the glass from the mirror body. I evenly applied heat to the glass, then used an assortment of scraping and prying tools to firmly but very gradually lift the glass out of the body.
PXL_20231228_031054212.jpg PXL_20231228_032244278.jpg PXL_20231228_031139201.jpg PXL_20231228_032557945.jpg

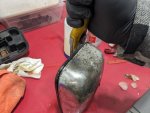
Next, we separate the aluminum back cover from the plastic body. This covers fasteners we need to get access to. It is held on with the same type of adhesive which is a relatively flexible silicone. I found it seemed to work best starting on one of the short sides.
PXL_20231228_032805305.jpg PXL_20231228_032823388.jpg

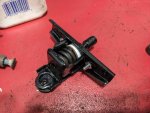
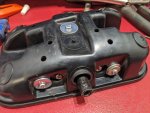
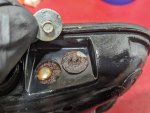
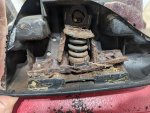
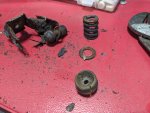
Once the back cover is off, we can see the three small bolts that hold the pivot mechanism inside the housing.
PXL_20231228_033118723.jpg PXL_20231228_033146790.jpg PXL_20231228_034148298.jpg PXL_20231228_034235860.jpg

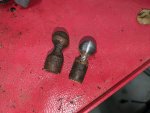
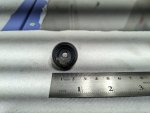
Taking apart and inspecting the pivot mechanism. Compared two of my available pivot balls, selected the one that seemed less rusted to garbage. Sanded it down to clean metal.
PXL_20231228_035503925.jpg PXL_20231228_040346834.jpg PXL_20231228_035748684.jpg

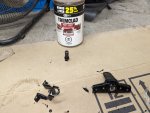
Sandblasted the pieces of the pivot.
PXL_20231229_004045018.jpg

Painted with an oil-based rust paint.
PXL_20231229_014801941.jpg

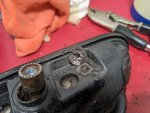
Upon closer inspection, I found that the 'socket' for the pivot ball stud has a crack in it. This is one of the failure points I've seen in the few mirrors I've looked at now, but this one doesn't seem too far gone to be worth trying to save.
I squirted some super glue inside the crack as well as lining the inside of the socket/cup, and will try to smooth it out once I see how it dries.

PXL_20231229_002647709.jpg

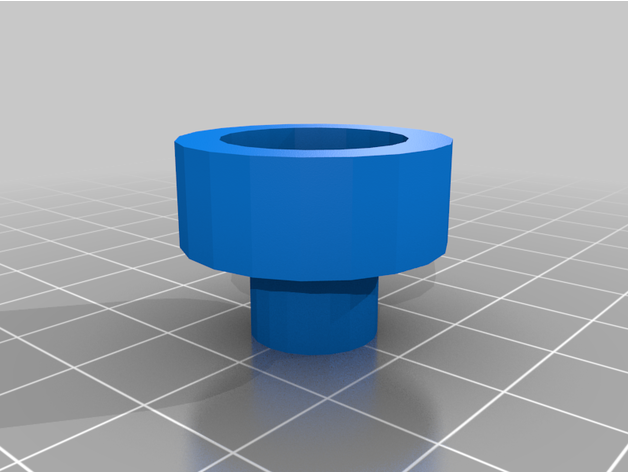
Status as of tonight: paint and glue are drying. If the glue looks like it'll hold up, I should be able to assemble the mirror when I get a few minutes, maybe this weekend. If the glue doesn't look like it'll work, I'll need to look for some sort of piece that can replace it, which might be tricky. It would be a pretty 3D-printable part for someone with the ability to model the part.


85_Ranger4x4

Forum Staff Member
TRS Event Staff
TRS Forum Moderator
Article Contributor
V8 Engine Swap
OTOTM Winner
TRS Banner 2010-2011
TRS 20th Anniversary
VAGABOND
TRS Event Participant
Joined
Aug 7, 2007
Messages
32,348
Reaction score
17,848
Points
113
Location
SW Iowa
Vehicle Year
1985
Make / Model
Ford
Engine Type
V8
Engine Size
5.0
Transmission
Manual
I very strongly suggest once you get it finished, tweak your format and submit this for a tech article.


kishy

Active Member
Joined
Jan 9, 2018
Messages
148
Reaction score
58
Points
28
Location
ON, Canada
Vehicle Year
1985
Make / Model
Ranger, RCLB
Engine Size
95 2.3 EFI Swap
Transmission
Manual
2WD / 4WD
2WD
Agreed, the final result will hopefully make a decent article...if I'm successful.

I had a few minutes tonight to go out to the garage. I threw a thin second coat of paint on the parts, which should be plenty, because they now have more paint on them than my entire truck.

I took the opportunity to study the mirror I took off my truck to identify what exactly failed about it. As I noted further up:
Fixing this, or even identifying what actually broke, was complicated by the fact that I had previously re-glued the glass into the mirror, and there was no way it was coming free without breaking.
PXL_20231230_054342161.jpg

Yes, I'd say so.

PXL_20231230_054353900.jpg PXL_20231230_054428770.jpg PXL_20231230_054448627.jpg PXL_20231230_054554362.jpg

Impressive. I managed to hit all 3 of the failures I described in the first post. The cage rusted apart, and the pivot rusted off of the mirror body, and the plastic ball socket was getting ready to let go as well.

At which point I turned my attention back to the best-condition ball socket, which is the one I patched with superglue.

PXL_20231230_054743891.jpg PXL_20231230_054804824.jpg PXL_20231230_054818352.jpg
Forgive the lighting weirdness, my phone is upset about using the flash in my garage lighting.

This piece will likely break apart if I return it to service. Not immediately, but maybe not too far down the road. It would be wise to figure out a possible replacement for it.

Since the piece has details which are not really used in this design, I suspect it is a piece of something else that was repurposed for use inside the mirror. Specifically, the detail on the bottom side with the cross shape which pokes into the centre of the spring seems to have molded detail that is unnecessary. If by chance you recognize this piece from some other thing that you've taken apart in your life, I'd appreciate any suggestions as to what other applications it may have.

Probably putting the brakes on mirror assembly until after I explore this piece a little more. I'll ask around in my friend circle about 3D modelling and printing a replacement, as well.
 

Josh B

Well-Known Member
Supporting Member
TRS 20th Anniversary
Joined
Aug 15, 2019
Messages
4,005
Reaction score
1,986
Points
113
Location
Oklahoma
Vehicle Year
1993
Make / Model
Ford Ranger
Engine Type
4.0 V6
Transmission
Manual
2WD / 4WD
4WD
I suggest including a photo of it on the truck :)
 

kishy

Active Member
Joined
Jan 9, 2018
Messages
148
Reaction score
58
Points
28
Location
ON, Canada
Vehicle Year
1985
Make / Model
Ranger, RCLB
Engine Size
95 2.3 EFI Swap
Transmission
Manual
2WD / 4WD
2WD
Happy New Year!

I went to Princess Auto, which is a Canadian store that's largely like a Harbor Freight in the US, except they also have expanded sections for surplus items (basically a liquidation store), as well as specialty stuff for custom hydraulics and farms. I showed the plastic piece to one of the employees I know has been there for several years, and asked if it looked like a piece of something, or similar to any item the store has ever sold to his knowledge. The answer was no, and he suggested 3D printing was probably the way to go.

I talked to a couple friends knowledgeable with 3D printing who said it would be a really easy model and a really quick print. Cool.
Briefly taught myself Tinkercad and came up with a model that seemed like it might work.
Sent that, along with the actual piece to my friend with a decent printer. He then made his own model which has some differences, printed both mine and his, and handed them back to me.
Results are looking positive.

Version A - the one I made. It almost works too well and locks the pivot pretty firmly in place.
Version B - the one my friend made. It seems to work very well and is the one I'm going to use when I reassemble the mirror.
Bear in mind that the mirror frame/body is plastic, so if this is too stiff, you could crack the mirror trying to adjust it.
You can download either one, or both, from In the photos below, version A has been printed in white and version B has been printed in black.

PXL_20240102_023651184.jpg PXL_20240102_023703480.MP.jpg PXL_20240102_031616424.jpg PXL_20240102_031626439.jpg

I just need to find some hardware that isn't made of grade 4 (about as tough as cheese), and then I can slap this back together to properly evaluate if I've actually been successful.
 

kishy

Active Member
Joined
Jan 9, 2018
Messages
148
Reaction score
58
Points
28
Location
ON, Canada
Vehicle Year
1985
Make / Model
Ranger, RCLB
Engine Size
95 2.3 EFI Swap
Transmission
Manual
2WD / 4WD
2WD
Lost a month due to some unpleasantly cold weather and a garage heater that decided to stop working.

So where were we...right, hardware that isn't made of cheese.
After pulling a bunch of hair out trying to figure out why I couldn't figure out what size and thread the bolts are which attach the pivot assembly to the plastic mirror body, I finally found the answer. They're M3. Honestly wasn't expecting to find metric in this assembly, but it is.

I thoroughly cleaned the plastic body for the mirror, the stainless outer cap/cover, and the glass. Didn't opt for the dishwasher but washed them like dishes in the sink.

I applied sil-glyde caliper slide grease to the 3D-printed ball socket, assembled it with the thinnest of the washers I had from the various disassembled mirrors (for lowest spring tension), and I used stainless 10-32 machine screws, double-nutted, to hold the spring cage to the bottom part of the pivot assembly. I used the only M3 screws I could get at Home Depot (mystery grade plated steel) to attach the pivot assembly to the plastic body. Fasteners inside the mirror all received medium-strength threadlocker. I then mounted it on the truck and tested how firmly it holds its position while remaining adjustable, and found it's about perfect. Took it back off to continue reassembly.

PXL_20240204_021551680.jpg PXL_20240204_021600597.jpg PXL_20240204_023023224.jpg

I used the cheapest general purpose silicone-containing caulk I could find, again at Home Depot, to glue the stainless cap back onto the body. This is the same method the factory used originally, but they used some sort of clear silicone. I'm hoping what I picked is close enough.

PXL_20240204_025005850.jpg PXL_20240204_025835295.jpg PXL_20240204_030024796.jpg

Anyway, got that glued on, then did the same with the mirror glass. I let it cure overnight, then when I revisited it, I gently pried at the glass and verified it seems stuck in place pretty well. I then ran a very small bead around the top and sides (for more adhesion and also to reduce moisture entry), leaving the bottom open for moisture drainage. Mounted it on the truck and went for a drive. Seems promising. And I can't tell you how great it is to have 3 stable, non-vibrating lanes in my passenger side mirror again vs the Dorman mirror that gives less than one jittering so much you can't even see it.

PXL_20240204_190553774.jpgPXL_20240204_190610891.jpg

I'm going to watch it carefully for any signs that my choice of caulk is not holding up, and once I have a good sense of that, I'll look at putting this in an article.
 
Last edited:

alwaysFlOoReD

Forum Staff Member
TRS Forum Moderator
TRS Banner 2012-2015
TRS 20th Anniversary
Joined
Apr 13, 2009
Messages
13,955
Reaction score
5,096
Points
113
Location
Calgary, Canada
Vehicle Year
'91, '80, '06
Make / Model
Ford, GMC,Dodge
Engine Size
4.0,4.0,5.7
Transmission
Manual
2WD / 4WD
4WD
FYI; 100% silicone won't adhere permanently to cured silicone. If the caulk you used has silicone added, then its probably fine.
 

kishy

Active Member
Joined
Jan 9, 2018
Messages
148
Reaction score
58
Points
28
Location
ON, Canada
Vehicle Year
1985
Make / Model
Ranger, RCLB
Engine Size
95 2.3 EFI Swap
Transmission
Manual
2WD / 4WD
2WD
FYI; 100% silicone won't adhere permanently to cured silicone. If the caulk you used has silicone added, then its probably fine.
Thanks. I very thoroughly removed the old stuff, so my new stuff (which is "Acrylic Latex Caulk plus Silicone") was directly attaching stainless to plastic, and glass to plastic. The second bead I mentioned was basically just attaching the outer edge of the glass to the inner edge of the plastic, not trying to add on to the dried caulk, so I think it should be fine in that sense.

Just a question of if this product will stay attached through weather changes and vibration. If the glass falls out, it isn't the most common mirror to find another one of at this point.
 

Sponsored Ad


Sponsored Ad

Staff online

Members online

Member & Vendor Upgrades

For a small yearly donation, you can support this forum and receive a 'Supporting Member' banner, or become a 'Supporting Vendor' and promote your products here. Click the banner to find out how.

Latest posts

Truck of The Month


Shran
April Truck of The Month

Recently Featured

Want to see your truck here? Share your photos and details in the forum.

Follow TRS On Instagram

TRS Events

25th Anniversary Sponsors

Check Out The TRS Store


Sponsored Ad


Sponsored Ad

Sponsored Ad


Amazon Deals

Top