
Introduction
This article explains how to use zip-ties to get rid of the slack in a stretched-out throttle cable.
Stretched Throttle Cable
Over time, the throttle cable stretches and the housing seats more into its ferrules, thus, adding play to the gas pedal. You never feel this because:
a) it happens so slowly and
b) the gas pedal drops down more so there’s no “free” period (where you push on the pedal and nothing happens) while you’re pressing on the gas.
This is an easy fix, and it’s free. All you need is a few zip-ties and 10 minutes.
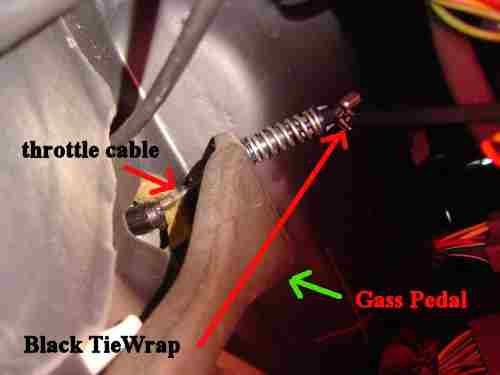
Crawl under your dash and find the throttle cable. There’s two of them under there, one is the right one, the other one I have no idea what it does, but don’t zip tie it. What you want to do is pull the gas pedal off the floor and wrap as many zip ties as you can fit around the excess throttle cable sticking out. I fit three around mine and the difference is huge. Once you’ve done this, your truck can fully achieve a wide opened throttle. My friend Tom did this and claimed his truck down shifts smother now. Whether or not it helps shifting is up to you. I don’t know. But you will get better response at the pedal.
Stretched Kickdown Cable
These comments were added by ‘oldmantruck’ and pertain also to the transmissions kickdown cable:
(Vehicle – 1994 4.0 Automatic Ranger)
“I don’t know who else this may apply to, but hopefully it helps someone. I’m pretty sure the newer trucks control the kickdown electronically, but for the older one’s it’s still a cable
If your truck is like mine, The throttle cable and kickdown cable are too long for the truck (or stretched over time when the first owner had it, I’m not sure which) This gave me a dead spot in the throttle as well as no way to get to fully open and completely prevented the kick down cable from working. After nearly getting killed when the truck didn’t kick down when I was passing a tractor, I decided something needed to be done.
Fortunately, the fix is easy. On the top of the Gas petal assembly where the two cables connect, (the one on the left is the throttle and on the right is the kick down,) just start installing zip ties to take up the slack. Zip it right around the cable and then slide up against the metal ferrule on the end of the cable. each tie should take out about 1/4 ” of slack. On my truck, I needed one tie on the throttle and two on the kickdown to get things working like they should. Additionally, I added a third to the kick down to make the transmission kick down a little sooner which seems to work well for me.
The best part is this is a cheap fix.”
Contributors
This information was submitted by TRS forum members ‘Destroyer’ and ‘oldmantruck’.
About The Author
Jim Oaks is the founder of TheRangerStation.com, the longest-running Ford Ranger resource online since 1999. With over 25 years of hands-on experience building and modifying Ford Rangers — including magazine-featured builds like Project Transformer — Jim has become one of the most trusted authorities in the Ford Ranger off-road and enthusiast space.
Since launching TheRangerStation.com, Jim has documented thousands of real-world Ranger builds, technical repairs, drivetrain swaps, suspension modifications, and off-road adventures contributed by owners worldwide. TheRangerStation.com has been referenced in print, video and online by enthusiasts, mechanics, and off-road builders looking for practical, and experience-based information.