
REQUIRED FLUID
1983-1990 – Use Dexron II automatic transmission fluid when refilling or adding fluid to the transfer case.
1991-2007 – Use Mercon automatic transmission fluid when refilling or adding fluid to the transfer case.
2008-2011 – Use Motorcraft Transfer Case Fluid XL-12
LEVEL CHECK
1. Position the vehicle on level ground.
2. Remove the transfer case fill plug (the upper plug) located on the rear of the transfer case. The fluid level should be up to the fill hole.
3. If lubricant doesn’t run out when the plug is removed, add lubricant until it does run out.
4. Replace the fill plug.
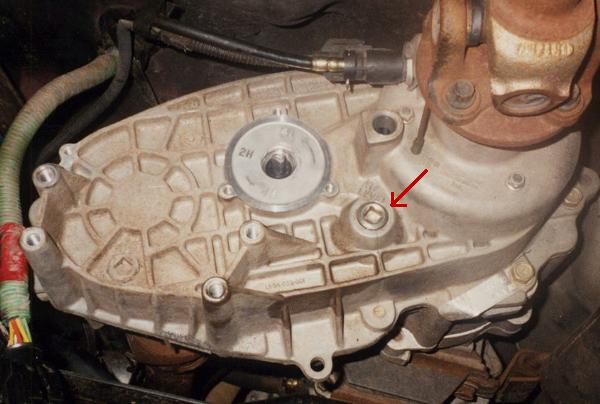
The transfer case fill level check plug is the upper most plug located at the rear of the case (See red arrows in photos above and below). Remove the plug using a 3/8 in. drive ratchet.
DRAIN & REFILL
The manufacturer recommends that the transfer case fluid should b changed every 60,000 miles (96,000km). However, if the truck is drive deep water (as high as the transfer case housing) it is a good idea to replace the fluid. Little harm can come from a fluid change when you just purchased a used vehicle, especially since the condition of the transfer case fluid is usually not known.
If the fluid is to be drained, it is a good idea to warm the fluid first so it will low better. This can be accomplished by 15-20 miles of highway diving. Fluid which is warmed to normal operating temperature will flow faster, drain more completely and remove more contaminants from the housing.
1) Drive the vehicle to assure the fluid is at normal operating temperature.
2) Raise and support the vehicle securely on jackstands. Remember that the vehicle must be supported level (usually at four points) so the proper amount of fluid can be added.
3) Place a drain pan under the transfer case housing, below the drain plug. Remember that the fluid will likely flow with some force at first (arcing outward from the transmission) and will not just drip straight downward into the pan. Position the drain pan accordingly and move it more directly beneath the drain plug as the flow slows to a trickle.
*To insure that the fill plug is not frozen or rusted in place, remove it from the transfer case BEFORE removing the drain plug. It would be unfortunate to drain all of your transfer case fluid and then realize that the fill plug is stripped or frozen in place.
4.) Remove the fill plug, then the drain plug and allow the transfer case id to drain out.
The transfer case drain plug is usually a square receiver which is signed to accept a 3/8 in. driver such as a ratchet or extension.
5) Once the transfer case has drained sufficiently, install the drain plug until secure.
6) Fill the transfer case to the proper level with the required fluid.
7) Reinstall the filler plug once you are finished.
8) Remove the jackstands and carefully lower the vehicle.

About The Author
Jim Oaks is the founder of TheRangerStation.com, the longest-running Ford Ranger resource online since 1999. With over 25 years of hands-on experience building and modifying Ford Rangers — including magazine-featured builds like Project Transformer — Jim has become one of the most trusted authorities in the Ford Ranger off-road and enthusiast space.
Since launching TheRangerStation.com, Jim has documented thousands of real-world Ranger builds, technical repairs, drivetrain swaps, suspension modifications, and off-road adventures contributed by owners worldwide. TheRangerStation.com has been referenced in print, video and online by enthusiasts, mechanics, and off-road builders looking for practical, and experience-based information.