
By: Alan Vaesa
Items Needed:
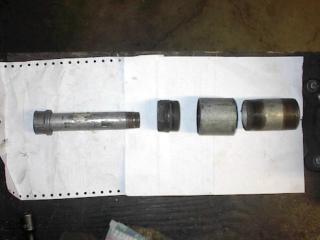
(A) (1) 3/4″ cap
(B) (1) 3/4″ x 6″ pipe
(C) (1) 1-1/2″ to 3/4″ bushing
(D) (1) 1-1/2″ coupling (one solid piece) (not a union)
(E) (1) 1-1/2″ x 4″ pipe
(F) (1) 1-1/2″ x 3″ pipe
All of this is standard water pipe that can be purchased at Home Depot, Lowes or the like.
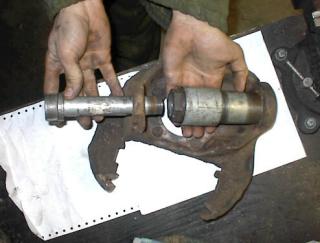
NOT needing a pipe wrench or a vice:
Thread (A) on to (B)
Thread (B) into (C)
Thread (C) into (D)
(Should look like a cookie cutter of sorts and stand on its own)
Thread (E) upper or (F) lower onto (D) depending on if you’re doing the top or the bottom
Piece (B) is the “handle”
NOTE: You must install the bottom ball joint FIRST, as you must unthread the handle, pass it through the hole for the upper ball joint and rethread back together to install the lower ball joint. (it sounds complicated but it’s really not)
How To Remove The Steering knuckle:
1 – Remove tire
2 – Remove hub
3 – Remove rotor/wheel bearings
4 – Remove 5 spindle bolts
5 – Tap/beat/whale/demolish a 2×4 with a hammer to remove the spindle, in a “star” formation (it will eventually come off)
6 – Remove axle through hole in steering knuckle
7 – Remove both bolts on both ball joints ((if equip) or loosen “pinch” bolt and or snap ring on top ball joint)
8 – With hammer (bigger/heavier the better but it can be done any size hammer) hit on the top of the bottom ball joint stud.
WATCH YOUR FEET – THE SPINDLE IS HEAVY
9 – Once the spindle is removed
10 – Remove ball joints by hammering them out in the direction the stud is pointing (hammer on the opposite side of the stud)
11 – Remove rust from steering knuckle and paint (color of your choice)
12 – Install ball joints using method mentioned above into steering knuckle
13 – Hold steering knuckle in place and place studs through holds in TTB
14 – Thread nuts on to stud (15/16″ as I recall)
15 This is where you will realize how your “camber/caster” bushing work and where they are located
Reverse Install The Rest:
- Axle
- Spindle
- Wheel bearing
- Rotor
- Hub
- Tire
NOTE: This a good time to also replace your;
- Wheel bearings (4 total (2 per side))
- Rotor (2 total)
- Spindle axle bearing (its tiny and it’s on the inside of the spindle) (2 total)
- Slinger boot (is the metal and rubber disc on the axle shaft) (2 total)
- Change from auto hubs to manual hubs (night and day difference)
- Place a thin layer of axle/wheel bearing grease between the spindle and steering knuckle so that next time you do this it will come off a heck of a lot easier
Go to Autozone for all the parts, they have a “NO Hassle” lifetime warranty on the ball joints (= trust me on that one (and stick them to it if you have to replace them again)
DON’T FORGET to torque all bolts to manufactures spec’s
DON’T FORGET to pump grease into the ball joints once your done VIA the zerk (grease) fittings that are provided with the new ball joints.
And check your outer and inner tie-rods and Drag-link too (great time to do all this)
Air tools can help some but, I have done mine many a times without them
FRIENDS… especially if they are mechanically inclined are a major BONUS.
About The Author
Jim Oaks is the founder of TheRangerStation.com, the longest-running Ford Ranger resource online since 1999. With over 25 years of hands-on experience building and modifying Ford Rangers — including magazine-featured builds like Project Transformer — Jim has become one of the most trusted authorities in the Ford Ranger off-road and enthusiast space.
Since launching TheRangerStation.com, Jim has documented thousands of real-world Ranger builds, technical repairs, drivetrain swaps, suspension modifications, and off-road adventures contributed by owners worldwide. TheRangerStation.com has been referenced in print, video and online by enthusiasts, mechanics, and off-road builders looking for practical, and experience-based information.