
When I lived in Ohio, we didn’t have any type of mandatory emission test or inspection in order to get/renew license plates in the county I lived in.
Now that I live in Texas, they have a test that plugs in to the port under your dash like a scan tool, and checks to determine whether the emissions system and its related components are working properly. These Catalyst Monitors are non-continuous monitors that assess the ability of the catalytic converter to decrease harmful emissions.
Fixing Codes & Getting The Ranger Ready For Testing
My check engine light bulb was burned out. That would be an instant fail.
After fixing the bulb, I scanned the Ranger and found (3) codes that needed fixed:
- P1443 Evap Emission CTRL System CTRL Valve
- P0155 O2 Sensor Heater Circuit Bank 2 Sensor 1
- P0401 Exhaust Gas Recirculation Flow – Insufficient Detected
The On-Board Diagnostics (OBDII) Emissions Test
Check 1 – Malfunction Indicator Lamp (MIL) or Service Engine Soon Light, Check Engine Light, Check Engine Symbol check This is considered the bulb check portion of the test. The light must come on when the ignition is turned to the ON position and the light must go OFF when the engine is started. The inspector answers these two bulb check questions as either a PASS or FAIL. If the light is not working, the vehicle will FAIL the test, because the purpose of the light is to alert the driver of the vehicle that there is a problem with the OBDII system (exceeding emissions) and the vehicle needs to be diagnosed and repaired.
Check 2 – MIL Command Status and Diagnostic Trouble Codes (DTC’s) check If the MIL command status is ON, then the vehicle’s Powertrain Control Module (PCM) is commanding the MIL to turn ON, because a problem has been detected within the OBDII system and a DTC has been set. For example, an engine misfire DTC – PO301. If the MIL command status is ON with a DTC set, the vehicle will fail. If the OBDII system is operating properly, the MIL command status will be OFF.
Check 3 – OBDII (Non -Continuous) Readiness Monitors check. These monitors are like self checks of each emissions component (EGR, O2 sensor, etc) within the OBDII system. These non-continuous monitors are considered Ready until either DTC’s have been cleared with a scan tool or if battery power has been disconnected, then the monitors will reset back to Not Ready.
In order to get the monitors set back to Ready, the vehicle must be driven through a drive cycle, which is a combination of city/highway driving for a set period of time. This drive cycle relearns the OBDII system and rechecks all of the emissions component’s individual systems. As each system completes its own self test, the monitor will set back to Ready.
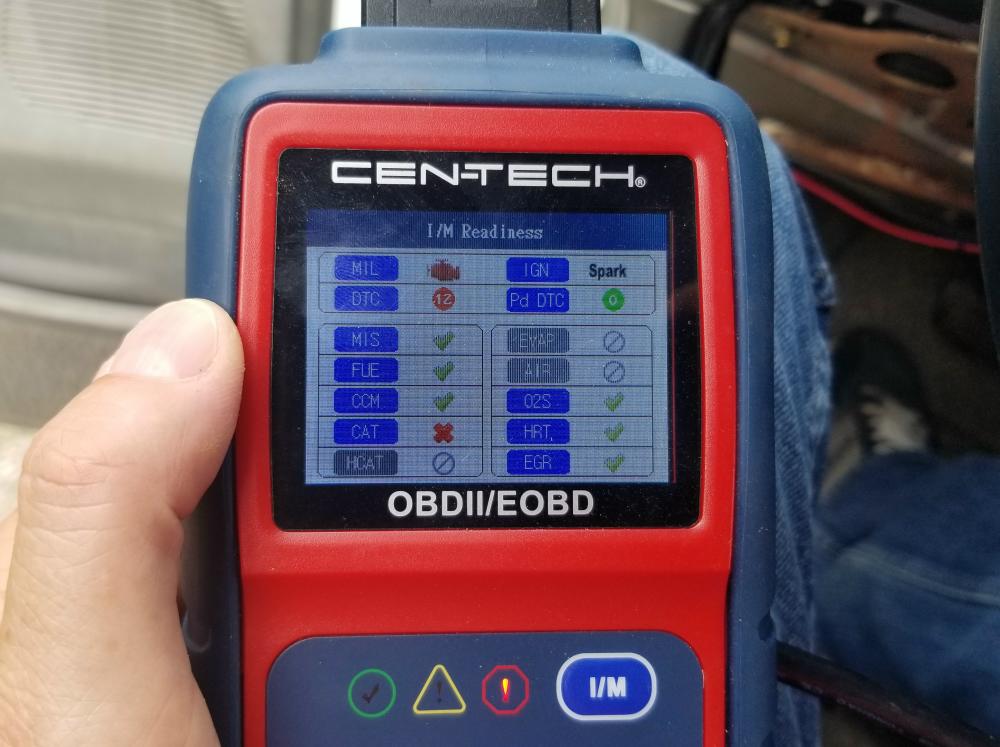
Looking at the scan tool above, you’ll see a red X next to ‘CAT’ (Catalyst Monitors). This indicates that the Ranger is not ready to be tested.
Driving Cycle
I was told that I would have to drive the vehicle for quite a distance to get it to show that it was ready to be tested. Unfortunately, I couldn’t get the ‘X’ to go away next to ‘CAT’ and make the vehicle ready.
I started searching and finally found a driving cycle that worked and got it ready in a very short period of time.
Pre-Conditioning Requirements
· Make sure engine is cold (hasn’t been driven)
· No DTCs present (Trouble Codes)
· Fuel fill between 15% & 85%
Driving Procedure
1) Start the vehicle and idle for four (4) minutes.
2) Idle the vehicle in drive for 40 seconds (neutral for M/T).
3) Accelerate to 45 mph, using 1/4 to 1/2 throttle (M/T stay in second gear for at least 5 seconds). Accelerate for at least 10 seconds and shift through to 5th gear.
4) Drive with a steady throttle at 45 mph for 30 seconds.
5) Stop the vehicle and idle in drive or neutral for 40 seconds.
6) Drive at speeds between 25 and 45 mph for 15 minutes.
Use 1/4 to 1/2 throttle accelerations. Include the following conditions:
· At least 5 stops with ten seconds of idle time.
· At least 3 steady speed sections of 1-1/2 minutes duration.
7) Drive the vehicle between 45 and 60 mph for 8 minutes (use high gear).
8) Maintain a steady speed between 45 and 60 mph for 5 minutes.
9) Drive the vehicle between 45 and 60 mph for 8 minutes (use high gear).
10) Stop vehicle, idle for 40 seconds.
It Worked!

Believe it or not, this actually worked. After doing this drive cycle I pulled over, scanned the truck, and saw that it was now inspection ready. I headed straight to the inspection station where it passed inspection.
Link:
About The Author
Jim Oaks is the founder of TheRangerStation.com, the longest-running Ford Ranger resource online since 1999. With over 25 years of hands-on experience building and modifying Ford Rangers — including magazine-featured builds like Project Transformer — Jim has become one of the most trusted authorities in the Ford Ranger off-road and enthusiast space.
Since launching TheRangerStation.com, Jim has documented thousands of real-world Ranger builds, technical repairs, drivetrain swaps, suspension modifications, and off-road adventures contributed by owners worldwide. TheRangerStation.com has been referenced in print, video and online by enthusiasts, mechanics, and off-road builders looking for practical, and experience-based information.