
Introduction:
This article details how to upgrade the u-joints and in your Dana 35 TTB and replace the c-clips that retain them with round snap rings.
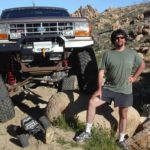
Busted Axle Yokes:
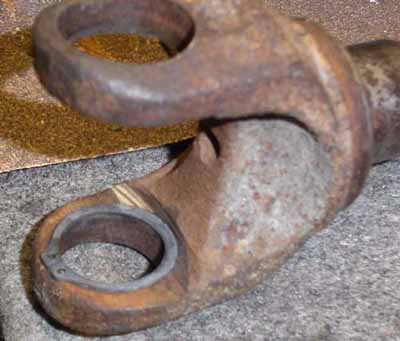
If you like to push your rig to its limits, you’re probably familiar with the sight below. You’ve probably just thought: “Yeah, that’s what happens when you push things too hard”. Well, you may be surprised to find out, sheer abuse is not always the culprit here.

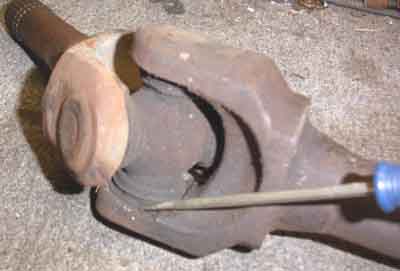
Your stock Dana 35 axle shafts are equipped from the factory with Spicer 5-297X u-joints and are retained by small half-round C-clips in the yoke. When pushed really hard with locking differentials & oversized tires, the joint’s bearing caps often will try to ‘spin’ in the yoke as the joint operates. As it rotates, it often “spits” off its clip and then the cap is free to walk out of the yoke, departing from the axle (if it doesn’t get crushed by the ball joint stud first). The u-joint trunnion then rips apart the axle yokes, causing a catastrophic failure like above (you can be sure this is what happened if you find the joint’s cross (main body) is not broken).
A full-round clip that fully encircles the joint’s bearing cap can quickly put a halt to this type of failure.
Unfortunately, just putting a full-round snap ring on the cap isn’t possible to do without a bit of work to the axle yoke.
Read on for how to make this possible (If you have a swapped-in Dana 44 axle, this modification will still provide the same benefits, as the joints are identical.
Modifying Your Yoke For A Round Snap Ring:

Start by removing the clips and pressing out the old joint (a shop press makes real quick work of pressing them out (even a homemade one lol). You can also purchase or rent a C-frame press (ball joint press) from some retailers that will do the same job. It basically looks like a large C-clamp but has a receiving cup on one side for the bearing cap to press into.
If the joint is stubborn from rust, a good smack with a hammer while it’s under pressure will usually pop it free.
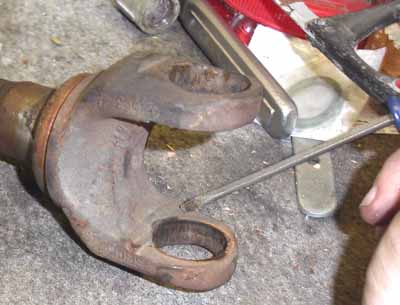
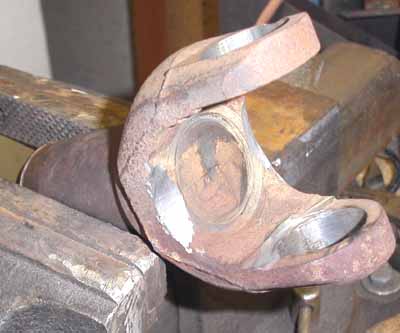
Here you can see why a round clip won’t fit, this shoulder on the yoke is in the way. This is primarily to blame for the c-clips coming off… As the cap spins, the clip wants to spin with it. The end of the clip hits against the shoulder and basically ejects itself.
This shoulder has to be removed from the yoke.
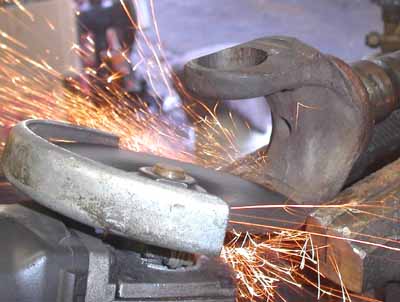
Using an angle grinder, carefully grind down the shoulder, being careful not to grind below the level of the flat area on the yoke, until it is almost even.
Next, using a Dremel (or similar) hi-speed rotary tool, carefully dress up the yoke until a 1-3/16″, external-type snap ring sits perfectly flat on the yoke.
While it is possible to do this with the angle grinder alone, I like the precision afforded here so that it’s much less likely you’ll whip off too much material at once and weaken (or ruin) the shaft.
You also want to make sure there are no high spots left, as this can create a stress point which could cause the cap to crack around the clip groove.
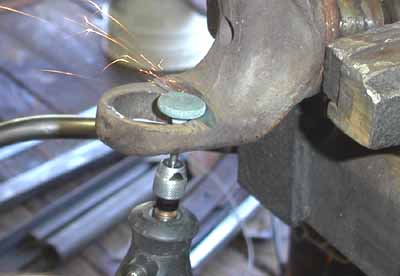
Keep checking your progress until you’ve determined that the clip sits down flat.
Here is the round snap ring (aka, retaining ring) shown next to the original c-clip.
They can sometimes be found at auto parts stores, as well as some hardware stores.

The Spicer 760 (5-760X) U-Joint:
Spicer phased out the old reliable 297X u-joint and replace it with the new 760X. Shown is a new Spicer 5-760X replacement joint next to the old 5-297X. These joints are an updated design and have a cold-forged cross which has repeatedly been shown to be much stronger than the 297’s hot-forged cross, with a much longer fatigue life. This should help to further put the brakes on broken u-joints.

I have found this cross is next to impossible to break, the needle bearings in the caps generally will crush and disintegrate before the cross itself fails (that is if the splined end of the shaft doesn’t twist off first).
Note the circular forging on it vs. the smooth center on the 297. These joints are currently priced around $25 or so each. Well worth the $$ over cheap “house” brand joints (which still use hot-forged parts)

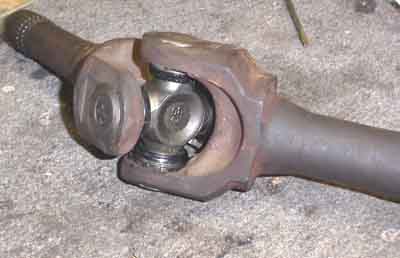
Position the snap rings on the joint and install it into the axle yoke. Install the bearing cap over the trunnion, being careful none of the needle bearings fall out of place and press the joint into place.
With the joint fully in place, use a set of snap ring pliers to position the rings into their grooves. Using pliers with a 45° angled tip can make things a bit easier in some cases.
Repeat for the opposite shaft.

Your shaft is now ready to put the power to the ground!
With the full-round snap ring clips, the caps can spin in the yoke all they want and won’t ever come out.
Adding Yoke Clearance:
While you have the grinder out, give the TTB center slip shaft a bit more clearance on its yoke as well.

I have found that this joint with its limited movement, can be prone to binding (and subsequent failure) on suspensions that have been modified for large amounts of travel.
A small amount of clearancing as shown below at right can help to eliminate failures at this joint as well.
Whatever you do though, never grind on the ENDS of the yoke to gain clearance (the loop part). This will weaken it.
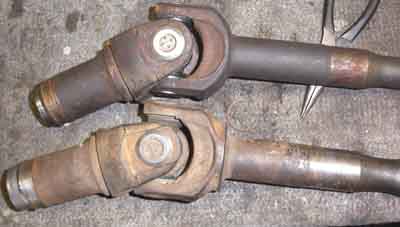
Left shows the additional operating angle that can be obtained (top shaft) next to an unmodified shaft (bottom). While it may not look like a whole lot, it adds up to having several more inches of available bind-free suspension travel, and can easily make the difference between busting, and flogging it with ease.
The simple modification of adding round clips to the caps (combined with using the 5-760X joint) can add 10-15% or more durability to your stock shafts (to put that into a better perspective, that’s about the difference in torque your shafts see when running 35″ tires vs. 31″ tires). This could be enough to eliminate the need for costly aftermarket alloy shafts in some cases.
Some guys will often just tack-weld their caps to the axle yoke. While this effectively accomplishes the same thing (and is much quicker/easier to do, if you have a welder), you are no longer left with the option of servicing or replacing the joint in the future. The snap rings will not hinder serviceability of the shafts should the need arise.
Conclusion:
I hope you find this article useful and it helps you add strength to your Dana 35 TTB axle shafts.
Related Articles:
Last Updated:
About The Author
Shawn “4x4junkie” has been part of The Ranger Station since 2001 and brings decades of hands-on mechanical experience to the community. A lifelong tinkerer from the San Fernando Valley, he’s largely self-taught, learning by working on his own vehicles, reading service manuals for fun, and tackling everything from suspensions and axles to transmissions. He currently owns and maintains a 1994 Ford Ranger XLT 4x4 and a 1990 Ford Bronco II XLT 4x4.
Shawn has contributed multiple technical articles and countless forum insights, most notably in the Suspensions and Axles sections. He’s known for practical, experience-based problem solving—often cutting through online folklore with real-world fixes. Whether helping diagnose issues or sharing fabrication knowledge, he’s committed to keeping TRS the best Ford Ranger resource available.