
Short Answer:
The 1983–1997 Ford Ranger uses a Twin Traction Beam (TTB) front suspension that can be lifted and optimized for off-road use, but camber change, alignment, and axle strength limit how far it can be pushed without supporting modifications.
Quick Answer: This guide helps you understand, lift, and optimize the Twin Traction Beam (TTB) front suspension on 1983–1997 Ford Ranger 4x4s. It covers Dana 28 TTB & Dana 35 TTB axles, lift kit options, extended radius arms, coil springs, rear suspension tweaks, travel maximization, tire fitment, fender considerations, and how these changes affect axles, tires, and lockers. Detailed step-by-step guides and manufacturer instructions are linked throughout.
What Is the TTB Suspension?
The Twin Traction Beam (TTB) front suspension used on 1983–1997 Rangers blends independent motion with solid‑axle durability. The front axles include:
- Dana 28 TTB: 1983–1989
- Dana 35 TTB: 1990–1997
TTB uses pivoting beams with U-jointed axle shafts connecting to a central differential, giving each wheel independent travel while keeping axle strength. Radius arms and coil springs maintain alignment and control axle motion.
Learn the fundamentals here: Ford Ranger Front Suspension Types Explained (TTB vs IFS).
Wondering if TTB is “bad”? Check misconceptions: Is the Ford TTB Suspension Really That Bad?
Pro Tip: If you have a Dana 28 TTB, doing a suspension lift is a good time to do a Dana 28 → Dana 35 Axle Swap since you have to disconnect the axle beams.
Pro Tip: Be sure to check the pivot bushings in your axle beams and Replace Them If Necessary.
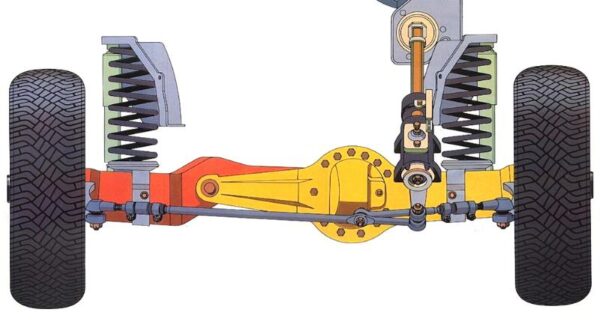
For a more detailed view, see this Diagram.
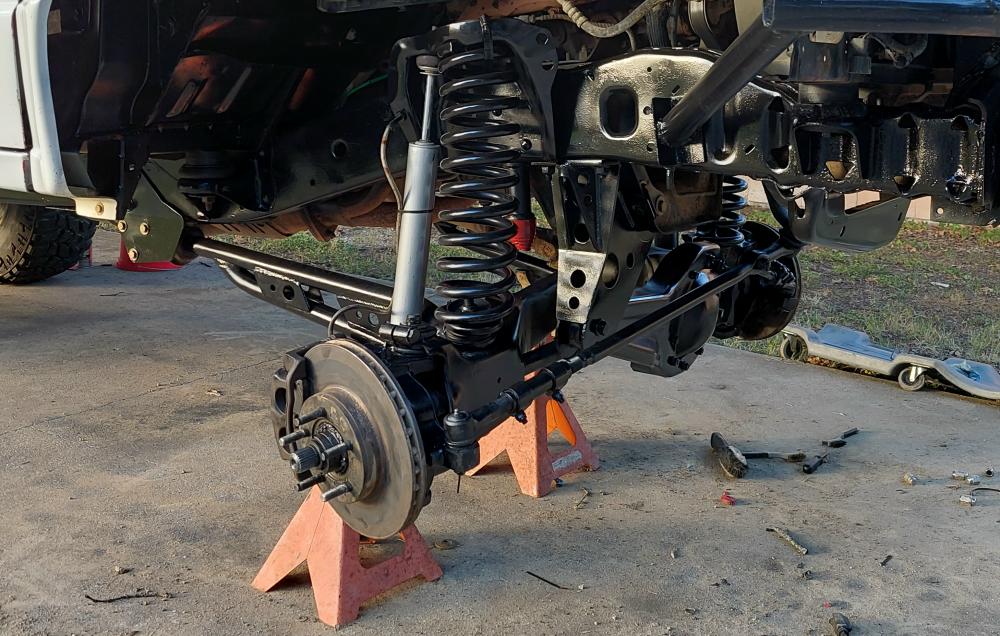
How The Suspension Is Lifted
Lifting the suspension involves replacing the stock coil springs with taller coil springs, replacing the stock TTB axle pivot brackets with lowered brackets for lifts of 2″ and higher, and lowering the rear radius arm mounts, or replacing the radius arms with longer ‘extended’ radius arms and mounting brackets. In addition, a lowered pitman arm is used to correct the steering geometry. The rear is lifted by using either a lift block, add-a-leaf, or a new leaf spring pack.
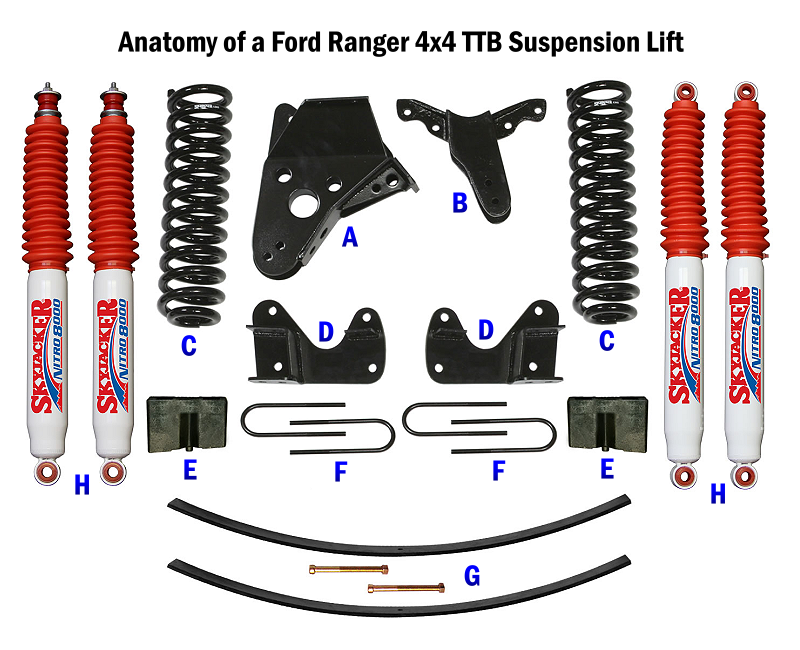
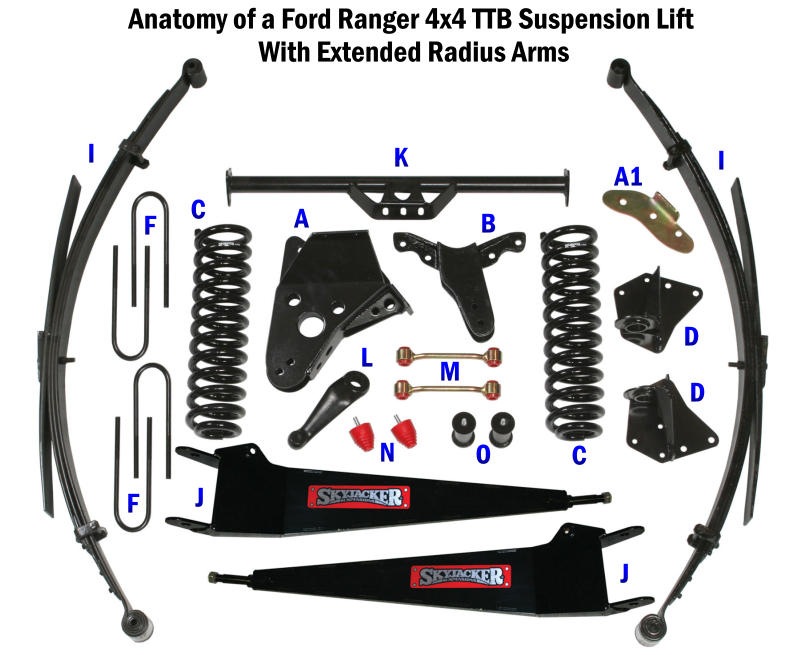
Anatomy of a Ford Ranger 4×4 TTB Suspension Lift:
- A – Driver’s axle beam TTB pivot bracket (mounted on passenger side)
- A1 – Driver’s axle beam TTB pivot bracket – Support Bracket
- B – Passenger’s axle beam TTB pivot bracket (mounted under engine cross member)
- C – Coil springs
- D – Radius arm drop brackets
- E – Rear lift blocks (mount between leaf spring and axle)
- F – Longer axle U-bolts
- G – Add-A-Leafs with new center bolt (upgrade instead of using blocks)
- H – Longer shocks
- I – Replacement leaf springs
- J – Extended radius arms
- K – Transmission crossmember
- L – Dropped pitman arm
- M – Extended sway bar links
- N – Bump stops
- O – Bump stops
Rear Suspension Components and Axle Wrap
Suspension lift blocks significantly increase axle wrap, while add-a-leaf’s and full replacement lift spring packs reduce or prevent it by increasing the stiffness of the spring pack. Axle wrap is the “S” shape bending of the leaf springs under acceleration or braking forces.
Suspension Lift Blocks
- Description: A spacer block is installed between the rear axle and the leaf spring pack to increase ride height. This is a cost-effective lifting method.
- Axle Wrap Relationship: Blocks increase the vertical distance between the axle and the leaf spring, which provides the axle with more leverage to twist or “wrap” the spring during acceleration or hard braking. This added leverage makes axle wrap worse and can lead to issues like wheel hop, premature U-joint wear, and leaf spring damage.
- Mitigation: If using lift blocks, especially taller ones (over 6 inches), traction bars (also known as ladder bars) are recommended to prevent the axle from twisting and stop axle wrap.
Add-A-Leaf’s (AAL)
- Description: An extra leaf spring is added into the existing leaf pack to provide additional support and lift (typically 1-3 inches). This is a more involved installation than lift blocks as the spring pack needs to be disassembled.
- Axle Wrap Relationship: The additional leaf increases the overall stiffness and load capacity of the spring pack. A stiffer spring pack is more resistant to the twisting forces that cause axle wrap, thus reducing or helping to eliminate the problem.
- Drawbacks: Adding a leaf can make the unloaded ride quality stiffer and harsher.
Replacement Lift Spring Packs
- Description: The entire factory leaf spring assembly is replaced with a new, custom-designed multi-leaf pack engineered for a specific lift height and weight capacity.
- Axle Wrap Relationship: These are the ideal solution for lifting a vehicle because they are specifically designed to handle the intended use (e.g., heavy hauling, off-roading, specific lift height) and are engineered to minimize axle wrap. A well-designed full leaf pack provides the proper balance of flexibility and stiffness, and the multi-leaf design naturally resists the S-shape bending of axle wrap better than stock springs or those with simple block additions.
- Benefits: Full replacement packs generally offer better ride quality and durability compared to blocks or AALs because every component is matched and engineered to work together as a complete system.
Choosing The Right Right Lift Kit Brackets & The Ones To Avoid
This is one of those topics that I think is overlooked and needs mentioning. People will buy a cheap lift kit to save money, or piece together their own lift with used parts. I strongly suggest you stay away from lift kits or suspension brackets that use a drop plate for the passenger beam pivot bracket.
Here’s why:
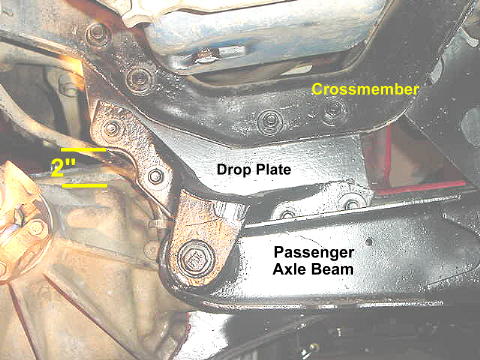
Looking at the back side of this lift, you can see where the pivot bracket for the passenger side beam has been lowered by using a drop plate. If you look to the left, you can see where there is only 2-inches of space between the bracket and the front differential. There is a risk that upward suspension travel could cause the differential to strike the plate and bracket and break the differential housing.

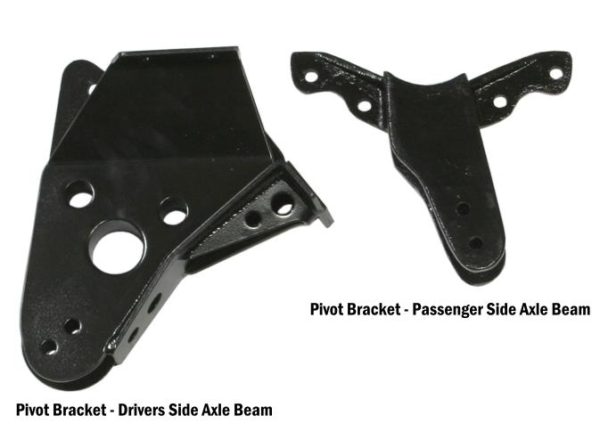
The photo above shows lift kit brackets that use the drop plate method. The photo below shows heavy duty brackets that includes a complete replacement passenger beam pivot bracket. Skyjacker is the only company I’m aware of that still offers a bracket like this.
Lift Kit Options (Budget → Serious)
Lifting a TTB Ranger requires disconnecting the front axle and adjusting geometry. Choosing the right lift kit depends on your goals, tire size, and budget.
Budget Lift Kits
- 1–2″ lifts with coil spacers or leveling kits. Ford Ranger Leveling Kits
- Minimal geometry changes, good for small off-road tires.
Moderate Lift Kits
- 4″ lifts with longer shocks and rear lift blocks or add-a-leaf’s. 1983–1997 Ford Ranger 4×4 Lift Kits
- Better ground clearance and approach angles for trail use.
Serious Lift Kits
- 4″-6″ lifts with longer shocks, extended radius arms, replacement rear spring pack, and a Dana 35 swap if you still have a Dana 28.
- Better ground clearance, approach angles, and wheel travel.
Extended Radius Arms & Suspension Travel
On a Ford Twin Traction Beam (TTB) suspension, extended radius arms are a critical upgrade for maximizing performance by optimizing geometry and mechanical leverage.
- Reduced Arc and Caster Swing: The stock radius arms on a 1983-1997 Ford Ranger are relatively short. As the suspension moves up and down (cycles), these short arms force the axle to travel in a tight arc, causing the caster angle (the tilt of the steering axis) to change rapidly. Extended arms move the pivot point further back on the frame, creating a much larger, flatter arc. This keeps the geometry more consistent and stable throughout the entire range of travel.
- Increased Leverage on Bushings: Longer arms provide more mechanical leverage against the frame-side bushings. This reduces the force required for the suspension to move, allowing it to cycle more freely and “droop” further without being inhibited by the binding typical of short, factory arms.
- Articulation & Bump Steer: Extended radius arms improve articulation and reduce bump steer: Extended Radius Arms
- DIY Build Guide: Build Your Own Extended Radius Arms
Increased travel allows each wheel to move independently over much larger distances. This helps keep tires firmly planted on the ground even in deep ruts or over large rocks, maintaining the traction needed to move forward.
Pro Tip: Make sure you add a Coil Spring Retainer to keep the top of the coil spring from coming out of the mount with longer suspension travel.
Maximizing Suspension Travel
Lifting without considering travel limits can lead to binding and poor articulation. For strategies to improve travel and reduce binding angles, see: Maximizing Your Ford Ranger Suspension Travel.
- Check shock length at full droop and full compression.
- Consider bump stops and limiting straps with bigger lifts.
- Pair with extended arms and quality shocks.
Tire Fitment & Suspension Clearance
Larger tires are one of the biggest reasons Ranger owners lift their trucks — but you need to know what tire sizes will physically fit, and what suspension and body modifications are required to make them work without rubbing or binding.
For a complete fitment breakdown on what tire sizes will fit 1983–1997 Rangers and what suspension/clearance mods are needed, see our dedicated guide:
1983–2011 Ford Ranger Tire Fitment Guide.
1983-1992 Models
- 31″ Tires: Requires 1.5 to 2 inches of suspension lift or a 3-inch body lift.
- 32″ Tires: Requires a 4-inch suspension lift.
- 33″ Tires: Requires a 6-inch suspension lift or a 4-inch suspension lift with a 3-inch body lift.
- 35″ Tires: Requires a 6-inch suspension lift, 3-inch body lift, and fender trimming (or a 6-inch lift and a decent amount of fender trimming)
- 36″+ Tires: Most builds with these require extensive suspension mods, solid axle swaps, and significant body clearance work.
1993-1997 Models
- 31″ Tires: 31×10.5R15 will fit on stock 15-inch rims with no rubbing issues.
- 33″ Tires: A 4-inch suspension lift or 3-inch body lift is needed
- 35″ Tires: A 6-inch suspension lift and 3-inch body lift or fender trimming is required (or a 6-inch lift and a decent amount of fender trimming)
- 36″+ Tires: Most builds with these require extensive suspension mods, solid axle swaps, and significant body clearance work.
Fitment Tips:
- Larger tires increase steering and driveline loads.
- Remember that bigger tires mean lower effective gearing; pair tire size with your gear ratios using the Gear & Crawl Ratio Calculators.
- Fiberglass Fenders & Bedsides from Fiberwerx and McNeil Racing have larger wheel openings designed to fit a 35″ tire and eliminates fender trimming.
How Suspension Modifications Affect Axles, Tires & Lockers
Every lift and travel enhancement change angles and loads on other parts:
- Pinion and caster angles shift — may need shims.
- Driveshaft and U-joint angle changes with big lifts — check U-joint stress.
- Larger tires often necessitate re-gearing — use: Ford Ranger Gear & Crawl Ratio Calculators.
- Stronger axles or lockers may be needed for larger aggressive tires or mud/rock use.
See also: Front Axles Overview (Dana 28 & Dana 35).
Common Mistakes & First-Person Tips
- The TTB suspension is difficult to align properly if lifted more than 1.5″ without lowered suspension brackets.
- Not having the suspension aligned properly causing uneven tire wear.
- Aligning the front end before the suspension has fully settled.
- Not ensuring that the nuts and bolts are still tight after installing and test driving.
- Not using the properly length shocks.
- Not installing extended brake lines to match the suspension travel
Related Guides & Resources
- Front Suspension Overview
- Lift Kit Options
- Dana 28 → Dana 35 Swap
- Extended Radius Arms
- Build Your Own Extended Radius Arms
- Tire Fitment Guide
- Maximize Suspension Travel
Manufacturer instructions and PDFs
Suspension Lifts
- Rancho Ford Ranger Lift & Extended Radius Arm Instructions
- SkyJacker Class I Lift
- SkyJacker Class II Lift W/Radius Arms
- Skyjacker Class I Instructions
- Skyjacker Class II Instructions
- Installing a James Duff 5-inch Stage 3 Lift
Extended Radius Arms
- Skyjacker Extended Radius Arm Instructions
- Skyjacker Extended Radius Arm Install
- Superlift Extended Radius Arm Instructions
- Tuff Country Extended Radius Arms Instructions
- James Duff Ford Ranger Long Link Radius Arm Instructions
About The Author
Jim Oaks is the founder of TheRangerStation.com, the longest-running Ford Ranger resource online since 1999. With over 25 years of hands-on experience building and modifying Ford Rangers — including magazine-featured builds like Project Transformer — Jim has become one of the most trusted authorities in the Ford Ranger off-road and enthusiast space.
Since launching TheRangerStation.com, Jim has documented thousands of real-world Ranger builds, technical repairs, drivetrain swaps, suspension modifications, and off-road adventures contributed by owners worldwide. TheRangerStation.com has been referenced in print, video and online by enthusiasts, mechanics, and off-road builders looking for practical, and experience-based information.