• Welcome Visitor! Please take a few seconds and Register for our forum. Even if you don't want to post, you can still 'Like' and react to posts.

What did you do to your Ranger today? (Part Deux!)


Maybe you could consider WeatherTech floor liners? Mine fit and work great. Don't really understand why a pickup would have carpet, at least for the front seats, anyway. I do still have the original carpeted floor mats, but they're stored in one of my sheds.

I have some now. They don't address issues around the cup holder on the floor where most of the spills and staining happen and under the emergency brake where the salt has chrystalized and won't scrub out.

The vinyl floor will be a permanent solution to the problem.

I do agree that carpet shouldn't be in a truck, but I use my truck to do things that involves dirt, snow, and road salt. So, I'm biased. Some people like and want their carpet.
 
A few thoughts on carpet. I’ve done it a few times, and I agree it’s a colossal pain.

A long time ago, the galaxy far far away, some old fart taught me that you don’t want to ever cut a “hole“ for a bolt or whatever penetrates the carpet. You locate the center point as best you can, mark it with chalk that will brush away, and then with a utility knife, you cut a cross, or an X. If you cut a hole too big or in the wrong place, you’re just screwed. If you cut crossing slots, and the center point is not in the right place, at least all the carpet is still there so you won’t have any hole in the carpet showing. If it’s a critical spot, you can repair any extra slot by taking a piece of sturdy fabric, coat it with E 6000, and stick it on the backside to glue the carpet back together. Nothing shows.

Ditto for the center console and for the center shifter/stick. Mark it with a piece of chalk as best you can, but don’t cut a piece out. Again, cut it in a cross, or maybe cut it with a few more slots in a star pattern. Start in the center and don’t cut it as far as you think you need to cut it. Here, do as I say not as I do, you can always cut it a little bit longer.

“I’ve cut this damn thing three times, and it’s still too short!“

A little Rick trick on nuts and bolts and clips. On my town cars, the windshield wiper transmission, the mechanical mechanism, ties into the motor arm with a special little clip. In typical Ford brilliance, there is nothing flat underneath it. Not only is there not nothing flat, there is actually space there where the clip can fall down between the firewall and another piece of metal that’s part of the dashboard. I’ve never been able to retrieve one, but I suspect if you could go down far enough it goes into the sixth or seventh level of hell!

Take a piece of nylon sewing thread (yes, nylon, and yes, sewing thread, not fishing line) and thread it through the clip or through the nut, and make it 2 feet long. Tie it together so it is a loop, that loops through the nut/clip like two links in a chain. Then climb on the roof with your back down and slide down the windshield and put your hands in a place that was never meant for your hands to be and try to put the nut or clip on while you’re wiggling 1 foot in the air, and rotating the other foot counterclockwise (if you’re in the northern hemisphere) in tribute to the Ford designers. If you drop the clip as designed, you just pull on the line and it’s back in your hand in three seconds.

If it’s a nut, it will start to thread on whatever you have to thread, with the fishing line still on it. when you’re done, just pull the thread hard and it will snap off.

My two cents, hope it helps
 
Last edited:
A few thoughts on carpet. I’ve done it a few times, and I agree it’s a colossal pain.

A long time ago, the galaxy far far away, some old fart taught me that you don’t want to ever cut a “hole“ for a bolt or whatever penetrates the carpet. You locate the center point as best you can, market with chalk that will brush away, and then with a utility knife, you cut a cross, or an X. If you cut a hole too big or in the wrong place, you’re just screwed. If you cut crossing slots, and the center point is not in the right place, at least all the carpet is still there so you won’t have any hole in the carpet showing. If it’s a critical spot, you can repair any extra slot by taking a piece of sturdy fabric, coat it with E 6000, and stick it on the backside to glue the carpet back together. Nothing shows.

Ditto for the center console and for the center shifter/stick. Mark it with a piece of chalk as best you can, but don’t cut a piece out. Again, cut it in a cross, or maybe cut it with a few more slots in a star pattern. Start in the center and don’t cut it as far as you think you need to cut it. Here, do as I say not as I do, you can always cut it a little bit longer.

“I’ve cut this damn thing three times, and it’s still too short!“

A little Rick trick on nuts and bolts and clips. On my town cars, the windshield wiper transmission, the mechanical mechanism, ties into the motor arm with a special little clip. In typical Ford brilliance, there is nothing flat underneath it. Not only is there not nothing flat, there is actually space there where the clip can fall down between the firewall and another piece of metal that’s part of the dashboard. I’ve never been able to retrieve one, but I suspect if you could go down far enough it goes into the sixth or seventh level of hell!

Take a piece of nylon sewing thread (yes, nylon, and yes, sewing thread, not fishing line). and thread it through the clip or through the nut, and make it 2 feet long. Tie it together so it is a loop, that loops through the nut/clip, like two links in a chain. Then climb on the roof with your back down and slide down the windshield and put your hands in a place that was never meant for your hands to be and try to put the nut or clip on while you’re wiggling 1 foot in the air, and rotating the other foot counterclockwise (if you’re in the northern hemisphere) and n tribute to the Ford designers. If you drop the clip as designed, you just pull on the line and it’s back in your hand in three seconds.

If it’s a nut, it will start to thread on whatever you have to thread, with the fishing line still on it. when you’re done, just pull the thread hard and it will snap off.

My two cents, hope it helps
I have an xacto knife set and plan to do exactly what you suggest. For the shifter, I'm going to remove the lever and cut the hole just big enough for the stub until I'm sure the flooring is where it needs to be.

I'm pretty sure I will not cut the openings for the jump seats. They are removed, with no plan to reinstall them. I still have the seats up in the loft in case I ever do sell the truck and the new owner wants them. They can worry about making an opening for the seat base to mount.

The plan is to build a wooden storage system and install it in the back of the cab, using the bolts that mounted the jump seats to the truck. But I don't want to do that until the flooring is in place.
 
I have an xacto knife set and plan tondo exactly what you suggest. For the shifer, I'm going to remove the lever and cut the hole just big enough for the stub until I'm sure the flooring is where it needs to be.

I'm pretty sure if I will not cut the openings for the jump seats. They are removed, with no plan to reinstall them. I still have the seats up in the loft in case I ever do sell the truck and the new owner wants them. They can worry about making an opening for the seat base to mount.

The plan is to build a wooden storage system and install it in the back of the cab, using the bolts that mounted the jump seats to the truck. But I don't want to do that until the flooring is in place.

Please post a few pictures on how you’re going to do that storage apparatus behind the seats. I have the extended cab in The Road Ranger, a giant space to put stuff, but I always end up with a few things scattered around on the floor as the space wasted because it’s just not accessible when you’re driving, and a big old fat guy like me can’t get to it even if you flip the seats forward. I don’t have the rear doors. I’d like to do it somehow so there’s an accessible shelf behind the passenger seat that I could reach while I’m driving, and somehow divide the rest of it up in compartments so I could organize stuff without totally killing the utility of such a big open space. Looking out the back windshield is not a big deal with what I’ve done with the headache rack and the toolbox, so I just want to be able to utilize the space better. You seem to be very good at such things.
 
Please post a few pictures on how you’re going to do that storage apparatus behind the seats. I have the extended cab in The Road Ranger, a giant space to put stuff, but I always end up with a few things scattered around on the floor as the space wasted because it’s just not accessible when you’re driving, and a big old fat guy like me can’t get to it even if you flip the seats forward. I don’t have the rear doors. I’d like to do it somehow so there’s an accessible shelf behind the passenger seat that I could reach while I’m driving, and somehow divide the rest of it up in compartments so I could organize stuff without totally killing the utility of such a big open space. Looking out the back windshield is not a big deal with what I’ve done with the headache rack and the toolbox, so I just want to be able to utilize the space better. You seem to be very good at such things.
I do have the rear suicide doors, which makes accessibility much easier. But I will post up pictures like I did for the drawer system. I do have a general idea in my head on how I want to build it. The layout will be pretty much how I have stuff stored back there already, it will just be more secure and out of sight. Reality will dictate as I go.
 
I've toyed with the idea of a storage system in my SuperCab, but I like to be able to recline the seats and anything placed back there would hinder that. Might be a consideration for you too.
 
I've toyed with the idea of a storage system in my SuperCab, but I like to be able to recline the seats and anything placed back there would hinder that. Might be a consideration for you too.

I have the bed setup to lie down and sleep back there if the need arises. I will be leaving room to move the seat back and forth some since the type of shoe I wear can dictate where the seat needs to be. As a side effect, some seat reclining will still be possible, but will be more limited than is currently available since I won't be able to move things out of the way. But your point is well taken and has been taken into consideration.
 
I will be leaving room to move the seat back and forth some since the type of shoe I wear can dictate where the seat needs to be.
I’m hearing that as a different seat position is required for boots vs high-heels? Who knew… :icon_rofl:
 
I’m hearing that as a different seat position is required for boots vs high-heels? Who knew… :icon_rofl:

That sounds like some kind of judgement there buddy! :mad:

Seriously, sandals, vs hiking boots, vs winter boots, there is a seat setting difference.
 
Maintance and such on my DD. New front shocks, swaybar end links and Rough Country leveling springs. Good for another 190k.
20250927_144257.jpg
 
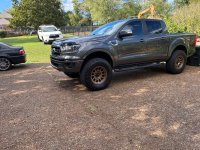
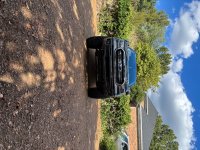
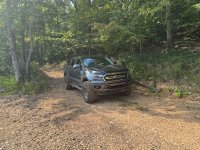
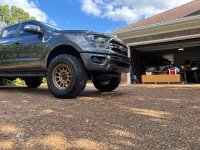
Removed the air dam. Looks way better in my opinion.
 

Attachments

  • IMG_0863.jpeg
    IMG_0863.jpeg
    615.6 KB · Views: 9
  • IMG_0861.jpeg
    IMG_0861.jpeg
    781.1 KB · Views: 10
  • IMG_0858.jpeg
    IMG_0858.jpeg
    372.1 KB · Views: 10

Attachments

  • IMG_0797.jpeg
    IMG_0797.jpeg
    795.1 KB · Views: 9
Removed the air dam. Looks way better in my opinion.
I forgot about that air dam. My FX4 didn't come with one. So, I'm used to not having one. It does have the little rubber air dam things in front of the tires but that is it.
 
I forgot about that air dam. My FX4 didn't come with one. So, I'm used to not having one. It does have the little rubber air dam things in front of the tires but that is it.
I’ve been meaning to take it off for a couple of months, just hadn’t gotten around to it.
 

Sponsored Ad


Sponsored Ad

Special Events

Events TRS Was At This Year

TRS Events

Member & Vendor Upgrades

For a small yearly donation, you can support this forum and receive a 'Supporting Member' banner, or become a 'Supporting Vendor' and promote your products here. Click the banner to find out how.

Recently Featured

Want to see your truck here? Share your photos and details in the forum.

TRS Latest Video

TRS Merchandise

Follow TRS On Instagram

TRS Sponsors


Sponsored Ad


Sponsored Ad


Amazon Deals

Sponsored Ad

Back
Top