• Welcome Visitor! Please take a few seconds and Register for our forum. Even if you don't want to post, you can still 'Like' and react to posts.

slow expedition ranger build


That truss is beautiful. I really like this build, excited to see what coming. What motor are you running? Stock 2.9? You seem to have a lot of skills and a lot of tools to match hahah
 
Lots of tools yes but I've never done any engine work before. It was a first for me to pull an engine, build up a long block and transfer working parts from the old engine to the new. I just followed the Haynes and used common sense. The engine is a 4L and the exhaust is 2.5" from the cats.

Hopefully when I was tearing down I labeled everything I touched so meow it's just a matter of joining all connections with matching labels. The first start is still going to be nerve racking I think lol
 
I'm not sure how I missed this build but its looking awesome!
 
the exhaust is done, just need to add a few more hangers. I hole sawed 2 4" holes in my rear bumper and cut out the rear cross member and a portion of the bumper because they were in the way. I welded a new crossmember and attached the 2 pipes together and then put an exhaust hanger there. I have 2 or 3 more hangers to add then its complete.

Its nice and high and out of the way. I re used the old tip so I have one shiny and one dull one, but that will work itself out eventually. there is roughly 1/4" clearance around the tips and the system doesnt seem to move much so I think ill be alright. I had to piece together the pipes as I didnt have long piece of 2.5" to work with, its looks a little ugly but its perfectly functional:)

pics

Y1lSQI5l.jpg


M40TY5dl.jpg


LxIjzfll.jpg


ibT83kkl.jpg


npWf6lHl.jpg


vCo1gdKl.jpg


Dyba9Qkl.jpg


4FvEdygl.jpg


WK97VP9l.jpg


Langn92l.jpg


zIQigWtl.jpg


G8ROR6Ml.jpg
 
everything is hooked up and running! I had a big smile on my face when it lit up first try, apparently I got all the connections correct lol. here is a brief clip of the exhaust, it sounds better in person as I recorded this with my iphone. ill try and get a better media recorder for future clips. now I have to get an alignment and insurance so I can break the motor in seat everything, but the hard part is done.

part numbers for the exhaust are in the description. cost was roughly $300 plus my time to fab/ install.

http://www.youtube.com/watch?v=wfsKV_hVocw
 
Last edited:
I started building a custom air intake. I used 3" mandrel bend pipe and welded them in the route I wanted. transferred the bolt pattern of the maf to a piece of 20Ga sheet.

welded a piece of 3" pipe to the inside for the filter to mount to. added a pipe for the valve cover breather, but I still haven't attached the little vacuum line that goes to the intake vacuum block.

I'm not sure I need it so I'm going to investigate what it does. if anyone knows off hand ill take the info, but if you dont feel like typing dont worry about, lol.

Im going to build a box around it and fully separate the air from the engine bay, i still need to make the bottom and 3 more sides. I plane on a tiny subtle reverse cowl scoop on my hood above the box.

the top of the box will be open but will have rubber trim that will seal to the hood. the only air coming in will be from the hood through the reverse cowl induction. I know that the stock box is a cold air intake and it flows plenty well for the engine, but I wanted something custom and different and to open up the engine sound a little. so far my tame sounding exhaust has dropped a little note wise in sound and is ever so slightly louder. mission accomplished. plus the intake sucking sound is awesome:)

starting materials

BfxNRq8l.jpg


3fTW2f8l.jpg


transferring bolt pattern

4YmJiLPl.jpg


wlZQEi5l.jpg


couple cuts, welds and double checks and here's where I'm at so far

GsB1suMl.jpg


tD6AIiVl.jpg


509Lt1Pl.jpg


FvsIdf9l.jpg


re1oSzZl.jpg


I17SmMcl.jpg


Brian
 
Aside from some mounting brackets for the box and paint. this intake project is done. I made a box out of sheet metal then cut a corner off. figured out were I wanted to put the MAF adapter plate I already made on to it and test fit everything. I then cut the height down to where I though it was good and started in on my hood. measured things, checked twice and cut away. everything fits in the engine bay with out touching anything else:) its rather larger but if I ever want to go the snorkel route modding the box will be a breeze

giant box

zBjY4YAl.jpg


there is 1/4" of space from the filter to the wall and the filter goes on and comes off no problem

SKmSGnzl.jpg


l7i9JC7l.jpg


zCMoQxZl.jpg


high tech orange electrical tape provided a guide for cutting. I cut the inside edge outlined by the squiggly line.

W9Jk9oWl.jpg


lots of swearing and heat adjustment later I have this

ltQL2IQl.jpg


xnBFFABl.jpg


on the truck for a final test install before paint

QaGncRhl.jpg


i4z7nw7l.jpg


MwGQRZgl.jpg


9w9QkISl.jpg


NIvV0ltl.jpg


I plan on using a high heat spray foam and coating the under side of the hood there the weather strip is and trimming it back so I get a good seal. I am probably going to weld on some water diverting fins on the hood in front of the hole, so water doesn't cascade in to the box. I will also drill a hole for any rouge water to escape. with the engine idling and the hood closed I can feel it draw air in through the scoop. Im not planning on trimming away any of the support metal on the hood where the scoop is, as I think it is allowing plenty of air to come in.
 
with the help of a buddy and an engine hoist/ straps through the shifter hole. we got the tranny out surprisingly easily. it was a mess in the bellhousing. so goodbye electric transfer case, hello manual:) hopefully ill get it in tomorrow.

YK3mugIl.jpg
 
UPDATE:

So the tranny is back in and the manual transfer case works. Ive been busy working on the rear suspension issues. the ranger main was whipped and sort of bending in the wrong direction a tad and the bushings were shot. So when I tried removing the front hanger bolt I found everything had fused to everything else. long story short I ruined the hanger.

I took the hanger off and used it to make a new one. I copied the bolt pattern and tacked 2 plates together for drilling so I would have perfect mirrors for the left and right side. I made the new bracket adjustable too. 5 holes 1" apart. the upper most hole being the stock height. made it out of 1/4". Theses are pics are of an uncompleted bracket, ive since added more gussets on the hanger portion to tie everything into itself.

UfBp7xOl.jpg


9y3axdjl.jpg


AVq69Rpl.jpg


I then cut the eyes off the ranger main and used an exploder main I got from mike many moons ago.
The pack is now 7 leaves. the main and the one under it are stockers, the rest is from a jeep 6" kit that was in there when I bought the truck.

I took a before and after measurement and when I added the new main, the whole pack lost a few inches of arch. Im not too worried as now this shouldnt sag nearly as bad as before.

If I need to, I can adjust the suspension via the brackets to get it sitting level or slightly raked

once both sides are installed Ill put up a before and after shot of the rear
 
here is a finished bracket. I think it's plenty strong. Things to notice over the previous pics are the 2 7" long gussets on the inner arm and the 4"X4" plate connecting the outer arm to the inner

dk4BTzUl.jpg


XjAWz4ll.jpg


cvtuuxpl.jpg


zj2OLKJl.jpg
 
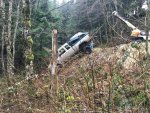
So the other bracket is on and the passenger leaf set has the exploder main spring, just like the driver. from a specific point on the frame to the ground on both sides im only out by 1/4" in height, good enough for me. There is a decent amount of rake going on but with a box, canopy and camping gear im thinking it will level out. I still have 2" either direction to adjust anyway.

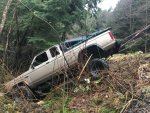
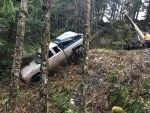
so bear in mind that the truck is on a slanted portion of floor, so the rake looks more severe than it is, and my before and after shots are from different sides. but at least it's parked in the same spot in both shots. stop judging me!

for those wondering about how the rear is lifted, this is the break down.

7 leaf pack
exploder main
ranger main with the eyes cut off as the second
6" lift springs from a jeep
ranger overload
belltech shackles in the rear
custom front hanger using using the 3rd bolt hole location out of 5. #1 is stock height and the holes are 1" apart.
bolts are a combination of 14mm hex head 10.8 grade and 14mm cap screw 12.9 grade. 10.8 is equivalent to a grade 8 bolt.
new poly bushings
still using the stock 2" blocks
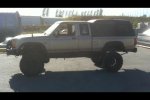
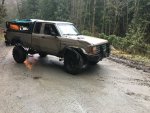
BEFORE

U5PeztCl.jpg


AFTER:

HhpPu5ml.jpg


CLOSER SHOT:

km7tG4Nl.jpg


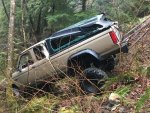
This is what I am attemping to correct:

fY3OBHsl.jpg


nkjaX00l.jpg


The box is fairly empty in this shot and you can see how low it is compared to the front. with a full load its a lot worse

This is the driver and passenger ranger main that was whipped into an inch of its life. note how it wants to reverses direction near the eye

vlLsH0cl.jpg


Ap8sgHxl.jpg


Thats it for meow
 
UPDATE:

moved to Mission BC

finished up the truck for now. there is always something to do though.

sounds amazing, rides a little vibratey at 50kph and 80kph because of the impossible to balance tsl's and is a little warm in the cab since i removed the carpet and the engine heat is going through all the speed holes in and around the dash and entering the cab, lol.

here she is at work before I took it for an alignment.

http://youtu.be/A1rEA2nJGBk
 
Are you going to set the back of this up for camping?
 
i do sleep in the back meow, but ultimately I want to have a fold out roof platform for a tent, that doubles as a dry spot to sit under. then the bed area will be made into easy access storage. lots to do before I get to that point though.
 
Well, I’m back. I sold the truck nearly 9 years ago and I just got it back. It was involved In a slow accident down a hill into some trees off road. I have some fixing to do, but the engine and drivetrain are still solid. Just cosmetic damages so far, but I have yet to investigate further.
 

Attachments

  • IMG_9430.jpeg
    IMG_9430.jpeg
    71.8 KB · Views: 47
  • IMG_6879.jpeg
    IMG_6879.jpeg
    365.7 KB · Views: 40
  • IMG_6880.jpeg
    IMG_6880.jpeg
    389.7 KB · Views: 44
  • IMG_6882.jpeg
    IMG_6882.jpeg
    385.1 KB · Views: 41
  • IMG_6883.jpeg
    IMG_6883.jpeg
    344.3 KB · Views: 48
  • IMG_6884.jpeg
    IMG_6884.jpeg
    320.8 KB · Views: 48
  • IMG_6885.jpeg
    IMG_6885.jpeg
    372.4 KB · Views: 51
  • IMG_6886.jpeg
    IMG_6886.jpeg
    377.4 KB · Views: 43
  • IMG_6887.jpeg
    IMG_6887.jpeg
    299.8 KB · Views: 47
  • IMG_6889.jpeg
    IMG_6889.jpeg
    255.5 KB · Views: 43
  • IMG_2230.jpeg
    IMG_2230.jpeg
    261.6 KB · Views: 44
  • IMG_9719.jpeg
    IMG_9719.jpeg
    302.6 KB · Views: 45

Sponsored Ad


Sponsored Ad

TRS Events

Member & Vendor Upgrades

For a small yearly donation, you can support this forum and receive a 'Supporting Member' banner, or become a 'Supporting Vendor' and promote your products here. Click the banner to find out how.

Recently Featured

Want to see your truck here? Share your photos and details in the forum.

Ranger Adventure Video

TRS Merchandise

Follow TRS On Instagram

TRS Sponsors


Sponsored Ad


Sponsored Ad


Amazon Deals

Sponsored Ad

Back
Top