• Welcome Visitor! Please take a few seconds and Register for our forum. Even if you don't want to post, you can still 'Like' and react to posts.

Lima drifting build


SloRanger23

Active Member
Joined
May 3, 2020
Messages
44
City
2025money
Vehicle Year
1992
Transmission
Manual
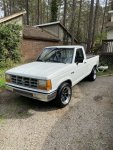
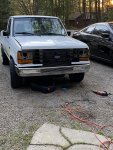
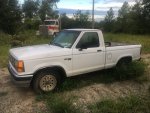
Hey everyone, I have been reading this forums forever and as my parts are piling up and I’m really starting to get heavily into the build. I need a build thread to keep track of the build and to motivate me. This is a new platform and I could use all the help/ advice I can get. The Ranger is to be a learning tool before I start a larger build. So I’m going to trying to do everything in and out side my wheel house. This is how it all started: late one Sunday night, I threw 2 rods out opposite sides of my G37s block. After another motor and a long story, all computers in “G” took a dump.... the G had to go and it was new project time.
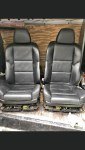
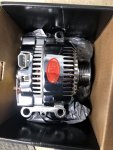
 

Attachments

  • 7438291C-DF03-47BA-B574-07F346D1662F.jpeg
    7438291C-DF03-47BA-B574-07F346D1662F.jpeg
    106.1 KB · Views: 202
  • 4BC9DEE8-2C12-4C85-9D53-CBECA21162E0.jpeg
    4BC9DEE8-2C12-4C85-9D53-CBECA21162E0.jpeg
    167.1 KB · Views: 207
Last edited:
Friend of mine had a 92 xlt, reg cab, short bed, 2.3/ 2wd/ 5 speed, that had been sitting in his family’s farm for awhile. After a jump start and not much money later, I had a very dirty but in good shape mini truck.
 

Attachments

  • D506B1F0-C661-4453-83B6-B143D01DBE07.jpeg
    D506B1F0-C661-4453-83B6-B143D01DBE07.jpeg
    254.4 KB · Views: 210
  • 2E4604A9-BEDD-469A-821C-08BCD0A3250F.jpeg
    2E4604A9-BEDD-469A-821C-08BCD0A3250F.jpeg
    255.5 KB · Views: 192
  • 834DC422-7D43-4DD0-B5EF-F2B8B839B1ED.jpeg
    834DC422-7D43-4DD0-B5EF-F2B8B839B1ED.jpeg
    161.3 KB · Views: 185
Last edited:
The truck had a unique smell and a thick layer of dirt in every spot of the truck even after a good scrub. Started with the interior, I ripped the old carpet out and had to fix the fallen headlinear. Fake black suede went on the headlinear and it came out great. Found out that trying to wrap the dash is easier outside the truck and because of the cold I will need to do it again in the next month or so. Pulled all the trim and wrapped it in fake black vinyl, did the rear of the cab in left over suede. The doors got powered windows with vinyl wrap panels with suede inserts. I now know why interior work cost what it does. I later put in new black carpet, black seatbelts and (fake) dynomatted everything but the roof, which I will be doing when I redo the dash. Plastidipped the dash bezel and vents black. It’s a Mini Truck so it got a stereo. Threw two powered 10”s behind the seats, 4x 100 Infiniti amp powering Orion Cobalt components. For $70 for all speakers, the 6x9 and 6.5 are great, the tweeter sucks. Paired it with 360 backup cam on China’s best single din 7” screen. You have to write a list out of all the things you want and make sure there in the ad when buying China’s best.
 

Attachments

  • A852E1A1-F7FB-4E3F-9ED9-73C4AFC77F86.jpeg
    A852E1A1-F7FB-4E3F-9ED9-73C4AFC77F86.jpeg
    199.9 KB · Views: 186
  • 0082F7DC-62CB-4549-B861-A9DF653FAE98.jpeg
    0082F7DC-62CB-4549-B861-A9DF653FAE98.jpeg
    114.6 KB · Views: 194
  • C4B25442-8A1B-40D0-8A95-EB4F983EC54D.jpeg
    C4B25442-8A1B-40D0-8A95-EB4F983EC54D.jpeg
    80.8 KB · Views: 199
  • 1651020E-99BE-4C30-8F4D-DEA551F62613.jpeg
    1651020E-99BE-4C30-8F4D-DEA551F62613.jpeg
    101.3 KB · Views: 195
  • 4E14A439-C982-4B78-8CA6-5C922DFA76F8.jpeg
    4E14A439-C982-4B78-8CA6-5C922DFA76F8.jpeg
    59.3 KB · Views: 207
  • 605AF047-0DDE-4272-9815-E230F587E253.jpeg
    605AF047-0DDE-4272-9815-E230F587E253.jpeg
    71 KB · Views: 212
  • E635AA4E-048D-483D-AF7A-408A69475E7A.jpeg
    E635AA4E-048D-483D-AF7A-408A69475E7A.jpeg
    114.7 KB · Views: 211
  • 62604DD6-4F54-424D-B992-874D761C0358.jpeg
    62604DD6-4F54-424D-B992-874D761C0358.jpeg
    184.5 KB · Views: 214
Last edited:
Do yourself the favor and spend the $50 for power windows. They really work well. You can see some of the matting. I just made the wiring safe but not neat and have an 2013 mustang power distribution box I’ll use to clean up the wiring when I start the MegaSquirt install.
 

Attachments

  • 6E52481B-6E52-4360-AD57-C41B0FA809B2.jpeg
    6E52481B-6E52-4360-AD57-C41B0FA809B2.jpeg
    222 KB · Views: 194
  • 38E542B2-16B4-4720-AC51-8C94FA1D2967.jpeg
    38E542B2-16B4-4720-AC51-8C94FA1D2967.jpeg
    319.2 KB · Views: 196
Last edited:
Happened upon a dusty but never mounted, set of Rota RKR, staggered on FB market place. They were half off the retail price and I couldn’t buy them fast enough. The fronts are 17x 8.5 -10 offset and the tears are 17x 9.5 -20 offset. Went with Federal 595 245/45/17 up front and 275/40/ 17 in the rear. I had to pull the large dent on my driver side, front fender to keep that tire running but everything else fits perfect. I think they should tuck when I lower it. The tires are cheap but wear great, low noise, do good in rain and rides well. At that price I will have no issue shredding them and recommend them to anyone that doesn’t need the stickiest tire out there.
 

Attachments

  • 9E8E60EF-149F-4D79-BFEE-B087DAA35B94.png
    9E8E60EF-149F-4D79-BFEE-B087DAA35B94.png
    426.5 KB · Views: 187
  • FD6B97E8-4939-4CC5-8EE9-1F7F0679A980.jpeg
    FD6B97E8-4939-4CC5-8EE9-1F7F0679A980.jpeg
    216 KB · Views: 198
  • ABA5B89B-79E6-4CAE-ABE6-959CFC3F0D34.jpeg
    ABA5B89B-79E6-4CAE-ABE6-959CFC3F0D34.jpeg
    293.3 KB · Views: 210
  • 63C662AB-305E-4843-85B9-C3AAB21D26E5.png
    63C662AB-305E-4843-85B9-C3AAB21D26E5.png
    471.3 KB · Views: 214
Last edited:
The brakes scared the crap out of me. They just wouldn’t grip. New hardware, wheel cylinders, shoes for the drums. Did 95 spindles up front, had a bracket made, to clear the 12” sport track drilled and slotted rotors, EBC yellowstuff pads. Go with the red stuff if your buying EBC, I’ll be switching to them. Painted the calipers red and the spindles black. Changed out to a Dodge 2500 master cylinder, flushed the lines using dot 4 and now she stops like a dream. I have a 8.8 with disk for the rear but have to build the rear end first. Added Moog ball joints and timken bearings while I was in there.
 

Attachments

  • 002B3889-80CB-4CC1-88E6-FE065794C11B.jpeg
    002B3889-80CB-4CC1-88E6-FE065794C11B.jpeg
    180.9 KB · Views: 193
  • 1BCFB6D6-656A-43BF-A849-6E7A1F90FD3F.jpeg
    1BCFB6D6-656A-43BF-A849-6E7A1F90FD3F.jpeg
    263 KB · Views: 197
  • DDF7E334-57EF-4373-9A27-A9A3D26BF110.jpeg
    DDF7E334-57EF-4373-9A27-A9A3D26BF110.jpeg
    247 KB · Views: 210
  • D3955B1D-2BCA-4BCC-BFDC-495D033ABA50.jpeg
    D3955B1D-2BCA-4BCC-BFDC-495D033ABA50.jpeg
    136.5 KB · Views: 194
  • 72496F0A-5155-49FB-9E05-3258A43B2CAE.jpeg
    72496F0A-5155-49FB-9E05-3258A43B2CAE.jpeg
    152.8 KB · Views: 191
  • FF8C4D95-A926-472C-BF04-23F107F9E8FE.jpeg
    FF8C4D95-A926-472C-BF04-23F107F9E8FE.jpeg
    257.6 KB · Views: 192
  • 49A32A15-5508-495C-B421-62358E86D1DD.jpeg
    49A32A15-5508-495C-B421-62358E86D1DD.jpeg
    210 KB · Views: 209
  • 4D94CBD5-C1C0-4937-B55F-D4677881E92C.jpeg
    4D94CBD5-C1C0-4937-B55F-D4677881E92C.jpeg
    246.8 KB · Views: 198
Upgrade to 130a power master for all the electronics and added the E60 bmw seats. I made the old pan work with the BMW pan and has to cut an inch off of the seat to make them fit. Took out the BMW heated seat, installed an after market heated seat and wired all the motors in the seat to rocker switches. I fit comfortably at 5’8” but 6’ wouldn’t!
 

Attachments

  • 6B11F255-941C-4719-ABC8-6D6024A5F950.jpeg
    6B11F255-941C-4719-ABC8-6D6024A5F950.jpeg
    243.1 KB · Views: 182
  • CD8C5E29-9831-4B02-AD78-63F373FAFEA6.jpeg
    CD8C5E29-9831-4B02-AD78-63F373FAFEA6.jpeg
    89.2 KB · Views: 192
  • 79CBDFCC-C5AC-485C-828B-CD6EA40E6DCE.jpeg
    79CBDFCC-C5AC-485C-828B-CD6EA40E6DCE.jpeg
    183.1 KB · Views: 198
  • 73D33BDE-CEC0-4B5E-A29D-98596DFFD6D1.png
    73D33BDE-CEC0-4B5E-A29D-98596DFFD6D1.png
    610.9 KB · Views: 189
  • 7235E01B-4EAE-487E-8269-31B4048694FE.jpeg
    7235E01B-4EAE-487E-8269-31B4048694FE.jpeg
    129 KB · Views: 185
Looks like it will be a nice build... Im still not selling the DJM beams.
 
Looks like it will be a nice build... Im still not selling the DJM beams.
Hahaha. I didn’t need the shocks or flip kit anyways. Man, I didn’t realized I put that much work in it. I still have a bunch to add! Thanks for the idea to document. Now I’ll have record of it. What about those clears?
 
Hahaha. I didn’t need the shocks or flip kit anyways. Man, I didn’t realized I put that much work in it. I still have a bunch to add! Thanks for the idea to document. Now I’ll have record of it. What about those clears?
HA... Not in this lifetime.
 
Big fan of the MaxTow series gauges. Get the digital and analog read at a third of the cost of auto meter/ AEM. If you have EDIS, do yourself a favor and use the wire off the backside of the instrument cluster. I tried off of the ignition module, into the computer and only got a correct reading off that wire. FWIW I had a nasty short in fords crap wiring that was probably my issue all along.
 

Attachments

  • 58E32675-AA4E-4497-8DE1-CA112E9A4E86.jpeg
    58E32675-AA4E-4497-8DE1-CA112E9A4E86.jpeg
    31.8 KB · Views: 182
Got a cosworth style IC and aluminum radiator for Merkur as a package deal with other parts. To be honest I would have been better off keeping the IC and selling the radiator but the man challenge got in the way. Radiator system is now an expansion tank system and it’s all in there. Radiator support is hacked to hell but is braced and the hood pins will be put in soon🤣
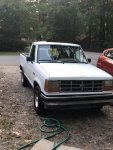
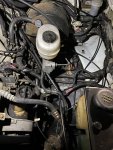
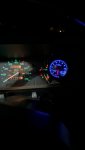
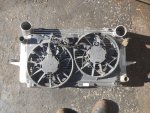
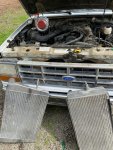
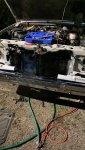
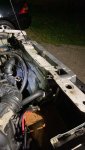
. My Rachet strap does a grey job holding the hood down, until then. Getting rid of the mechanical fan, flushing the radiator fluid, new water pump and thermostat were well worth it. I picked up 2 more miles per gallon and the truck pulls a little better.
 

Attachments

  • 66561C4E-C600-43E9-930F-7854B343E3C8.jpeg
    66561C4E-C600-43E9-930F-7854B343E3C8.jpeg
    259.1 KB · Views: 209
  • E674F114-09DD-4D7A-9159-A239251EE097.jpeg
    E674F114-09DD-4D7A-9159-A239251EE097.jpeg
    310.4 KB · Views: 208
  • 42B7DD4D-8ACA-48CD-9061-04C226DA5843.jpeg
    42B7DD4D-8ACA-48CD-9061-04C226DA5843.jpeg
    252.2 KB · Views: 205
  • B71BD03C-6209-4206-B926-091E7EC3ED5C.jpeg
    B71BD03C-6209-4206-B926-091E7EC3ED5C.jpeg
    149.8 KB · Views: 187
  • FE1BC1F6-D63E-4551-A6E9-B42F5D75C9FA.jpeg
    FE1BC1F6-D63E-4551-A6E9-B42F5D75C9FA.jpeg
    296.6 KB · Views: 187
  • 27A38C48-23F0-4296-95AD-F85D82218EC8.jpeg
    27A38C48-23F0-4296-95AD-F85D82218EC8.jpeg
    166.7 KB · Views: 196
  • AB1476ED-93D8-400A-9C9C-29BEE7E41BC1.jpeg
    AB1476ED-93D8-400A-9C9C-29BEE7E41BC1.jpeg
    114.7 KB · Views: 214

Sponsored Ad


Sponsored Ad

TRS Events

Member & Vendor Upgrades

For a small yearly donation, you can support this forum and receive a 'Supporting Member' banner, or become a 'Supporting Vendor' and promote your products here. Click the banner to find out how.

Latest posts

Recently Featured

Want to see your truck here? Share your photos and details in the forum.

Ranger Adventure Video

TRS Merchandise

Follow TRS On Instagram

TRS Sponsors


Sponsored Ad


Sponsored Ad


Amazon Deals

Sponsored Ad

Back
Top