• Welcome Visitor! Please take a few seconds and Register for our forum. Even if you don't want to post, you can still 'Like' and react to posts.

Better to drop radius arm or carrier bearing crossmembers?


lowspeedpursuit

Well-Known Member
Joined
May 6, 2022
Messages
277
City
DE
Vehicle Year
'94, '95
Transmission
Manual
Found a new Ranger! Doing the clutch on a '95 4.0 Supercab.

Tcase won't split from the trans, which happened in my other '95, so I just dropped them together. But, I've also got a stripped bolt from the little stub rear driveshaft to the tcase.
The entire assembly, trans/tcase/driveshaft stub, is too long and hung up between the two crossmembers that are riveted in.

I feel like it's probably easier to drop the carrier bearing crossmember (it looks hard to get a grinder on the upper rivet for the radius arms) but I'm not sure about access below the gas tank to get bolts back in, and dropping the radius arms now makes it easier to put a lift there in the future.

What do the experts say?
 
Well if you must do one or the other... the carrier bearing crossmember for sure, because it's not partially attached to the front suspension.

That said here are a few other options:
- There is a little spot on one specific part of the t-case where it mates to the transmission where you can fit a screwdriver or pry bar into and I have had 100% success prying there to separate the two when they are stuck together.

- You can separate the two halves of the driveshaft pretty easily, could you do that instead of removing the crossmember?

- Surely there is a way to get the stripped bolt out. Bolt extractor, vise grips, cut the u-joint strap off, cut the head of the bolt off, etc...................
 
So I forgot to mention, the ship has probably sailed on extracting the bolt or splitting the tcase, because I'm a dumbass and already pulled the trans off the engine. I can't get the leverage I need at this point. Cutting the head off the driveshaft bolt is hypothetically feasible.

The driveshaft is split, and the carrier bearing is off the crossmember. Basically I figured I would either fold the driveshaft stub around the carrier bearing crossmember, or slide the assembly far enough back for the trans to clear the radius arms, then forward again, but I'm used to working on my old truck with a 1" body lift.

Without a BL, the stub wedges between the body and the crossmember and won't drop. The tcase clocked normally hits the heat shield and gas tank before it gets far enough back for the trans to clear the radius arms, and I can't rotate the assembly so the tcase points down because the starter pocket wedges the bell between the cab and radius arms.

It's like a perfect shitshow of "if I had one inch more space in any direction, this wouldn't even be difficult".
 
Circling back, I managed to stabilize everything well enough on one trans jack, one floor jack, and a ratchet strap to cut the driveshaft bolt, so big ups to Shran pointing out that would probably be easier.

I'm now looking for "Manual Transfer Case Shift Linkage Bushing" 3L5Z-7335-AA. Apparently Ford finally discontinued those since I last did a tcase 3 years ago. Thought I bought a spare, but who knows where it ended up.

What are people doing for these anymore? Only search result seems to be this dude saying "I made my own".
 
Now I have extra parts.

Just sanity-checking: there's no o-rings this small in our trans or transfer cases, right? I'm like 95% confident I haven't seen one of these before, and I don't see it in the manual or rebuild kit pictures, but it ended up near my head when I was bolting the cat back in just now.

It could be from any of 1000 other things going on in this truck or my garage, but I want to make sure it didn't fall out of what I'm actually working on.

oring38.jpg
 
Okay, can someone explain the driveshaft bearing dust shield situation to me?

There's exactly one, on the forward side, and nothing built into the driveshaft? How far is this bearing supposed to be pressed on? Barely snugging the dust shield up?

I have a squeak coming from this area. I beat the old bearing off with a hammer, and the old dust shield didn't move one bit, so I assumed it was part of the shaft, and now I'm doubled up.

I don't really see anyone with pictures acknowledging this bearing is press-fit at all.
 
I would have just swapped to the later “one piece” driveshaft rather than mess with the carrier bearing…

I think @Rick W had to deal with this just recently, maybe he has some helpful input
 
I probably just need to search better. I hate video tutorials, and I'm only finding 2wd examples, so I can't confirm if the 4x4 stub shaft might actually have this piece built-in.

I just checked the '94 manual, and realized the "official" writeup basically just copies that. No diagrams, doesn't acknowledge any dust shield, no info on press-fit.

For my convenience, sure, one-piece all day. I still could in the future. But we're talking $39 vs $772 new off-the-shelf shipped.

EDIT: This dude with his F250 with stacked lift blocks is showing a different shield fit onto the driveshaft like I have, says he doesn't use the bearing dust shields, and then the video shows him installing the front one anyway. So that's helpful.
 
Last edited:
I would have just swapped to the later “one piece” driveshaft rather than mess with the carrier bearing…

I think @Rick W had to deal with this just recently, maybe he has some helpful input

I just did the 2 Piece Driveshaft Center bearing on my 97 4.0 2-Wheel Dr.

First, and this was my $400 mistake, before you pull the two pieces apart, Mark both sides of the shaft and the yoke on the front driveshaft to put it back with the same alignment. When you put it back together, the U joints have to be in the same alignment or you get a vibration.

To get the driveshaft out, I had to take the two straps off the center U joint by the center bearing. Then there are the two bolts that hold the horseshoe for the bearing in place. With those out, you can wiggle the whole thing forwards and backwards to get the front piece out. You don’t really have to take the back of the back shaft loose. Again, just make sure it’s lined up when you put it back together with the front shaft.

There’s a bolt down the center of the yoke that holds the center u joint. You have to take that out. I had to use a puller to pull that yoke off. Then I had to use a different puller to pull the bearing off.

I cleaned everything up with a wire brush and a little emery paper. I used a scrap piece of pipe the right diameter to gently tap the bearing onto the drive shift. It’s supposed to be bottomed out. When you put the yolk back on, again line it up, and crank down on the bolt down the center to just close the gap on the front or back of that bearing. I don’t know the torque spec. then it just gets reassembled in reverse order.

I don’t exactly remember exactly where the dust shield was installed, at what step. I could look under my truck tomorrow and take a picture and tell you if you need it.

The rubber bushing in the horseshoe went bad when I was going about 30 miles an hour, and those two driveshafts really banged around under the truck for the 10th of a mile it took me to drive home at 5 miles an hour. When I had the vibration after I put it all back together, I just assumed the driveshaft had gotten damaged from that racket. Actually, I screwed up the alignment, I took it to a driveshaft shop, and I had to check the entire thing, and basically I had that yolk on the spline at incorrect clock setting and that was the vibration. I’ve driven it a couple thousand miles since, maybe 3000, and I have no issue (with that).

If you need me to look at it, I could do that tomorrow morning, just let me know
 
Last edited:
I crawled underneath the truck this morning. Lincoln was licking my face, but I was still able to get a couple pictures.

Rear side:

IMG_4762.jpeg


Front side:

IMG_4771.jpeg


Remember, this is the way the professional driveshaft shop installed it. That dust shield ring is on the backside, between the bearing and the yoke.

Hope it helps
 
You da man, thanks for going out of your way for the pics.

I just got my driveshaft stub back out and on the bench. Waited until I had time to mount 31"s and a 1" BL on the bed to give myself a bit more room to work.

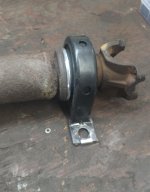
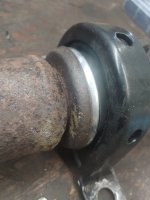
95_drivestub_zoomout.jpg95_drivestub_zoomin.jpg

This is what I'm working with. The rusty bit the redneck in that youtube video called the "slinger" is at least press-fit on the driveshaft and always spins with it 1:1. The dust shield I assumed would also be sandwiched in between the slinger and the rubber, but my bearing is bottomed out and the shield still has barely enough room to wiggle back-and-forth on its own, which I assume is my squeak.

There is a ton of room on the other side between the bearing and the yoke. I would need to deliberately not bottom out the bearing to even have a chance of holding the rear dust shield in place. I'm thinking I just run without either shield.

Hopefully the shaft fits through the beam in my tiny press with the flange adapter u-joint at the other end removed, because I don't see how I could get the bearing off non-destructively otherwise.


On yoke alignment, the yokes at each end of the shaft are meant to be in-line with one another, right? So there should only be two possible alignments: in-line one way, and then exactly 180° around the other way? Or is that not correct?
 
I think you only need one of those slingers or dust shields or whatever you want to call them. I would recommend reusing the old one. I just did this on my wife's 95 and the aftermarket piece was just barely a press fit. It started spinning on the shaft within a couple miles (frustrating because I bought the good Dana part... junk.) I had to disassemble it and put the old one back on. Two are not needed. IIRC it was oriented with the dust shield towards the front of the truck so that dust blows off it as you drive forward.

As far as removing the bearing: I just use a two jaw puller to remove it. Very easy. I think I just pressed the bearing on as far as it would go and that's where it was at before. Think I just used a socket and a hammer to drive it back on... it was not a super tight press fit where the shop press would have been needed.

As far as yoke alignment - it should go back the way it was before, that's how the shaft was balanced. I'd imagine the yokes should be aligned with each other but I guess it could have been balanced either way.
 
Yeah, I used a bearing separator. Press just pops the rubber off the bearing itself.

I see how it's supposed to work now: the rusty shield and the new shields are supposed to be the same part, but the new one has a greater inner taper up to a major ID ~0.08" too large to press onto the shaft. The bearing cage has a lip that could fit together with the shield and restrain it, but they're ~0.4" shy of actually snugging up, even with the bearing bottomed out. Ditto for the forward lip on the rubber.

I'm not sure if aftermarket parts aren't meeting tolerance, or there are subtle variations in Ranger shafts by drivetrain, etc. and they're just selling the most common size, or what, but it sucks that even the Dana parts have this problem.


I was in a hurry to get to inspection first thing in the morning (still took 3+ hours) and never marked the yoke alignment in the first place. Figure if I have a vibration I'll try 180° first, then maybe 90°, and at that point I'd probably just rebalance it as well as I can with a hose clamp or two, which is what I did after shortening the shaft from my other '95.
 
You da man, thanks for going out of your way for the pics.

I just got my driveshaft stub back out and on the bench. Waited until I had time to mount 31"s and a 1" BL on the bed to give myself a bit more room to work.

View attachment 130890View attachment 130891

This is what I'm working with. The rusty bit the redneck in that youtube video called the "slinger" is at least press-fit on the driveshaft and always spins with it 1:1. The dust shield I assumed would also be sandwiched in between the slinger and the rubber, but my bearing is bottomed out and the shield still has barely enough room to wiggle back-and-forth on its own, which I assume is my squeak.

There is a ton of room on the other side between the bearing and the yoke. I would need to deliberately not bottom out the bearing to even have a chance of holding the rear dust shield in place. I'm thinking I just run without either shield.

Hopefully the shaft fits through the beam in my tiny press with the flange adapter u-joint at the other end removed, because I don't see how I could get the bearing off non-destructively otherwise.


On yoke alignment, the yokes at each end of the shaft are meant to be in-line with one another, right? So there should only be two possible alignments: in-line one way, and then exactly 180° around the other way? Or is that not correct?
I put everything in the right order, but I didn’t have it aligned right by clock settings.

These are the guys who corrected that for me: doraville Drive line and spring

IMG_4784.png


They are really nice professional guys. I’m sure if you call them up on the phone and tell them you’ve got this problem and they were recommended. They can walk you through the steps.

I’m not exactly sure how the yoke and such are supposed to be lined up other than the fact that it’s gotta be correct which I found out when I had a vibration. But they pulled it out and fixed it and put it back in after that, so I still haven’t learned the particular

Hope it helps
 

Sponsored Ad


Sponsored Ad

TRS Events

Member & Vendor Upgrades

For a small yearly donation, you can support this forum and receive a 'Supporting Member' banner, or become a 'Supporting Vendor' and promote your products here. Click the banner to find out how.

Recently Featured

Want to see your truck here? Share your photos and details in the forum.

Ranger Adventure Video

TRS Merchandise

Follow TRS On Instagram

TRS Sponsors


Sponsored Ad


Sponsored Ad


Amazon Deals

Sponsored Ad

Back
Top