• Welcome Visitor! Please take a few seconds and Register for our forum. Even if you don't want to post, you can still 'Like' and react to posts.

Another fallen victim of leaking capacitors


ronclark

Well-Known Member
Supporting Member
Ham Radio Operator
GMRS Radio License
Joined
Oct 22, 2008
Messages
926
City
Woodland, WA
Vehicle Year
1987
Engine
4.0 V6
Transmission
Manual
Total Lift
2
Tire Size
30
My Ranger has started to run like its got no fuel. It start as a stumbing under load and then not idling.
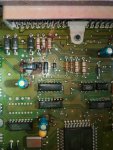
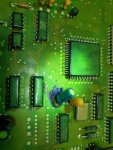
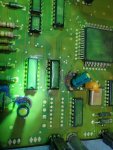
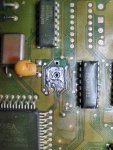
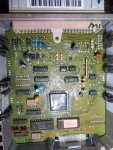
Today I stared to dig into things and decide to pull the ECU and found this carnage.
While I wait for parts I am ultrasonic cleaning for board. I am hoping for no to minimal board damage.

20250628_124136.jpg
 
Oof… hope that cleans up fine. Starting to wonder if I should just replace caps as preventative maintenance or at least do a regular check of my rigs…
 
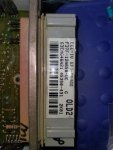
The ECU is from a 94 Ranger, I think anything from
Oof… hope that cleans up fine. Starting to wonder if I should just replace caps as preventative maintenance or at least do a regular check of my rigs…

I think it's a good idea to prevent board damage. I am going to replace the tantalums as a good measure, since those of that vintage tend to short out in computers.
 
That is a good point…

Well, once I get a few projects handled I might have to just start doing some computer surgeries on my workbench… might need to get myself a good stool…
 
My Ranger has started to run like its got no fuel. It start as a stumbing under load and then not idling.
Today I stared to dig into things and decide to pull the ECU and found this carnage.
While I wait for parts I am ultrasonic cleaning for board. I am hoping for no to minimal board damage.

View attachment 130540
Oof, that's nasty. I think you caught it in time where it would be pretty easy to save it though. Amazing what the electrolyte did to the coating on the resistors.

Edit: modern tantalums are supposedly better than vintage ones but you might consider changing them for film caps or electrolytics depending on the values.
 
So… I’m gonna follow this and ask for updates of the process and what got changed… I’m starting to realize that it’s been enough years since I messed with circuit boards and what I remember is probably way out of date… the things that happen when you don’t have a good place to work on stuff. Now that I have a shop because I managed to pull my head out of my posterior and realized that the only thing stopping me from having a shop was… me. So I have a place to do these projects… and a list of projects a mile long…

Maybe we could put together a tech article on it since this is becoming a common problem as these vehicles age…
 
I could do some or all of that. I'm not a Ranger computer expert but I work on all sorts of PCBs. Would you guys prefer an article with Ranger specific detail or would a general "how to work on PCBs" be helpful? I can hit some high points here too. Some of the basics like "how hot should my iron be" and "what kind of solder should I use" and "how do I test X component/how do I know X is bad?" aren't things most people deal with on a daily basis.

Edit: if you guys want to suggest in this thread, or in a new thread, what kinds of questions you think should be answered in a tech article like that, let's get something basic going and then I can maybe flesh it out into something more permanent.
 
Last edited:
Maybe start with a Ranger specific one? I suspect some people are capable of soldering but wouldn’t know where to start with what parts would need to be replaced and how to know what to get, so that would help them with specifics on what to do. A general article would be a good idea too. Gonna be awhile before I can get to it, but I could even do some video
 
I'll have to defer to someone who has an old Ranger computer and/or someone who's familiar with their particular issues then - I don't have any on hand to refer to.
From what I've seen from the various threads on here (including this one), the main issue seems to be bad electrolytics, which is pretty straightforward to deal with if you have decent soldering skills.
I know very little about pcms, so a general article would be great, we can always apply general knowledge to a ranger.
 
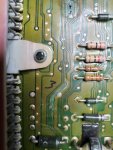
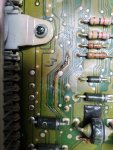
I have an update: I had to repair two traces, replace three capacitors, and four resistors. I don't have the tantanum, and I need to conformal coat the areas where I removed it, so I'll do that later.
The truck started right up and runs like a top.

I am by no means an expert at board repair, so probably better ways to get this done.
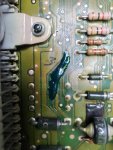
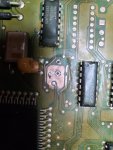
I found it best to clip out the bad components, scratch with the fiberglass pen to remove conformal coating, solder mask, and corrosion. The electrolite gets under the conformal coats and solder mask and eats the copper away.
Flux the area and add new solder to melt the old solder, pull the legs out.
I used the needles to clean out the holes; solder wick would work too.
I used my ultrasonic cleaner with a mild solution of white vinegar to clean up as much of the mess as I could.

A tip: with a UV light, you can see where the electrolyte has leaked.
For the traces that were damaged, I used magnet wire to make the repairs. Coated the clean copper and the magnet wire repairs with UV-cure coating.
Make sure you use an ohm meter to verify your repairs. The vias can also be eaten away, and that's a tougher repair; that's when you have to run bodge wires to complete the circuit.

The resistor values were guessed, I decoded the best I could, and compared them to photos online. I hope they're right

My ECU is from a 93 4.0L Ranger, if that helps anyone. If I were not in a hurry to get everything running, I would have made a video.

I used
  1. One 10uf 63v 105c capacitor (buy high-quality caps)
  2. Two 47uf 16v 105c capacitors (buy high-quality caps)
  3. Two 200-ohm 1/2w metal film resistors (just what I had on hand)
  4. One 510-ohn 1/2w metal film resistor (just what I had on hand)
  5. One 2k-ohm 1/4w metal film resistor (just what I had on hand)
Tools and supplies you might want
  1. Solder Iron, of course
  2. Solder
  3. Solder wick and or stainless steel non-stick tin hollow core needle (Great for cleaning the throw holes out)
  4. Lots of flux
  5. conformal coating
  6. magnet wire
  7. Fiberglass Scratch Brush (works great for removing the solder mask, conformal coating, corrosion.
  8. UV-cure solder mask.
20250628_124136.jpg20250629_082813.jpg20250629_083050.jpg20250629_085039.jpg20250629_085607.jpg20250629_085624.jpg20250629_085654.jpg20250629_093223.jpg20250629_095607.jpg20250629_204224.jpg
 
That's a great write-up. Thank you.
 
I have an update: I had to repair two traces, replace three capacitors, and four resistors. I don't have the tantanum, and I need to conformal coat the areas where I removed it, so I'll do that later.
The truck started right up and runs like a top.

I am by no means an expert at board repair, so probably better ways to get this done.
I found it best to clip out the bad components, scratch with the fiberglass pen to remove conformal coating, solder mask, and corrosion. The electrolite gets under the conformal coats and solder mask and eats the copper away.
Flux the area and add new solder to melt the old solder, pull the legs out.
I used the needles to clean out the holes; solder wick would work too.
I used my ultrasonic cleaner with a mild solution of white vinegar to clean up as much of the mess as I could.

A tip: with a UV light, you can see where the electrolyte has leaked.
For the traces that were damaged, I used magnet wire to make the repairs. Coated the clean copper and the magnet wire repairs with UV-cure coating.
Make sure you use an ohm meter to verify your repairs. The vias can also be eaten away, and that's a tougher repair; that's when you have to run bodge wires to complete the circuit.

The resistor values were guessed, I decoded the best I could, and compared them to photos online. I hope they're right

My ECU is from a 93 4.0L Ranger, if that helps anyone. If I were not in a hurry to get everything running, I would have made a video.

I used
  1. One 10uf 63v 105c capacitor (buy high-quality caps)
  2. Two 47uf 16v 105c capacitors (buy high-quality caps)
  3. Two 200-ohm 1/2w metal film resistors (just what I had on hand)
  4. One 510-ohn 1/2w metal film resistor (just what I had on hand)
  5. One 2k-ohm 1/4w metal film resistor (just what I had on hand)
Tools and supplies you might want
  1. Solder Iron, of course
  2. Solder
  3. Solder wick and or stainless steel non-stick tin hollow core needle (Great for cleaning the throw holes out)
  4. Lots of flux
  5. conformal coating
  6. magnet wire
  7. Fiberglass Scratch Brush (works great for removing the solder mask, conformal coating, corrosion.
  8. UV-cure solder mask.
View attachment 130592View attachment 130593View attachment 130595View attachment 130596View attachment 130597View attachment 130598View attachment 130599View attachment 130600View attachment 130601View attachment 130602
Ummmmnnnn....what did he say? :unsure:
I have no idea, but I am bookmarking it and looking up translations.
@ronclark Do you do repair work and what are your rates?
Seriously.
I understand some of it. On my 94, I made it as far as the three typical capacitors that always seem to go bad, but after that...pphhhhtttt.
This is great info. Between you and @pentode a tech article would be great. I am sure someone here would volunteer a PCM.
Thanks for this.
 

Sponsored Ad


Sponsored Ad

TRS Events

Member & Vendor Upgrades

For a small yearly donation, you can support this forum and receive a 'Supporting Member' banner, or become a 'Supporting Vendor' and promote your products here. Click the banner to find out how.

Recently Featured

Want to see your truck here? Share your photos and details in the forum.

Ranger Adventure Video

TRS Merchandise

Follow TRS On Instagram

TRS Sponsors


Sponsored Ad


Sponsored Ad


Amazon Deals

Sponsored Ad

Back
Top