• Welcome Visitor! Please take a few seconds and Register for our forum. Even if you don't want to post, you can still 'Like' and react to posts.

Aluminum topper refurbishing


professor229

Well-Known Member
Joined
Dec 24, 2021
Messages
142
City
Minnesota
Vehicle Year
2004
Transmission
Automatic
I found a seven foot Radco topper (cap) for my Ranger project.....and I bought it for $100 because it was in fairly decent shape.... Since I live in MN I really like toppers on my trucks because of the snow.... I have come to a stopping point on the Ranger until the new year when I will begin pulling hail dents and try to get some major dents out of the box/bed sides.... The plan was to replace the passenger bedside but every place I look now to buy one it says "discontinued." Remember it is a seven footer.... So I will do my best to pull dents instead.... So we just got a minor arctic blast so I moved my bench grinder into my utility room in the basement and decided to pull the ladder rack off the topper and grind the powder coating paint that is flaking off.... and have one more day of grinding before painting the ladder rack.... Since I have rebuilt/restored aluminum boats, I know what I need to do for painting... Back to the topper though... The guy I bought it from tore off all the black trim molding in the screw tracks... The black molding is used to wedge in the tracks to cover the screws.... This may seem like a pretty goofy request... but when I went to buy some new molding, they had three sizes.... 1/2 3/4 and 1 inch wide..... The distance across the trough of this track is 3/4 inch.... Now, which size should I order? I tried to google this... "how to measure for topper track molding" and came up with nothing definitive... Suggestions? Have you done this? I am also going to try a technique for fixing the minor rust problem around the wheel wells... filling the holes by filling them with welds instead of the hated bondo.... I was successful with fiberglass/resin filling on a 240Z years ago but I saw a kid doing this kind of fill welding in high school and remember him saying... "you gotta love grinding metal.... " but it looked great when he was done... It was a Cougar he was working on and after that project he was nicknamed "Coug"...... anyway.... Have a happy new years! PS... Created a new Flickr account for this Ranger project too....
100_5812.JPG
100_5940.JPG
 
Last edited by a moderator:
I would like to learn your techniques for painting aluminum, so i hope you document the process.
For the trough, i installed sunrooms and they have a similar system for covering screws. The filler piece needs to be wider than the triugh so that the filler is concave. Measure the trough and go to the next bigger size. If the filler is aluminum then be careful, it kinks easily. Order enough so you can practice first.
 
Good morning.... yes, if the trough is 3/4 I would think 1 inch is the best bet.... and seems to be the most prevalent size you find as well... I did a direct "chat" with Radco online and sent photos etc.... and the response was to take the unit to my nearest Radco dealer so they could look in person.... which I am not going to do..... Simply, if I go there, I will feel more/less obligated to buy from them and I do like to shop around.... so I am going to stay independent and wait until I can find someone with the end of a 1 inch roll and ask for a couple inches to "try"...... I can wait... swap meets next summer etc...

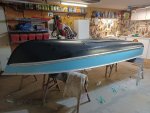
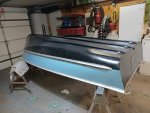
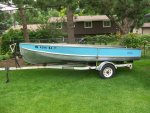
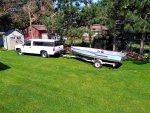
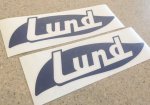
As far as the aluminum boat painting technique, I learned it "the hard way" many years ago now.... but times have changed there too.... Aluminum paint stripper, better known as "aircraft paint stripper" has gotten very very expensive... It works well... but ...... The first attempt at restoring a 1960's Lund boat was fun... and super easy (I thought) compared to painting a vehicle.... I even contact Lund boats in those days because I heard if you sent pictures of the project, that they would send you the period correct decals for free.... and it happened.... The next time I tried to restore a Lund boat I found that contacting the factory was impossible and you were funneled to a local dealer, who is/was not going to give you free decals.... That led to plan B and of course Ebay for aftermarket decals which were reasonably priced.... I did buy the stripper at Walmart and went to work on my first attempt... I thought about trying to "save" the hull numbers and registration but it wasn't worth it..... I had to get a new registration sticker anyway.... so the old razor blade scraper came out after shooting all these stickers down with WD40.... I then removed all the paint... As a paint prep I have always used generic brake cleaner...... poor man's paint prep..... So after the prep was done, including the masking, I used self-etching primer...... and after it cured (doesn't take long with this stuff) I then applied the Lund red paint.... what color is Lund red paint? They won't tell you..... take a few chips of red flaked off paint to your nearest big box store and match it up and buy a quart.... I then used a high density roller to paint the upper third of the boat...... and it looked fantastic.... for about one month.... Then the paint started "flaking off" .... So what did I do wrong? Research and found out that Rustoleum red paint or any paint for that matter does NOT like self-etching primer.... but, you have to use self-etching primer on aluminum.... The solution? Simple and intuitive.... after the layer of self-etching primer, put down a layer of "sandable auto primer" or two before applying the single stage enamel or whatever.... The second time I did the boat it worked great and lasted more than five years..... As the weather turned cold this fall, I decided to put a new paint job on the boat.... something different than Lund red..... and I was facing that old problem of hull gunk that is hard to remove..... but I did.... get the hull clean and thought I would experiment by painting it... worse case scenario in the fall is to remove the paint and re-coat it if it was again hard to clean..... So I used my marine blue paint on the upper part, and below the bumper strip, I used semi-gloss black Rustoleum..... with the warning that this might not last long if the boat is moored all the time in the water... It is not.... trailered... so I will try.... This again used self-etching primer first, and then a couple layers of sandable primer, and several coats of Rustoleum paint with the high density roller system.... and of course, frog tape.... Attached are the finished pictures and there are no decals yet although I did order two Lund decals that are a very dark blue (almost black looking) from the Internet guy..... and I think they will look fine although far from "authentic." The hull numbers come from Walmart... where else.... and I cannot renew the license sticker on this until after January first.... So next spring I have a good hour of work applying decals.... Right now the boat is sitting upside down behind the garage with a nice cover and layer of snow on top of it.... Three years ago I made an impulse buy at a garage sale... a 1960s Cadillac 16 footer... brought it home and it took a lot of work inside and out... as well as the Shorlander trailer which turned out spectacular.... I paid $500 for everything.... but sold it when it was no longer needed and just sitting there.... and a 12 footer is just so easy to launch.... I also attached the Lund dark blue decal pictures.... The best part of restoring boats? You don't need a year or two to do them and they don't cost an arm and a leg.... most of the cost is labor... and I am sure everyone on this website knows how cheap labor is...... It's all fun though.... Hope this helps.... PS.... How do you like the lightening bolt on the Cadillac boat the day I brought it home?
 

Attachments

  • 20211101_132538.jpg
    20211101_132538.jpg
    341.9 KB · Views: 107
  • 20211101_132555.jpg
    20211101_132555.jpg
    309.2 KB · Views: 110
  • 100_5295.JPG
    100_5295.JPG
    283.2 KB · Views: 108
  • IMG_20190607_160511445.jpg
    IMG_20190607_160511445.jpg
    452.4 KB · Views: 103
  • lund4.JPG
    lund4.JPG
    83.8 KB · Views: 104
The filler piece needs to be wider than the triugh so that the filler is concave. Measure the trough and go to the next bigger size.

Agree 100%. Sunroof screw covering, and the trim used on hi-top van conversions both work on the same principal. The filler is wider than the channel, and will bow out after it's installed. Slip one side of the filler strip into the groove on one side of the trim for a short distance, then use a blunt tool to push the other side of the filler strip back and under the other groove. A wooden paint stir stick works well, whereas something like a screwdriver may gouge the filler strip.
 
I took a chance and researched one inch trim and it was worth the time... shipping cost is a killer on this and I found Walmart to be about $9 plus about $6 shipping.... for 25 feet or one inch material..... I suspect that is a decent deal.... even though I have no idea how much I actually need.... BUT I kept looking and found 100 feet of one inch stuff on Amazon for less than $14 with free shipping using Amazon prime... my son has that account.... so it is going to be a lot more than I need .... 100 feet, but for less money than the 25 feet from anyplace else....

I also started using my bench grinder wire brush to clean up the roof ladder racks and removing the flaking off power coated black.... and some of it argued... some of it just flew off... Regardless, I thought I could finish with the poor excuse of a wire wheel that I have had on this machine for years... I was wrong!!! So I am headed for Menards to buy a new six inch wire wheel.....

Thanks for the advice on the screw covering trim.....
 
When it comes time for install, you may find that silicone spray may help get the molding to slip in better and it won't harm the paint or the molding.

I agree with the self etching primer. For aluminum, zinc coated steel, and galvanized steel, it's the only thing I could find that would get the paint to stick reliably. At the current $10 a can price, it hurts the wallet a bit but it's a "buy once, cry once" kind of deal.
 

This is the self etching primer I have used... Also.... I installed some stripping like this many years ago now, on a snowmobile trailer and if I remember correctly, I had to use a heat gun to warm it a bit to make it more pliable..... Did I remember correctly?

And a question......When you say "silicone spray" would WD40 work? or is there another product I should consider?

I tried to grind some more powder coating off the ladder racks today.... exciting work you know.... and had to quit because my bench grinder started tossing small pieces of wire at me.... Time to replace the wire wheel!!!!!

Is anyone else "old school" and have a dislike for clear coat and powder coating? Most all my restoration projects over the years has been a single stage enamel, with color sanding and buffing.....
 
And a question......When you say "silicone spray" would WD40 work? or is there another product I should consider?

Is anyone else "old school" and have a dislike for clear coat and powder coating? Most all my restoration projects over the years has been a single stage enamel, with color sanding and buffing.....

WD-40 can effect the rubber/vinyl depending on it's composition. Silicone spray won't do that.

I don't like clear coat and I think powder coat is over hyped in my opinion. From what I see, powder coat doesn't hold up any better than any other surface coating. At least not in the rust belt.
 
From what I see, powder coat doesn't hold up any better than any other surface coating. At least not in the rust belt.

Ive had black powder coated step bars, grille guards & trailer hitches. The coating just peels right off after a year or two. Some of it could be bad prep but Ive yet to have any powder coated product hold up. At least its easy enough to areosol spray black paint back on it. Ive never had any experience with aluminum refinishing, Ive heard about zinc chromite primer but thats about it . (worked at a boat dealership after high school for a few years)
 
Is there a brand name of silicone spray that you can recommend from a big box store? Headed for Walmart early tomorrow morning and will buy some or at least look....

I was supt. of a golf course for over 30 years and during that time, we saw the change over to powder coated "everything" from ball washers to benches to rims.... Without fail, we had to strip them down after, at most, two years and repaint them... this time with a decent coat of primer or two and of course, Rustoleum....

My other pet peeve is clear coat.. It is wonderful for people who don't take care of their cars but want them to look nice for a few years and it does accomplish that... but then it starts to lift, especially on wheels in Minnesota... and the most common question I get from people is "can I just clear coat over it?" or "How do I fix it; the rims look awful."

For years, we took pride in buffing out cars with Satin wax and made them look almost new again... In the last few years, we have been using nothing but NuFinish on our cars and equipment... Yes, my neighbors still laugh at me for waxing my mowers.....

And the best paint I used when painting a restoration project, had been the Restoration Series paints made by Valspar.... but they discontinued that a few years ago now.... The guy that bought my 1947 street rod asked what color it was... I didn't have the heart to tell him it was Massey Fergeson red......

Have a good one...
 
Ive never had any experience with aluminum refinishing, Ive heard about zinc chromite primer but thats about it . (worked at a boat dealership after high school for a few years)

Zinc Chromate works. That what we use on aircraft at work. I've not seen any in hardware or auto parts stores though. Self-Etching is the next best thing and has worked pretty well for what I've done.
 
Is there a brand name of silicone spray that you can recommend from a big box store? Headed for Walmart early tomorrow morning and will buy some or at least look....

Whatever is on the shelf. They all seem to work about the same. I use it to keep the door seals pliable and "non-stick" in the winter. So I usually have some on the shelf. Gumout and CRC are two that I regularly see at the parts store.
 
Now I am beginning to question if I am doing the door seals correctly.... Whenever I am spending some quality time with a vehicle and doing it right, I wax the paint on the door jambs, lubricate the hinges, and apply Armor All (or equivalent) to the rubber gaskets that seal the doors to keep them pliable and nice looking..... Maybe I should be using something else?
 
Painting Aluminum: One coat of epoxy primer, then paint or powder coat. Aluminum has to be clean.

We sent awning frames to BOTH paint shops AND powder coater. The best luck we had to stop "chipping" was to use a two-part epoxy primer on clean aluminum. We tried cold galvanized spray primer, regular Rustoleum primer, K2 & a few other automotive primers. Nothing worked like the Epoxy stuff. Glad that you've found a way. The self-etching under the sandable/paintable stuff is good to know. It's more steps than epoxy but probably more cost effective.
 
Now I am beginning to question if I am doing the door seals correctly.... Whenever I am spending some quality time with a vehicle and doing it right, I wax the paint on the door jambs, lubricate the hinges, and apply Armor All (or equivalent) to the rubber gaskets that seal the doors to keep them pliable and nice looking..... Maybe I should be using something else?

Silicone spray. Armor all is for interior and exterior trim pieces. I prefer low sheen Armor All for interior bits to prevent blinding glare.
 

Sponsored Ad


Sponsored Ad

TRS Events

Member & Vendor Upgrades

For a small yearly donation, you can support this forum and receive a 'Supporting Member' banner, or become a 'Supporting Vendor' and promote your products here. Click the banner to find out how.

Latest posts

Recently Featured

Want to see your truck here? Share your photos and details in the forum.

Ranger Adventure Video

TRS Merchandise

Follow TRS On Instagram

TRS Sponsors


Sponsored Ad


Sponsored Ad


Amazon Deals

Sponsored Ad

Back
Top