• Welcome Visitor! Please take a few seconds and Register for our forum. Even if you don't want to post, you can still 'Like' and react to posts.

Aluminum topper refurbishing


I learned about self-etching primer over aluminum the hard way..... restoring a Lund boat and spending time and money to strip off the old original paint with aluminum aircraft $tripper...... which worked well... but after the final prep and taping, I used self etching primer and then a couple coats of red.... and put on the decals and it looked great for about one month... Then the flaking began right along with my research to find out what went wrong.... and I found out I was not alone and learned about self etching primer first and then you always run into the guy who actually knows the answer.... and in this case that guy said Rustoleum won't stick long to self etching and you have to put a layer or two of regular primer down before paint.. He was 100% right and the paint job lasted for five seasons and the only reason I removed the red paint, was because I wanted the boat to be a different color....

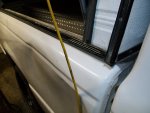
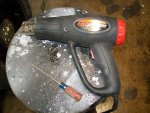
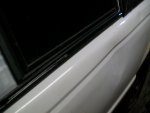
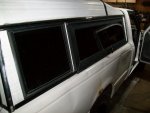
PS... Yesterday I learned.... the hard way again I guess.... My molding for my topper arrived so I cut off about six inches of it and tried to install it. I have done this one other time on a snowmobile trailer years ago.... but just didn't recall how I got it done.... It didn't go well because the garage wasn't all that warm and the molding was cold and brittle.... I also tried to clean the track rails with brake cleaner.... which I always have used as a paint prep and to clean items.... This time, I put a generous amount of the brake cleaner on a cloth and rubbed down one small area of the rail, then within ten seconds noticed the that the white paint was gone all the way down to the aluminum..... geez.... but I was debating whether or not to paint the topper because it was not perfect and kind of tacky looking.... This episode ended the debate.... Now the question is whether or not I want to remove the screw strips to paint the thing or just tape them..... I removed them from my Chevy topper only because it was going to be a color change.... As far as the molding... I remembered and tried it... It went VERY well... After cleaning the rail well, I heated the six inch piece of vinyl with a heat gun.... enough to where it was very pliable and it slipped right in where it belongs.... easy... the only mistake I think you can make is heating it TOO much.... But I am going to cut a piece of molding longer than needed for each strip off the 100 foot roll, and then heat it slightly as I go pushing it into the grooves..... Same old story.... win some/ lose some.....
 
I spent today installing the trim molding on the topper.... got about half done and learned some techniques that worked extremely well... I wonder if the pros have a tool to do this? Simply, I had to remove part of the vertical ends to be able to slide the horizontal ends under them when you come to the ends..... I actually didn't use any tools except a very small flat blade screwdriver to persuade a couple pieces in a little farther... but simply, I got out my heat gun, and turned it on moving it quickly back and forth across about six-eight inches of molding... for about a five/six count..... and then quickly pinched the molding and it goes right in the top and bottom... I also tried to slide the cold stiff molding in the top, heat about five inches and then the bottom was pliable enough to push into the bottom of the rail.... and of course, reversed that too sliding one five inch piece into the lower part of the rail and then heating and pushing the top in... the key to all this was heat.... and yes, I think you can overheat the vinyl molding... I didn't but a couple times you could tell I left it on too long.... There are four horizontal molding pieces, two on each side above and below the windows.... Tomorrow we get a lot of snow/wind and then bitter cold until next Monday... my wall heater in the garage will not keep up and life is too short to work in lower than 50 degrees.... So my next session will probably be Monday..... and I will finish the four? vertical pieces across the top.... then mask it all off, and paint the topper.... Check out the attachments..
 

Attachments

  • 100_0465.JPG
    100_0465.JPG
    161 KB · Views: 102
  • 100_0466.JPG
    100_0466.JPG
    251.4 KB · Views: 104
  • 100_0467.JPG
    100_0467.JPG
    79.4 KB · Views: 103
  • 100_0469.JPG
    100_0469.JPG
    146.6 KB · Views: 101
I hope you were sure to cut it a little long and force extra molding in there, to allow for contraction in the molding cools off. You know, Shrinkage and all.
 
You learn as you go and on the ends, I had to remove the screws from the vertical tracks so the horizontal runs would be trapped under the vertical tracks.... and then the screws went back in which holds secures the actual molding from moving at all... but you can tell that when you heat the molding it goes limp, and about ten seconds after, it cools done rapidly and becomes hard again.... Time will tell on this one but I also found that removing the screws on the first vertical track nearest the cab, that the aluminum sheet is not one unit.... there is break in the little down panels.... and now I have about a millimeter gap in that break area.... Can you say white silicone? The topper is NOT as good as I thought it was but it was still worth the $100.... This will never be a show vehicle and I will be content to drive it to the lake and back.... I have a long way to go though... listed out everything that needs to be done, 99% of it optional fixes or cosmetic...... so nothing important....
 
Don't use silicone, nothing adheres to it once cured, not paint, not even more silicone.
 
The weather is getting warmer so it is easier and more economical now to heat the garage with the electric wall furnace.... and I should have at least a good month to work now before the fishing opener and I have priorities.... I could use this truck as it is, right now, to pull the small fishing boat trailer, but I would like to get a bunch more done on it and I did buy the single stage enamel paint for it last week. This week, it will be the topper to finish.... starting with replacing the silicone beads around each and every seam trying to minimize/eliminate any leaks. I also need to replace the re-done ladder racks but screwed up..... I didn't mark their location holes and have since added new molding strips.... which I may try to heat a bit and pry up the molding to find one or two holes and hope the rest match up.... Then the topper is removed so the prep work can be started for new paint. I also will try to get the used tires installed.. but they have to be heated a bit to make life easier and usually this is done with them sitting in the sun..... not in MN this time of the year, so I am going to break out a heat lamp in the garage..... and do them one at a time. The rear bumper also suffered some kind of a hit and you can see it is not level with the world so that has to be removed, to straighten the brackets perhaps, and also so the rear area of the truck can be sanded and primed for new paint. I also want to get a good look at the spare tire assembly...... I did update some of the pictures and will add more as I make some progress (hopefully) this month.... The topper turned out well... it took a lot of time to do right..... https://www.flickr.com/photos/194674506@N05/
 
PAINTING Al,

1) Remove as little material as necessary by the least abrasive means possible.
2) blow off then clean to a water break free surface with scotchbrite and water
3) etch with Alodine, then rinse with water (neutralizes it and rinses all in one)
4) wipe all prepped surfaces with lint free cloth and isopropyl alcohol (leaves no residue)
5) prime with the appropriate primer for paint system
6) if necessary, rewipe with lint free cloth and isopropyl alcohol
7) apply top coat in accordance with paint system instructions

I've never used a self etching primer in my life and sprayed years of Al. Just saying, Alodine will permit the use of any paint system.
 

Sponsored Ad


Sponsored Ad

TRS Events

Member & Vendor Upgrades

For a small yearly donation, you can support this forum and receive a 'Supporting Member' banner, or become a 'Supporting Vendor' and promote your products here. Click the banner to find out how.

Latest posts

Recently Featured

Want to see your truck here? Share your photos and details in the forum.

Ranger Adventure Video

TRS Merchandise

Follow TRS On Instagram

TRS Sponsors


Sponsored Ad


Sponsored Ad


Amazon Deals

Sponsored Ad

Back
Top