85_Ranger4x4
Wallers in rivers
TRS Forum Moderator
TRS Event Staff
💻 TRS Socials
Article Contributor
TRS Event Participant
TRS 20th Anniversary
VAGABOND
OTOTM Winner
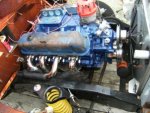
V8 Engine Swap
TRS Banner 2010-2011
- Joined
- Aug 7, 2007
- Messages
- 36,964
- Points
- 2,001
- City
- Frankfort
- State - Country
- IA- USA
- Vehicle Year
- 1985
- Engine
- 5.0
- Transmission
- Manual
Looking good, didn't know you had a build thread going.
How does your B&M shifter play with that console?
I have a three speed, I couldn't get it into first or second with that cupholder. I got picked up the more compact single cup cupholder (with the rollup door for the coin thing) and I could get it partway into second.
How does your B&M shifter play with that console?
I have a three speed, I couldn't get it into first or second with that cupholder. I got picked up the more compact single cup cupholder (with the rollup door for the coin thing) and I could get it partway into second.

")