• Welcome Visitor! Please take a few seconds and Register for our forum. Even if you don't want to post, you can still 'Like' and react to posts.

83 302 build


Looks great!! cant wait to see the finished project.
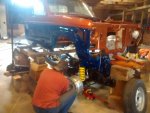
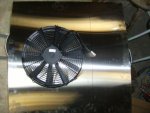
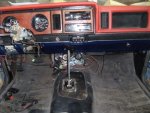
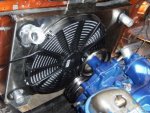
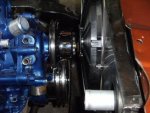
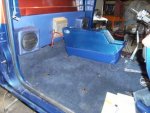
 
Time to drop the cab back onto the frame. Up 3 feet, then back down 3 feet. to help lower the height, used rubberless rims to help roll the frame under the cab.

Angie decided she wanted to redo the hood and give it another set of flames. Who am I to stop her. Turned out nice.
 

Attachments

  • 3 feet up.jpg
    3 feet up.jpg
    96.2 KB · Views: 414
  • rims.jpg
    rims.jpg
    67.1 KB · Views: 408
  • front on.jpg
    front on.jpg
    98.2 KB · Views: 385
  • hood 2.jpg
    hood 2.jpg
    34.6 KB · Views: 380
Last edited:
we decided to finish the tonneau cover today. this is after 2 coats of clear.

(Incase anyone is wondering about W.T.F. this is about) Concept time travel and rock n' roll.
The older members might remember the album. This is all painted with gold pin stripe applied. we were going to dagger it on, however, decided to take the short cut.

just google "2112" and it will be explained.. cheers
 

Attachments

  • done.jpg
    done.jpg
    66.4 KB · Views: 363
  • 2112.jpg
    2112.jpg
    82.9 KB · Views: 351
Last edited:
Haven't given up on the project....

Been busy on another thread in the V8 section. Been busy building the rad/fan section and was needing some advice so made thread there. link to follow with updated pic.

Bought a new small Northern rad and have ordered a 2 inch fan. Before this was placed in, had to move the motor back 1 1/2 inches for more room. had a friend rebuild the motor mount plates with new holes added for the new placement.

The fan should be in mid week coming up. and will post pic of the newly mounted/built rad and fan.

cheers

http://www.therangerstation.com/forums/showthread.php?t=167372&page=3
 
here is an update of the cross member all buttoned up giving the motor the needed 1 1/2 inches room.

and here is the start of the building of the stainless fan shroud for the fan.

cheers
 

Attachments

  • stainless fan.JPG
    stainless fan.JPG
    22.7 KB · Views: 447
  • trans in.jpg
    trans in.jpg
    56.3 KB · Views: 357
  • Trans crossmember.jpg
    Trans crossmember.jpg
    26.5 KB · Views: 357
Slowly chewing away at this elephant....

Getting the rest of the dash in now. Waiting for the rad shroud to get bent into shape at work. They broke their 3 stage press by accident and have been waiting for a seal ever since.

Time to work at this thing is what is holding me up mainly. An hour here an hour there is the best I can do. cheers
 

Attachments

  • dash.JPG
    dash.JPG
    27.2 KB · Views: 659
Was able to find some time over the weekend to rebuild the base for the B&M shifter.
 

Attachments

  • b M shifter base.JPG
    b M shifter base.JPG
    26 KB · Views: 631
  • B M Shifter 2.JPG
    B M Shifter 2.JPG
    29.4 KB · Views: 635
More from the weekend progress.... Monday Angie wanted to tint the back windows.... then she decided it was time to finish the console. now I have it placed in (but not secured yet with the carpet just sitting in the cab. Not laid down yet, just getting the bearings to see how this is going to work out. the console is from a mid 90's explore.

All the wires that are in the console is where the stereo fuses and the main entry point for all accessories will be coming in from the bed mounted batteries. easier place to get at then under the dash ....

cheers
 

Attachments

  • console 2.JPG
    console 2.JPG
    27.8 KB · Views: 592
  • console.JPG
    console.JPG
    28.2 KB · Views: 586
  • blue tint.JPG
    blue tint.JPG
    19.7 KB · Views: 583
Its coming along nicely, looks great. id like to see some more pics of the console wiring when you get it finished. I like the idea of putting the fuse block in there rather then under the dash.
 
here are some pictures of how the fuse block is mounted. I also placed under the dash (where it is easy to get at) a ground block and a jumper block that is tied into the panel lights for making it easier to wire in the lights for the tach, vac gauge and the volt gauge. last pic is of the plate angie bought for the dash. it is just resting in where i am thinking of sticking it when the truck is done...

cheers
 

Attachments

  • fuse block 1.JPG
    fuse block 1.JPG
    26.4 KB · Views: 567
  • fuse block 2.JPG
    fuse block 2.JPG
    27.6 KB · Views: 562
  • fuse block 3.JPG
    fuse block 3.JPG
    22.2 KB · Views: 559
  • ground block.JPG
    ground block.JPG
    14.6 KB · Views: 563
  • redneck.JPG
    redneck.JPG
    28.7 KB · Views: 569
looks great. awesome work!! ive been choppin at the bit to get started on my build. your truck is motivating me to get started!
 
thanks recutright...

progress over the weekend... have the fan and rad finally mounted
 

Attachments

  • fan.JPG
    fan.JPG
    35.3 KB · Views: 547
  • fan 2.JPG
    fan 2.JPG
    26.6 KB · Views: 561
here is an update for the cab, wired in the back speakers and the finishing touches for the console. the cab stereo is direct wired to the battery so no keys are needed, and the rem is wired direct to the second switch that is a 3 way. this switch also will be an over ride to a relay that will turn on the system in the box so i can remotely operate it from the cab. you can see the switches in the console.

thread to next project here.

http://www.therangerstation.com/forums/showthread.php?t=168499

cheers
 

Attachments

  • rear set.JPG
    rear set.JPG
    29 KB · Views: 513
  • console in.JPG
    console in.JPG
    23.6 KB · Views: 529
  • box system.JPG
    box system.JPG
    19.1 KB · Views: 406
Today dropped the cab/frame to the exhaust shop for the custom headers to get built :) the shop will have the truck for 2 weeks give or take to complete the work as he juggles projects in his shop. I have done the oil re-locator, mini starter, double knuckle lower steering shaft (shop will place this before doing the headers) figured out the fan, and rad. will update with all the sweet pics of what has been done when I get the truck back... can't wait .... cheers
 

Sponsored Ad


Sponsored Ad

TRS Events

Member & Vendor Upgrades

For a small yearly donation, you can support this forum and receive a 'Supporting Member' banner, or become a 'Supporting Vendor' and promote your products here. Click the banner to find out how.

Recently Featured

Want to see your truck here? Share your photos and details in the forum.

Ranger Adventure Video

TRS Merchandise

Follow TRS On Instagram

TRS Sponsors


Sponsored Ad


Sponsored Ad


Amazon Deals

Sponsored Ad

Back
Top