• Welcome Visitor! Please take a few seconds and Register for our forum. Even if you don't want to post, you can still 'Like' and react to posts.

83 302 build


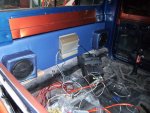
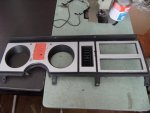
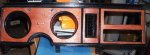
testing the stereo and popped in the seats with the console to see how this will go together. thinking this will be a good mix in this old truck.

cheers

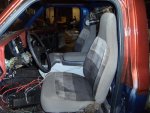
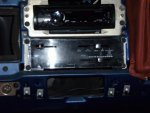
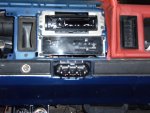
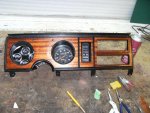
nice of ford to place these nice extra holes for placing more important things like switches... will be painted yet, these seats will be redone in orange.
 

Attachments

  • DSCF7162.jpg
    DSCF7162.jpg
    94.5 KB · Views: 397
  • DSCF7167.jpg
    DSCF7167.jpg
    92.4 KB · Views: 407
  • DSCF7170.jpg
    DSCF7170.jpg
    57.5 KB · Views: 418
  • DSCF7172.jpg
    DSCF7172.jpg
    72.1 KB · Views: 426
this will work out nicely one for the power amp, one for a set of fog lights (maybe) and one for an electric fan
 

Attachments

  • DSCF7175.jpg
    DSCF7175.jpg
    73.2 KB · Views: 396
This is the top of the tonnue cover (work in progress)
 

Attachments

  • DSCF7203.jpg
    DSCF7203.jpg
    73 KB · Views: 371
  • DSCF7197.jpg
    DSCF7197.jpg
    70 KB · Views: 355
Cool build. Love the color choices and graphics. Looking forward to seeing that interior finished.
 
thanks qaz, your truck is a nice polished ride. i have been watching your work.


got this for the build from santa (angie) this year... can't wait till we get to detail the interior with these....

(deleted the pics before) this was pics of the steering wheel and the rear mirror
 
Last edited:
No way to go wrong with flames and billet!! Hurry up and get it in there.
 
Great looking build Angie!!! gives me a little more motivation to get on top of my build. cant wait to see how this turns out for ya.
 
redid the dash. took the original silver one and placed a sheet of veneer over it then gave it 2 coats of hardwood floor clear coat. was going to drill holes for more indiator lights where the original warning lights were. but now that it is covered, i may leave it like this and place the lights in other places. blue turn signals.

cheers and i am impressed how nice this turned out.
 

Attachments

  • DSCF7213.jpg
    DSCF7213.jpg
    65 KB · Views: 383
  • DSCF7222.jpg
    DSCF7222.jpg
    107.1 KB · Views: 375
  • DSCF7228.jpg
    DSCF7228.jpg
    110.3 KB · Views: 375
Nice work on the dash bezel, it look good.
 
That does look good! Great job. What glue did you use for the veneer?
 
Thanks guys... it turned out way nicer than i thought it would.

We used 3M super77 spray glue. the veneer is sticky backed to start with and the 3M was added insurance.

it was a learning process to do this. took 2 tries. first time I had pre cut the holes before trying to glue it together. this was painful to get lined up fast as the glue is super freaking fast dry and sticky as hell. had to take it off.... then cut the 3 pieces 1/4 inch larger, without the large cut outs.... glued down the full sheets, let it dry solid 24 hours. THEN took a new bladed x-acto knife and carefully cut the holes for the radio, heaters and the gauge holes.

cheers

oh in case anyone is wondering what is used to fill the large indicator void... I have large chunks of 1/4 inch and 1/2 inch plexi glass that i was able to get from work (scraps they were going to toss) and use this stuff all over the workshop on projects over the last 6 years. this was 1/4 inch stuff that i cut beveled with a dremel. placed into the proper area. let dry, then took bondo and fillied, dried and sanded smooth. cheers
 
Last edited:
Well I need to update the dash... It all buckled up and under further examination it wasn't thin wood that I thought it was. turns out that it was some sort of plastic stuff that was 100% wood look and feel to it.

Had to tear it all off and started from scratch... in the back of the shop was an old table with real wood veneer that I was able to peel up in nice clean sheets. started last Saturday to cut and form these into the panels that will be shaped into the dash covering... pictures to follow as I get it looking good... amazing what can be accomplished with a Dremel and files....

cheers
 
That sucks. Good luck with the repair.

Sent from my XT1032 using Tapatalk
 
Finding time to work on this project again...

here is the new 100% wood dash.
 

Attachments

  • 1 wood dash.jpg
    1 wood dash.jpg
    50.1 KB · Views: 428

Sponsored Ad


Sponsored Ad

TRS Events

Member & Vendor Upgrades

For a small yearly donation, you can support this forum and receive a 'Supporting Member' banner, or become a 'Supporting Vendor' and promote your products here. Click the banner to find out how.

Recently Featured

Want to see your truck here? Share your photos and details in the forum.

Ranger Adventure Video

TRS Merchandise

Follow TRS On Instagram

TRS Sponsors


Sponsored Ad


Sponsored Ad


Amazon Deals

Sponsored Ad

Back
Top