Here’s another update a the transmission controller.

You are using an out of date browser. It may not display this or other websites correctly.
You should upgrade or use an alternative browser.
You should upgrade or use an alternative browser.
3.0 sho in 4x4 99 ranger
- Thread starter 14TR
- Start date
SenorNoob
Speaks to bots
💻 TRS Socials
TRS Event Participant
TRS 25th Anniversary
GMRS Radio License
- Joined
- Oct 24, 2012
- Messages
- 6,327
- Points
- 1,601
- Age
- 36
- City
- Lafayette
- State - Country
- TN - USA
- Other
- 1978 Honda XL350 12v & Electronic Ignition Swapped
- Vehicle Year
- 1988
- Vehicle
- Ford Ranger
- Drive
- 4WD
- Engine
- 4.0 V6
- Transmission
- Manual
- Total Lift
- 4"
- Tire Size
- 245-70-R16
Nice work there!
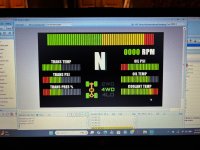
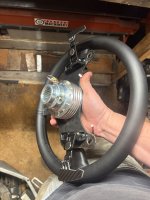
Tested the trans controller with the lcd keypad and it shifted flawlessly up on jackstands! Now, I’m putting together a much more integrated system that is gonna look and function high end, but will get it done for shockingly little money! Proper magnetic paddle shifters. Digital display for engine vitals, gear selection, RPM, shift light, even electronic transfer case control.
Here’s a pic of what I have done so far for the user interface on the display
Here’s a pic of what I have done so far for the user interface on the display
Attachments
- Joined
- Feb 28, 2024
- Messages
- 383
- Points
- 101
- Vehicle Year
- 2003
- Engine
- 3.0 V6
- Transmission
- Automatic
Love getting to see progress on this truck every now and then, great inspiration for me to get back out there and work on my own rack.
Keep it up brother!
Keep it up brother!
bobbywalter
TRS Technical Staff
TRS Event Staff
TRS Technical Advisor
TRS Event Participant
TRS 20th Anniversary
TRS 25th Anniversary
Ugly Truck of Month
TRS Banner 2012-2015
- Joined
- Aug 9, 2007
- Messages
- 26,302
- Points
- 3,101
- City
- woodhaven mi
- Vehicle Year
- 1988
- Engine
- Transmission
- Automatic
- Total Lift
- sawzall?
- Tire Size
- 33-44
- My credo
- it is easier to fix and understand than "her"
noice!!

- Joined
- Mar 6, 2020
- Messages
- 2,105
- Points
- 601
- City
- 48022
- State - Country
- MI - USA
- Vehicle Year
- 1994
- Vehicle
- Ford Ranger
- Engine
- 4.0 V6
- Transmission
- Automatic
- Total Lift
- 1-1/2 inch front leveling
- Total Drop
- Stock
- Tire Size
- 31/10.50/15
- My credo
- What's the worst that could happen?
This is insanely wild in a really good way.


- Joined
- Feb 28, 2001
- Messages
- 10,699
- Points
- 7,601
- City
- Dayton
- State - Country
- OR - USA
- Vehicle Year
- 1990, 1997
- Drive
- 4WD
- Engine
- 2.3 (4 Cylinder)
- Transmission
- Manual
- Total Lift
- 6
- Tire Size
- 35"
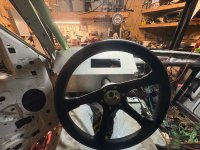
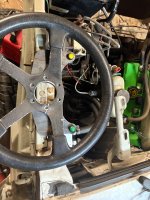
wait, quick detach steering wheel on something that isn't a stock Honda Civic? That's allowed? ")
bobbywalter
TRS Technical Staff
TRS Event Staff
TRS Technical Advisor
TRS Event Participant
TRS 20th Anniversary
TRS 25th Anniversary
Ugly Truck of Month
TRS Banner 2012-2015
- Joined
- Aug 9, 2007
- Messages
- 26,302
- Points
- 3,101
- City
- woodhaven mi
- Vehicle Year
- 1988
- Engine
- Transmission
- Automatic
- Total Lift
- sawzall?
- Tire Size
- 33-44
- My credo
- it is easier to fix and understand than "her"
wait, quick detach steering wheel on something that isn't a stock Honda Civic? That's allowed?
obviously.....this thing identifies as a stock honda civic.....
try to keep up. just because its a yamaha doesnt mean it cant identify as a honda.....
sheesh. some peoples kids.
Before I take it racing, I’ll have to go see my vinyl guy and get some random Chinese alphabet characters printed up for the doors and hood. Wait until you guys see the digit dash that reads “Danger To Manifold!”obviously.....this thing identifies as a stock honda civic.....
try to keep up. just because its a yamaha doesnt mean it cant identify as a honda.....
sheesh. some peoples kids.
PS, if anyone wants to share this truck or the thread or even my videos on any of the FB pages etc feel free. I haven’t been on FB in a decade and when I just got back on the Ranger pages won’t let me post lol
Sponsored Ad

TRS Events & Gatherings

Latest posts
-

-

-

-
-
DIY Electric to "Manual" transfer case conversion mod
- Latest: Li'l Work Truck
-

-

-
Issue with DRL staying on while truck is off – 96 Mazda B4000 4x4
- Latest: Li'l Work Truck
-

-

Featured Rangers
TRS Latest Video
Official TRS Merchandise
Follow TRS On Instagram


