• Welcome Visitor! Please take a few seconds and Register for our forum. Even if you don't want to post, you can still 'Like' and react to posts.

1983 2.8 Ranger Resurrection


drsvox

Well-Known Member
U.S. Military - Veteran
Joined
Sep 26, 2013
Messages
240
City
Prattville, AL
Vehicle Year
1983
Transmission
Automatic
Hello everyone:

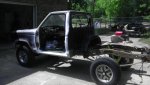
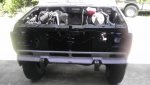
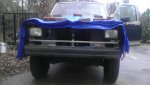
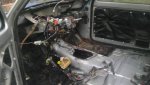
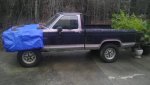
Like everyone else, wanted to share my work in progress. Attached are the best before pictures I could find. Yes that's right, at the time, my poor ranger was nothing more than a hoodless plant holder.

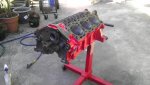
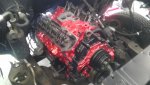
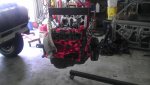
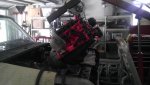
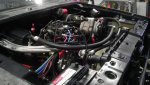
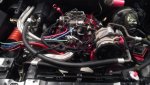
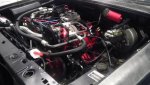
Since these photos were taken the engine compartment was gutted, cleaned and painted. Engine out and currently in the shop getting fitted for new pistons and headers are getting reworked.

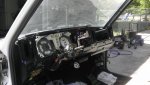
Inside cabin has been repainted, new padding and carpet installed, dash frame back in and dash components restored and installed; still working on the vinyl dash--needs minor work and paining. Seat webbing repaired and custom upholstery on order.

Doors off and I rattle-canned the insides with a few coats of red inferno met and a few clear coats.

Traced out the wiring harness checking for integrity; fresh new split braid loom.

Still a lot of work to do, but it's nice to be able to document...

Thanks for your time!
Chris
 

Attachments

  • IMAG0156.jpg
    IMAG0156.jpg
    58 KB · Views: 310
  • IMAG0155.jpg
    IMAG0155.jpg
    54.7 KB · Views: 324
  • IMAG0154.jpg
    IMAG0154.jpg
    60.6 KB · Views: 338
Last edited:
It's awesome to see another 1st gen saved. Sounds like it's going solid so far!

Speaking of solid, Hows the rust? Especially behind the dash where the cowl rots out?


Welcome to the forums!
 
Thanks! I am looking forward to getting her back on the road!

Thankfully, the body is generally in excellent shape. I did have rust under the dash, driver's side, but it was an easy repair by cutting out and spot welding a section of floor pan (courtesy of lmctruck) back in place. sealed and coated the entire floor w/ por15 before adding the new padding/carpet.

got engine diagnosis from the shop today:

block is good; boring 40 over (was already 30)
heads are trash; replacements on order
replacing both crank and cam (lifters, rods, etc.)

may take some update pics this weekend...
 
Nice! Doesn't sound too bad but that's a shame about the heads.
 
Some update photos:

Block back from the doctor and painted; crank, cam, and pistons in, but dang it if I haven't misplaced the oil pump bolts. I bag, label and hoard everything...old pump, check; bolts...hmmm...guess I'll be sizing some new ones.

Glad I've got a job to finance this project; wish I didn't have a job so I could work on it all the time!

That's it for now,
Chris
 

Attachments

  • IMAG0274.jpg
    IMAG0274.jpg
    64 KB · Views: 344
  • IMAG0272.jpg
    IMAG0272.jpg
    56 KB · Views: 340
  • IMAG0273.jpg
    IMAG0273.jpg
    61.9 KB · Views: 330
  • IMAG0276.jpg
    IMAG0276.jpg
    66.7 KB · Views: 337
Memorial Day Update

Can't think of a better way to spend the day...apart from the fact wife and kids went down to PCB yesterday and I stayed home to do homework, and of course this:

Can't wait for break-in...
 

Attachments

  • IMAG0315.jpg
    IMAG0315.jpg
    57.6 KB · Views: 340
  • IMAG0320.jpg
    IMAG0320.jpg
    56.9 KB · Views: 348
  • IMAG0311.jpg
    IMAG0311.jpg
    63.3 KB · Views: 331
  • IMAG0317.jpg
    IMAG0317.jpg
    56.9 KB · Views: 318
The quiet before the storm...

Some back story:

Two years ago I wanted a Camaro ZL1; why, I’m not really sure. Maybe it was the promotion I got at work, or maybe it was a reaction to a quasi-mid-life crisis. All I knew is I wanted a ZL1. I thought it’d be unique. That was, of course, until I started noticing that seemingly every other car on these Alabama roads was a Camaro in some form or another. I said to myself: no way in hell I’m going to be driving around in a car that everyone else is driving; time to find something else.

My solution? So obvious…I had this beautiful (albeit broken down and dilapidated) 1983 2.8 V6 Ford Ranger sitting in my driveway. She’s been dead for years. Had halfway gutted her at my old house and left her to rot after towing her to my new house.

Time to put to use all those fantastic father’s day, birthday, and Christmas tools my wife bought me over the years.

Now, I’m sure some (if not all) of the 2.8 enthusiasts are wondering why I didn’t just go ahead with the duraspark conversion while I had everything pulled out. Indeed, the vacuum and emissions systems suck (pun intended). Truth is, this resurrection has become somewhat of an obsession with me. I am by no means an expert or a professional when it comes to auto mechanics--I sincerely wish I possessed just half of the knowledge and skills that you all have. Alas, I do not. I am purely a hobbyist at heart, and my journey is one of frustration, satisfaction, and most importantly, learning (as I believe most of ours is).

Thus: I decided that if I’m going to put her back together, I was going to do it just as she was intended to be driven out there on the road back in 1982. I feel I owe at least that much to her, and to myself…

So here it is, the engine compartment of my 2.8, restored to as close to OEM as I could get it. I still have a few more minor things to do, but for the most part I’m pretty much done with this phase of the project.

And after hooking up the battery, nothing seems to have melted or cooked…which is a good thing! Let’s hope it stays that way.

These will be the last photos I put up until engine brake-in is complete (hopefully in the next couple weeks).

My next post to this thread will either be one of joy, or one of anguish…

Cheers,
Chris
 

Attachments

  • IMAG0331.jpg
    IMAG0331.jpg
    67.4 KB · Views: 333
  • IMAG0333.jpg
    IMAG0333.jpg
    62.1 KB · Views: 342
  • IMAG0334.jpg
    IMAG0334.jpg
    58.9 KB · Views: 334
Nice work, your Rangers looking good.
 
went for broke at 9:00 pm last night...no go.

narrowed it down to fuel delivery. first problem: of all things, a dirt dauber built a nest in the fuel line coming off the pump to the carb (guess I wasn't meticulous enough checking and blowing out lines...) and so thought that might have been it but the carb (second problem) just isn't delivering fuel.

breaking it down to clean and rebuild.

I've got air and I've got spark...just waiting on that one last ingredient.
 
Looks like it's going to be a nice stock restored ranger. Keep it up!
 
Put your finger in the #1 spark plug hole and turn the crank clockwise until you feel compression. Line the TC mark wide groove up with the pointer not the round thing that is TDC on compression stroke of #1 cylinder. Now look at the distributor rotor it should be at around 11 oclock or pointed toward the #1 tower on the distributor cap and set the fireing order from there. One way to cheat is to just put the timing light on different plug wires until you see the timing marks and use that tower for #1 cylinder and set the fireing order from there. If it just backfires rotate the plug wires 180 degrees and it should fire up. You just need to remember that the next time you change cap and rotor.
 
These motors like it rich on the idle air needles preadjust them out 3 1/2 turns from lightly seated and pull the spout wire connector apart it is the 1 wire coming from the distributor with a connector in line and set the timing at 10 degrees one line back from 12 on the crank pully. Once you get the timing set correct then we can go through how to properly dial in the carb and choke.
 
Thanks kim.

I marked everything during the build to make sure I was at #1 TDC on compression when I put the distributor back on after priming, but will definitely do a manual check for compression.

I put new mixture screws in the carb and preset them at 1.5 turns out; will adjust to 3.5 as you suggested.

Two other things that that I'm concerned about: one is simple (and dumb if I overlooked it), the other is more complicated.

First: I left a vacuum line going into the tree unplugged. normally it attaches to the air cleaner bi-metal valve. I'm thinking this might be creating a carb leak.

Second: I lost the woodruff keys for the crankshaft and had to fashion (grind and file down) new ones. I was as precise as I could be, but human error almost always intervenes, for me anyway. My fear is that I sheered the key on the balancer and it's now giving me a false TDC.
 
You can check TDC with a piston stop tool but I dont think it is necessary. The way the bimetal works is it provides vacuum to the preheater door until the bimetal heats up and it closes the door. The only way it is a vacuum leak is if the door motor its called has a leak in the diaphram. I actually still have the air pump, thermactor and bypass valves still workin along with the preheater door. Just plug the vacuum to the door until you get it running good and then see if it affects performance. Do you have the vacuum to the charcoal cannister hooked up correct? There is a vacuum nipple on the back of the egr spacer pointing straight back toward the firewall. It is hard to see as it is under the brake booster hose. That can be a bad vacuum leak if the solenoid is not working properly. There are two solenoids one for the carb bowl vent that one is open with the key off and closed with the key on. The other one is open with the key on but only pulls a vacuum at a certain pressure if the manifold vacuum drops below a certain pressure it stops pulling vacuum from the cannister. I made it a mission to get mine to pass emissions and went through every wire and component and eventually got down to just the egr codes not knowing at the time the egr ports on the heads were plugged with carbon. Your engine being rebuilt may work just fine it is just getting all the crap working together can be a challenge for sure. Your crank pully does not have the rubber damper so the timing marks should be real close as long as the key fit snug.
 

Sponsored Ad


Sponsored Ad

TRS Events

Member & Vendor Upgrades

For a small yearly donation, you can support this forum and receive a 'Supporting Member' banner, or become a 'Supporting Vendor' and promote your products here. Click the banner to find out how.

Recently Featured

Want to see your truck here? Share your photos and details in the forum.

Ranger Adventure Video

TRS Merchandise

Follow TRS On Instagram

TRS Sponsors


Sponsored Ad


Sponsored Ad


Amazon Deals

Sponsored Ad

Back
Top