• Welcome Visitor! Please take a few seconds and Register for our forum. Even if you don't want to post, you can still 'Like' and react to posts.

What did you do to your Ranger today? (Part Deux!)


I put escape rims on the butt today, both spares for the escape dont want to hold air so I broke the beads, cleaned the rim & tire surface and then put some oil on the bead surface of the rim before reinflating. Figured Id drive it a couple of days on the ranger and see if they stay up. Doesnt look horrible, I used 2” spacers to correct for the positive offset of the escape rims. Put them about where they should be. Tire size is 235/70/16” so not much bigger than when I run the 235/75/15’s. Put my gps in so I can see how accurate (or not) the speedometer is. Wouldnt want to tow or haul with this setup but it should be ok to get to work and back.
IMG_6498.jpeg
IMG_6501.jpeg
IMG_6499.jpeg
IMG_6500.jpeg

Those 9” drums sure look tiny inside of a 16” rim!
 
Last edited:
Looks like I have a vacuum leak on the 2011, had been idling low since last summer, especially with the ac on. Today it was idling really low on the way home, and doing all kinds of weird stuff.
The vacuum readings on my gauge had seemed a little lower then usual, but still close to 20 in when driving.


I unplugged the MAF when I got home and it died immediately

Probably take a look at it this weekend.
 
I noticed my brake pedal had a bit of a spongey feeling a few days ago. My last inspection I figured next look it would get new shoes and hardware. I ordered shoes and hardware kits and pull it apart yesterday. Not a huge shocker but both wheel cylinders were seeping. As with most rust belt trucks the lines rounded off from rust. So I ordered cylinders and 25 feet of NiCop line with a bunch of fittings. I've always just use standard steel brake line... but many here say it's good stuff. I guess I will know more when it gets here tomorrow.

I also soaked everything in Kroil in prep for installing my torsion bars. Hopefully they don't give me much trouble.
NiCop line is much easier to bend and flare than steel and the not rusting part is really nice. I did my first Ranger in stainless line and that was not at all fun. But the lines were awesome, lol. Everything else has got NiCop since I discovered it. Regular steel lines just rust too fast, but I do still have a little of that on hand for random stuff and my lever style flare tool doesn’t destroy the protective coating on the steel lines. Anymore, once the first brake line goes or I do an overhaul on the vehicle, everything becomes NiCop. Just stop the headache from the start. Was using brass fittings but you can’t get them anymore so I’ve switched to stainless and some grease.

Thinking about going to braided PTFE lines over regular rubber brake hoses too. The PTFE shouldn’t really break down over time like the rubber lines do. Haven’t really made a decision yet, but I’m trying a set on the front of the Choptop.
 
Well, I set out to mow my property before it rained and then I was going to work on the Choptop. Got the outer edge all cut in and about two passes around when it started raining (the rain that wasn’t on the radar of course). Drove the tractor under a tree and hoped it didn’t rain too much. It was starting to drip through when it let up so I boogied back over to the house. Of course, then the sun came back out but now the yard was wet so I started working on the Choptop. Started making progress on getting the drivers side front axle together, got all the way to where I had the spindle back on and it started pouring rain again. Got soaked before I made the house, but a little bit later the sun was back out so I went back to work on the Choptop.

Ended up re-packing the bearings that I kept saying I wasn’t going to. Closer examination showed that either it had been blue grease that was now more blackish, or it had black grease and I already refreshed it with blue grease. Either way, I figured it probably should be done. I didn’t go through the trouble to clean the bearings with solvent, just pushed the old out with the new. So the drivers side is now fresh red grease. Got the drivers side all back together with a new O-ring (or rather X-ring) for the hub (trying this out anyway). Also got my front sway bar links partly on (drilled the lowers to take a 1/2” pin which I intend on picking up in my travels tomorrow so they will be quick-disconnect). Cleaned up my mess a bit and tweaked my redneck intake tube so it would stop rubbing on the radiator.

After all of that, with the sun and wind and how dry things have been the past few days, I figured I could finish mowing and I did. Going to have to take a look at the mower though, it found a small stump and something seems off because it’s now trying to scalp one side. Something else to deal with, lol.
 
Yesterday I got to drive the Choptop a bit because I wanted to. Can still feel the bad ball joints on the passenger side, but I’m intending on addressing that today. Also got the front sway bar hooked up yesterday which definitely helps, but it’s still a lifted thing, lol. I’m fine with that. Radio is dead though. Also finally got around to stopping the roll cage rattle against the body, it fits a little close on the drivers side, lol.
 
Early this week, my neighborhood tire shop got in two Hankook 225/70R14 tires to replace a pair that some mischievous kids had slashed with a knife. I had been driving on two mis-matched spares since that incident. The new tires cost me $270, including spin balancing and installation. Not a bad deal for a size tire that has a reputation for being hard to find.
The installation problem began when they tried to install the second tire on the right front. The mechanic said, NO WAY, and showed me the five lug nut holes had been stretched into an oval shape. I am not sure how this could have happened, but I bought a deer-hoof rim from a local junkyard later in the week, and the second new tire was installed today.
And this is where the fun began.
There were no holes to mount the center caps with the three screws like the other three rims! WHAT THE HECK?
After doing some research on the Forum, I found out that Ford changed the design in 1995 so that the three mounting screws wouldn't be required. Not a bad idea, as it would make changing the tire on a dark raining night much easier.
But now I have a shiny new-looking rim that requires a much different (and pricier) center cap!
Cosmetic issues aside, should I drill three holes in the newish wheel so that I can attach the older-styled center cap? Or buy a set of the newer styled caps (1996 and later) that would cost me about $120?
Not a serious dilemma, but just frustrating....

Drill the holes. The right size plastic wall anchor works. I’ve done it before. When you put the plastic anchors in, dip them in clear silicone, and Mount the cap the next day.

Do I have to say be precise so the center cap doesn’t wobble? When I did it, I made a paper template. I did a pencil rubbing of an original and then transferred the spots.

Hope it helps!
 
Afterthought. I’ve had a couple issues where the Lugnuts would bottom out against the brake rotor before completely snugging up on the wheels. This is when I was playing with all different kind of Lugnuts and wheels without thinking of what was original or such. Just something you might want to look at.
 
Well, passenger side of the front axle of the Choptop is apart, had to torch the lower BJ, the nut was a rust blob that I couldn’t get a socket to bite on. Can’t be tight if it’s a liquid. Melted the blob, knocked it free with a chisel and knocked the knuckle down while everything was hot. Also broke a punch and bent another trying to get the remains of a cotter pin out of the tie rod end. Gotta look for some better punches. Hopefully tomorrow I can get it back together.
 
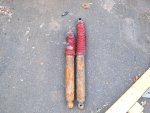
View attachment 95129 These are 5 year old Rancho. Not impressed with the life span

The Rancho shocks I put on the front of the 09 were junk right out of the box. There is a bridge on the freeway I drive over on the way to work every morning, and the front end bounces 3 times before the shocks finally settle it down...
 
My Ranchos have been fine but it has only been a little over 3 years since I installed them.
 
Afterthought. I’ve had a couple issues where the Lugnuts would bottom out against the brake rotor before completely snugging up on the wheels. This is when I was playing with all different kind of Lugnuts and wheels without thinking of what was original or such. Just something you might want to look at.
That isn't or shouldn't be possible. Lug nuts aren't supposed to go THROUGH the wheel, they're supposed to press against it, pushing the wheel against the center of the rotor.
 
That isn't or shouldn't be possible. Lug nuts aren't supposed to go THROUGH the wheel, they're supposed to press against it, pushing the wheel against the center of the rotor.

AMEN! I agree “it shouldn’t be possible.” It happened to me twice. On a 15” inch bullet hole mag (now scrapped) that I used to use as a spare for the Road Ranger, I believe the holes were hogged out or over-torqued/pressure-spread-out for some reason. Keep in mind all the stuff I bought was used.

When I made my mount for the spare, using original lug bolts on my backing plate, I had to put a half-inch lock washer underneath each nut to hold the wheel snug. On the Road Ranger, if I had a flat on one of the critical front and first/rear/drive axles, I would have moved one of the floating axle tires over, and used this funky spare on the floating axle, just to get me off the road. Fortunately, I never had to test it before I found an undamaged mag.

This is a good spot to also comment on how many people don’t know how to use a torque wrench. Don’t jump, I’m sure you guys do, this is offered for the newbies and young kids who don’t have the gray hair yet! On the 15, I think it may be that it was just over torqued too many times. I have seen a lot of tire shops who crank down on the lug wrench, and then check if it’s “tight enough“ by putting a torque wrench on it to hear the click. If the nut doesn’t move when you’re applying the torque wrench (before the click), it has been tightened too much. The torque wrench should click at the right point when the nut is turning. If you use a 220 pound impact wrench on the aluminum wheels, it can deform the lug holes. More on torque wrenching another day.

I had the same thing on some 14 inch bullet hole/outlaw mags. I picked up about 20 for the projects for little money on craigslist and such, but on those I think it was the funky Lug nuts I was trying to use. They had a particularly long, narrow cone. They’d hit the brake rotor/backing plate about the same time they snug down the rim.

I say “amen,” again. I completely understand that theoretically, this should never happen, but one of the unfortunate things about gray hairs, is you see a lot of crazy stuff. I just threw/throw it out here so @lil_Blue_Ford can check it.

Always, hope it helps!
I got into it a bit with one of the local tire shops awhile back. I took bare rims in the bed of my truck and told them to mount the new tires and put them back in the bed. They wanted to pull the truck in the shop. Fine. Little bit later truck comes out with the new rims and tires on. That’s not what I asked them to do, but whatever. Not long after I lost two or three studs on one back wheel. Came off going down the road. I figured well, it is kinda old so I got new studs for the back axle and figured I’d just replace them all. I had a 3’ cheater pipe on a 24” breaker bar and had to JUMP on the cheater pipe to break them free. My air impact (650 ft/lbs) wouldn’t budge them, and this was prior to my Milwaukee battery impacts.

I did the rear axle and went back to the tire shop and pitched a fit, told them I wanted the fronts loosened and re-torqued to spec. They argued claiming they always use a torque wrench. I told them they were full of shit. I specifically told them not to put the rims and tires on the truck and they did it anyway. I also said when I have to jump on a cheater pipe on a breaker bar, there is no F@#$&*G way it’s torqued to 95 ft/lbs and some dick ugga-dugga’d the shit out of them. I told them they were lucky I wasn’t demanding the new wheel studs and lug nuts out of them too.

I have been guilty in the past of hammering lug nuts down with an impact, but after a couple issues with wheels coming loose and finding that it’s more inconsistent than I thought, I’ll run them down with the impact, but I hand tighten with a breaker bar. I’m too lazy to fetch the torque wrench all the time, but I think I have a pretty good feel for what 95-100 ft/lbs feels like on a breaker bar which is below the maximum force I can generate by hand.
 

Sponsored Ad


Sponsored Ad

Overland of America

TRS Events

Member & Vendor Upgrades

For a small yearly donation, you can support this forum and receive a 'Supporting Member' banner, or become a 'Supporting Vendor' and promote your products here. Click the banner to find out how.

Recently Featured

Want to see your truck here? Share your photos and details in the forum.

Our Latest Video

TRS Merchandise

Follow TRS On Instagram

TRS Sponsors


Sponsored Ad


Sponsored Ad


Amazon Deals

Sponsored Ad

Back
Top