
Original Poster:
Daniel Inbinett (gungfudan)
Difficulty:
4 out of 10. The time depends on how experienced you are.
Disclaimer:
The Ranger Station, The Ranger Station Staff, nor the original poster are responsible for you doing this modification to your vehicle. By doing this modification and following this how-to you, the installer, take full responsibility if anything is damaged or messed up. If you have questions, feel free to PM the original poster or ask in the appropriate section of The Ranger Station forums.
This is an explanation on how to trouble shoot you fuel level sending unit and what the ohms you need (depending on the year of you truck) for a new aftermarket fuel level gauge or to use a your factory gauge with a new fuel cell that has an after market sending unit. Note: the reason is if you do not have the correct ohm range your gauge will not work.
Tools Needed:
- An electricians meter (that reads ohms)
- Flat head screw driver
Parts needed:
(All parts in list are based on if parts are bad or need repair.)
- Possibly new sending unit
- Auto wire
- Butt connectors
IMPORTANT – Things you need to know before you start:
The fuel gauge is a fairly simple electronic. The fuel gage circuit consists of the sending unit in the fuel tank, the gauge in the dash, and the wiring and dash wiring (or circuit board) between them. It’s power source comes from a voltage regulator that is 5 volts.
(NEVER HOOK THE SENDING UNIT OR GAUGE TO A 12 VOLT BATTERY)
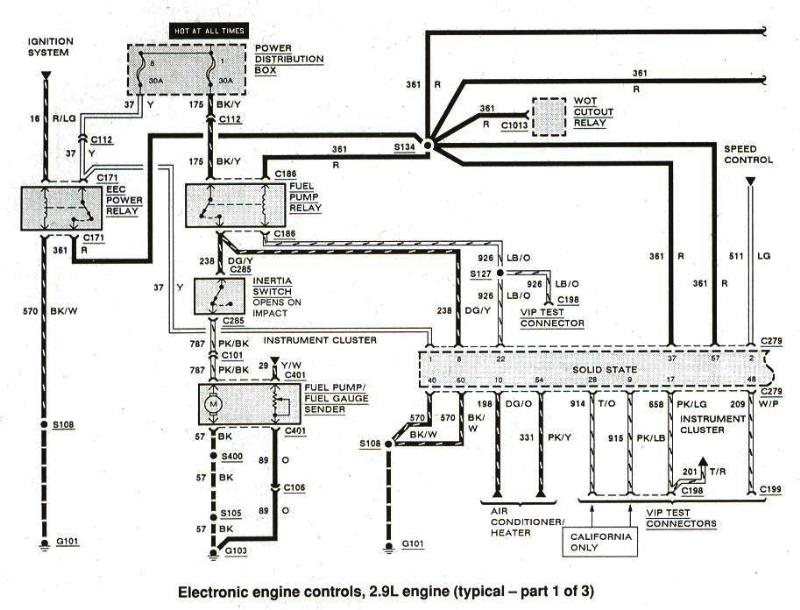
Here is a picture of a sending unit on a 1988 Bronco II wiring diagram:
How It works:
The sending unit is a variable resistor. It resists the flow of current from the ground to the gauge, depending on the position of the float within the tank. When the float arm is at the full position, It decreases the resistance between the gauge and the ground (basically there is shorter distance for the current to flow). The more current that flows through the meter, the higher the gauge needle moves.
The gauge uses a 5 volt pulse supplied by the instrument cluster’s voltage regulator.
Troubleshooting:
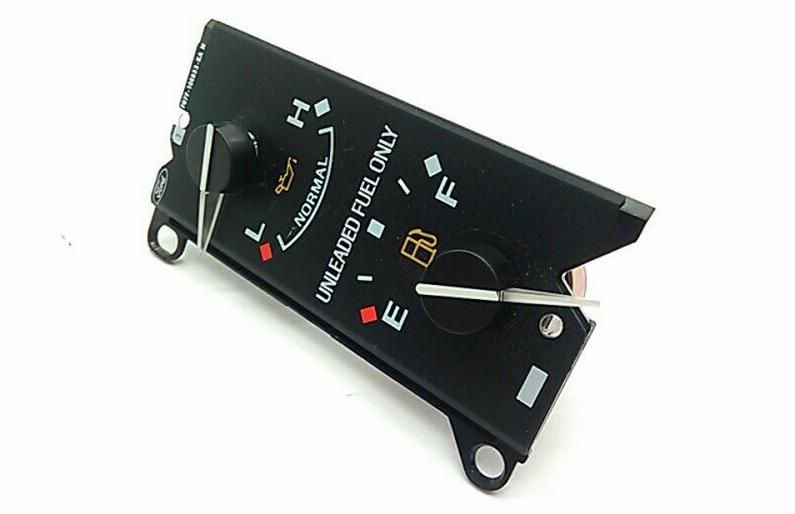
Problem; The gauge does not work (the needle does not move).
Turn the key to the on position for this operation. If you can get to your sending unit wiring harness without dropping your tank(s), go ahead and pull it. If not, then drop the tank(s) and pull the harness. Get a piece of wire (jumper wire) to connect to the positive of the harness, and the negative of the sender housing. This should make the gauge jump to full.
If the gauge’s needle moves:
It means that the wiring is fine and it is your most likely your sending unit. You’ll need to remove the sending unit from the tank for inspection and testing.
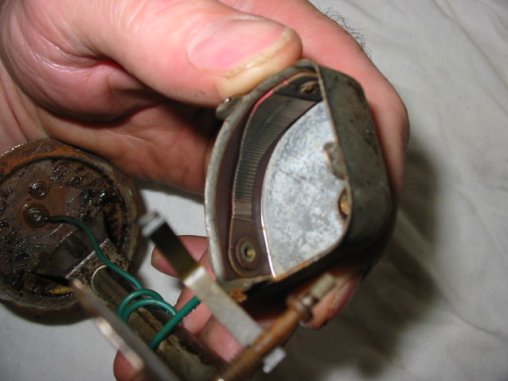
Here is a picture of a 1985-1988 sending unit.
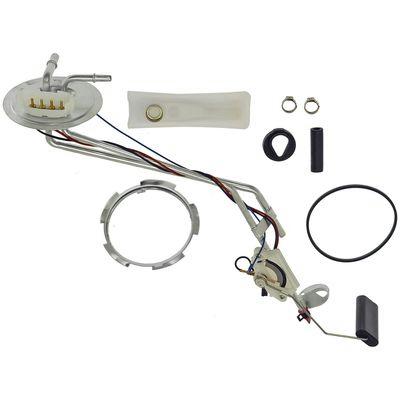
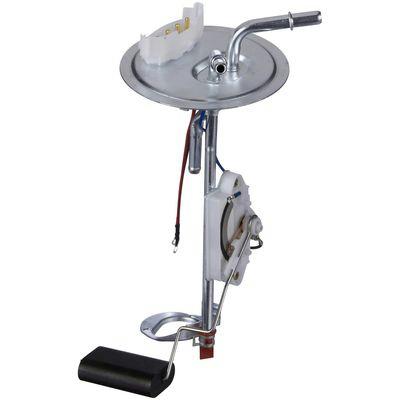
(The black bar at the bottom is the float)
When you remove the sending unit, inspect the float, float arm, wires, and the sender itself to ensure it’s intact and functioning properly. There is a possibility that the arm is binding, so move it up and down to make sure it moves freely.
Reconnect the gauge wiring to the unit and ground the unit. Move the float arm up and down. If the gauge reads full in the full up position and empty in the full down position, then the sending unit is good. Verify by hooking up an ohmmeter to it and making sure it reads:
- 8-12 ohms full and 70-73 ohms empty (pre-1989)
- 16 ohms full and 158 ohms full (1989+)
If not, the sending unit needs repaired or replaced.
I have an 1988 Ford Ranger and my sending unit was not working. The gauge worked, so I knew there had to be something wrong with the sender. Now if you have a mechanical fuel pump like mine, then you can’t get the sending unit for that year, because they stopped making it. It’s stupid because it’s just one metal tube on the sender plate, and a two prong connection. I had to get a sending unit for a 2.3L Ranger and modify it. It works great.
If the gauge does not jump to full:
Ground the sending unit wiring to a good chassis ground (instead of the sending unit housing) and watch the gauge. Does it now jump to the ‘Full’ side? The power supply to the gauge has been interrupted, (check fuses), the gauge is defective, or the wire from the gauge to the sending unit is open or has a break in it.
To check the voltage regulator for proper function use a tester. Probe the connector with the tester, it should flash on and off.
I hope this was helpful. I want to thank http://www.fordification.com for the information I read about.
See Original Post:
Other Related Problems:
Float Not Floating:
Remove the pump from the tank and see if the float is still floating. If the isn’t floating, meaning it has sunk, then it’s due for replacement.
Sending Unit Contacts:
The contacts on the sending unit itself can also wear out, but that is less common.
Question: What causes the gauge to read way past full for 3/4 tank and then fly down to reading empty in around 20 miles?
Answer: Contacts on the sending unit are worn out, and do not send a reading to the gauge once it gets to a certain level.
Example:
See all those gold horizontal lines? Each one sends a different level of resistance to the gauge. As the contact point moves across them, they wear out over time, notice how they are all worn down? That’s probably what yours looks like from 3/4 way down.
Aftermarket Gauges:
Note: If you are installing an aftermarket fuel gauge you need to make sure that the gauge is the same ohms as your sender. It will not work if they are not the same. The same goes for after market sending units that you might get with a fuel cell. Check your instructions or call manufacturer for information.
Manufacturer of Gauges:
- Auto Meter (have fuel gauges for ford)
- Equus (have fuel gauges for Ford)
- Sunpro
- there are many others.
About The Author
Jim Oaks is the founder of TheRangerStation.com, the longest-running Ford Ranger resource online since 1999. With over 25 years of hands-on experience building and modifying Ford Rangers — including magazine-featured builds like Project Transformer — Jim has become one of the most trusted authorities in the Ford Ranger off-road and enthusiast space.
Since launching TheRangerStation.com, Jim has documented thousands of real-world Ranger builds, technical repairs, drivetrain swaps, suspension modifications, and off-road adventures contributed by owners worldwide. TheRangerStation.com has been referenced in print, video and online by enthusiasts, mechanics, and off-road builders looking for practical, and experience-based information.