
Introduction:
The lock up Torque Converter circuit in the A4LD automatic transmission is a ground switching system. The ECU grounds the circuit to control the operation of the Torque Converter. So, in order to install a switch to force lockup all you have to do is hook up a grounding circuit.
Advantages:
You can force the Torque Converter to stay locked in 3rd and OD (overdrive). When you take your foot off the gas in 3rd or OD the Torque Converter unlocks and then relocks once the gas pedal is pushed down. This causes unnecessary wear and heat. With this switch set up you can keep the torque converter from unlocking until you either turn it off or shift into 2nd gear.
ECU Connection:
The ECU grounds the circuit to control the operation of the torque convertor. So, in order to install a switch to force lockup, all you have to do is hook up a grounding circuit.
1) Locate pin #53 on the ECU. They are numbered on the ECU.
2) Tap into the pin #53 wire in the engine management harness.
3) Run a wire from the pin #53 wire to a switch, then from the other side of the switch to a good ground. I ran mine to the negative battery terminal.
Note: Your wire might not be Pink and Yellow but mine is Orange. You can verify the wire color by looking at the TC plug on the transmission.
1994 3.0L Ford Ranger 60 Pin Connector #53 (Purple / Yellow).
1998-2001 2.5L Ford Ranger 104 PCM Pin Connector is actually #54 (Pink / Yellow).
1994 4.0L Ford Explorer/Ranger 60 Pin Connector is Pin #53 (Purple / Yellow).
1994 2.3L Ford Ranger 60 Pin Connector is Pin #53 (Purple / Yellow).
Transmission Connection:
You can do this mod at the transmission plug instead if you want (probably easier).
Locate the oval-shaped connector on the passenger side of the transmission. It runs over the transmission to the driver’s side and up to the PCM. You are looking for the purple w/ yellow tracer (it might look like a blue with orange tracer. We have looked at SEVERAL trucks, and they all look similar) wire coming out of pin 4 on the 12-pin connector. This is the wire that controls the lockup of the torque converter. Tap into this wire with a piece of 16-18 gauge wire and run into the cab through the firewall. Be sure to install a rubber grommet when routing wires through the firewall so the wire doesn’t rub through.
Add The Switch:
Now you can control lock up. When the switch is in the on position the lock will stay locked up regardless of engine load as long as the transmission is in 3rd or OD.
When the switch is in the off position the lock up will operated as it always did.
Note: There is no lock up in first or second. The valve body overrides it in those ranges. Also remember to turn the switch off when coming to a stop or the engine will lug down until the transmission drops out of 3rd gear.
Warning: Do not use the manual lockup in 1st gear at any time. There is not enough transmission fluid pumped at the lower speeds to properly lubricate the transmission, and you could damage your transmission.
Benefits:
You can force the torque convertor to stay locked in 3rd and OD. When you take your foot off the gas in 3rd or OD the torque convertor unlocks and then relocks once the gas pedal is pushed down. IMO this causes unnecessary wear and heat. With this switch set up once turned on the TC will not unlock until you either turn it off or shift into 2nd gear.
Flashing OD Light:
This mod may cause your OD light to flash when it’s turned on. Here’s a solution that may work:
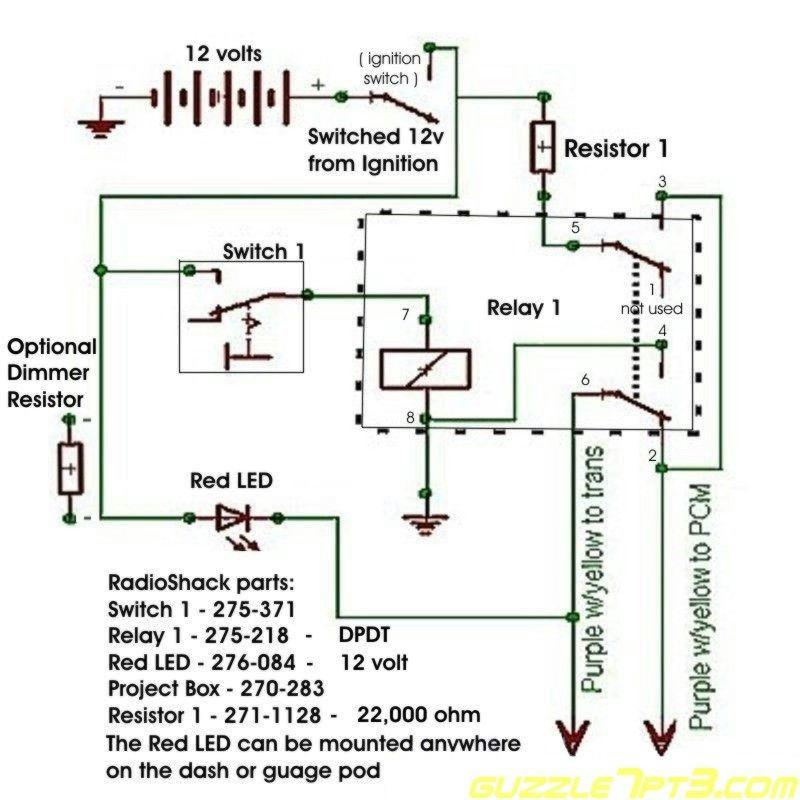
The solution actually turned out to be rather a simple one. All I had to do was to fool the ECM into believing that it still had control of the torque converter solenoid by feeding it 12 volts through a resistive load.
WARNING: It is necessary to use a resistor as a load because when the ECM attempts to ground the solenoid, a direct 12-volt feed from the battery would fry the ECM. For this reason, if you try to build this device yourself, be careful to follow the schematic closely.
All of the components were mounted on the breadboard that came with the project box with exception to the relay which was mounted in the box with double sided tape. I also used two Molex connectors from Radio Shack so I would be able to easily unplug the box if I needed to modify or work on it.
About The Author
Jim Oaks is the founder of TheRangerStation.com, the longest-running Ford Ranger resource online since 1999. With over 25 years of hands-on experience building and modifying Ford Rangers — including magazine-featured builds like Project Transformer — Jim has become one of the most trusted authorities in the Ford Ranger off-road and enthusiast space.
Since launching TheRangerStation.com, Jim has documented thousands of real-world Ranger builds, technical repairs, drivetrain swaps, suspension modifications, and off-road adventures contributed by owners worldwide. TheRangerStation.com has been referenced in print, video and online by enthusiasts, mechanics, and off-road builders looking for practical, and experience-based information.