
Instructions:
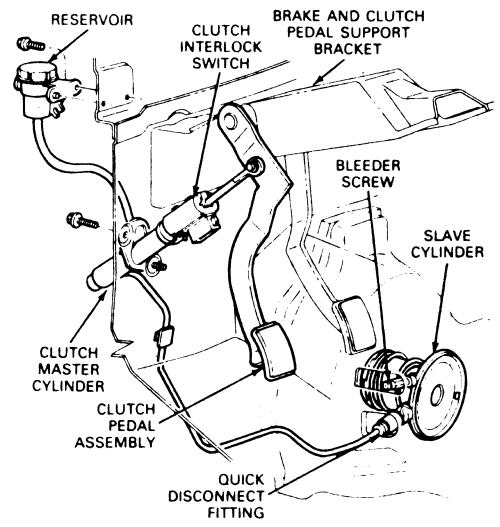
1) The Hydraulic system should be bled to remove all the air whenever air enters the system. This occurs if the fluid level has been allowed to fall so low that air has been drawn into the clutch master cylinder. Under normal circumstances, air should not enter the system when the quick disconnect hydraulic line fittings have been disconnected. The procedure is very similar to bleeding a brake system, but depends mainly on gravity, rather than the pumping action of the pedal, for the bleeding effect.
2) Fill the master cylinder to the top with new brake fluid conforming to DOT 3 or DOT 4 specifications. Caution: Do not re-use any of the fluid coming from the system during the bleeding operation and don’t use fluid from which has been inside an open container for an extended period of time.
3) Raise the vehicle and place it securely on jack stands or drive it securely up on ramps (whichever method you chose) to gain access to the bleeder valve, which is located on the top left side of the bellhousing (See Illustration 1-1 below). Try to keep the truck as level as possible. Caution: Don’t forget to chock the rear wheels and set parking brake for extra safety…
4) Remove the dust cap which fits over the bleeder valve and push a length of clear plastic hose over the valve. Place the other end of the hose into a clear container.
5) Open the bleeder valve. Fluid will run from the clutch master cylinder, down the hydraulic line, into the release cylinder (the Slave Cylinder) and out through the clear plastic tube. Let the fluid run out until it is free of bubbles.
Note: Don’t let the fluid level drop too low in the clutch master cylinder, or air will be drawn into the hydraulic line and the whole process will have to be started over.
6) Close the bleeder valve.
7) Open the bleeder valve and have an assistant slowly depress the clutch pedal allowing fluid to flow through the clear plastic hose. When the clutch pedal is almost to the floor, close the bleeder valve and have the assistant release the pedal.
8) Slowly press the pedal five times, waiting two (2) seconds each time the pedal is released. When releasing the pedal on this step, release it fast. This tends to help suck fluid down the stream and aid in faster bubble reduction.
9) Fill the fluid reservoir to the top.
10) The clutch should now be completely bled. If it isn’t, (indicated by failure to disengage completely, and a soft or no pedal), repeat steps 5 through 9.
11) Continue this process until all air is evacuated from the system, indicated by a solid stream of fluid being ejected from the bleeder valve each time with no air bubbles in the hose or container.
12) Install the dust cap and lower the vehicle. Check carefully for proper operation before placing vehicle in normal service. Check the fluid level.
Note: If you can NOT get fluid out of the bleeder screw, then the internal check valve in your clutch master cylinder may be stuck, or you haven’t bled the system for at least 30 minutes. You will either have to use a different bleed technique or replace the clutch master cylinder. Bleeding a Ranger clutch system takes time and patience. One small mistake / loss of patience / or shortcut, and you’ll have to start all over.
Alternate Technique: (these provided by Dirk). Here is one way you can try that really worked great for him.
1) Disconnect the hose from the bottom of the fluid reservoir
2) Use a hand pump to manually force the fluid down the line.
3) Reconnect line to reservoir after process and fill fluid as needed.
Note: The reverse bleeding procedure will not work on all Rangers. Some rangers’ bleeder is nothing but a tapered hex bolt with a hole in it, no real way to get a good seal on it.
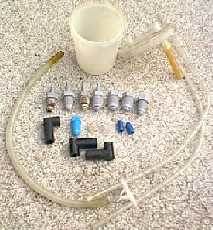
Bleeder Kit
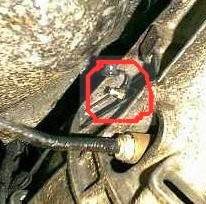
Illustration 1-1
Related Articles
Ford Ranger Manual Transmissions
About The Author
Jim Oaks is the founder of TheRangerStation.com, the longest-running Ford Ranger resource online since 1999. With over 25 years of hands-on experience building and modifying Ford Rangers — including magazine-featured builds like Project Transformer — Jim has become one of the most trusted authorities in the Ford Ranger off-road and enthusiast space.
Since launching TheRangerStation.com, Jim has documented thousands of real-world Ranger builds, technical repairs, drivetrain swaps, suspension modifications, and off-road adventures contributed by owners worldwide. TheRangerStation.com has been referenced in print, video and online by enthusiasts, mechanics, and off-road builders looking for practical, and experience-based information.