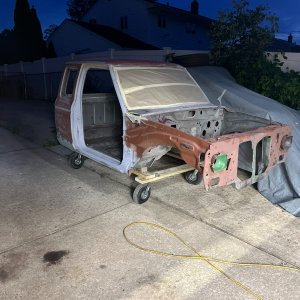
What did you do to your Ranger today? (Part Deux!)


The Hurst super boot does not fit over the factory inner boot, even though the instructions seem to indicate it does. I think most people tend to keep the factory console with cupholders, so it doesn’t matter.

I don’t have the factory console.
I’m going to trim the factory inner boots plastic bezel to the super boot will fit around it.

I could leave off the factory inner boot, but it seals around the transmission to keep water out of the cab.
 
Not a fan of Red. I'm Whore for metalflake.

Metal flake can make red look good, after being washed and waxed, shiny af.
Metal flake is a real pain in the rear when it comes to painting/repainting something. I learned that lesson when I painted the windshield visor to match the paint on the 2011. It took forever to get it to come out right.
 
Today I learned that the Royal Purple Syncromax may be worth the (ridiculous) price. Made the beat 2001 M5OD in my 2011 a lot quieter and shift smoother.

Took a blackstone sample of the Mercron V that was in it. We all get to learn if it's appropriate from the lab report. 🙂

(It's probably not appropriate. Thanks Ford!)
Interesting. I'll be following. I noticed this last fluid change that the shifting smoothness did not return like it did before with Mercon V. It's not horrible, but it could be better.
 
Interesting. I'll be following. I noticed this last fluid change that the shifting smoothness did not return like it did before with Mercon V. It's not horrible, but it could be better.
Put 300ish miles on the Syncromax so far. It stopped overheating, syncros stopped whining, the shifter rattles less (except 4th gear), and it's a little smoother to shift. Worth the scratch if you ask me.

I need to order a kit and rebuild the original trans over the winter. Pretty sure only thing wrong was input shaft bearing.

Very Interested in seeing what blackstone says. Fluid looked torched.
 
For those following, the 2011 is still not fixed concerning it's crank/no start when hot. It is slightly better, but not fixed. More details are in the 2011 build thread but it basically comes down to when the relays for the A/C and the fuel pump/Fuel Injectors in the power distribution box get above a certain temperature, they fail to close but work just fine after they cool off enough. Aftermarket Hella relays are even worse than the OG factory ones. So, I'm waiting on actual Motorcraft relays to be delivered to hopefully fix the problem once and for all. I did note that the original part number relays are no longer available. So, I don't know if they got replaced because of other people having issues or what.

On the silver lining side of things, I now have relays I can swap out so I can get the truck going again. The truck runs fine once it's started and stays running. It's the shutting off and getting it to restart after things get hot int he engine bay.

The original relay part number is 9L2T-14B192-AA. The new relay part number is 5M5Z-14N089-AA. Both are four pin relays. You do not want the other one listed that has five pins.
 
Put 300ish miles on the Syncromax so far. It stopped overheating, syncros stopped whining, the shifter rattles less (except 4th gear), and it's a little smoother to shift. Worth the scratch if you ask me.

I need to order a kit and rebuild the original trans over the winter. Pretty sure only thing wrong was input shaft bearing.

Very Interested in seeing what blackstone says. Fluid looked torched.
Other than shifting smoothness, I'm not having any of those issues. Having to ease the shifter into first, instead of it just going right in as it should, is slightly annoying. But better than what other "compatible" Mercon V alternatives have been so far. Mercon V isn't cheap to begin with. So, if Royal Purple is about the same, not a big deal for me.
 
For those following, the 2011 is still not fixed concerning it's crank/no start when hot. It is slightly better, but not fixed. More details are in the 2011 build thread but it basically comes down to when the relays for the A/C and the fuel pump/Fuel Injectors in the power distribution box get above a certain temperature, they fail to close but work just fine after they cool off enough. Aftermarket Hella relays are even worse than the OG factory ones. So, I'm waiting on actual Motorcraft relays to be delivered to hopefully fix the problem once and for all. I did note that the original part number relays are no longer available. So, I don't know if they got replaced because of other people having issues or what.

On the silver lining side of things, I now have relays I can swap out so I can get the truck going again. The truck runs fine once it's started and stays running. It's the shutting off and getting it to restart after things get hot int he engine bay.

The original relay part number is 9L2T-14B192-AA. The new relay part number is 5M5Z-14N089-AA. Both are four pin relays. You do not want the other one listed that has five pins.
We are having relay issues at work, we've been using the same part number relays since '07 and didn't start having any issues until about 3 years ago and to this point we cannot buy a relay that will last worth a darn... unfortunately I can't get it through some peoples thick skulls at work that the heat in a relay is NOT caused by the contacts but by the electromagnet, especially when the heat in the relay is concentrated in the middle of the relay where the magnet is and not the end where the contact is... We've even gone as far as seeking alternators that make less voltage, upping wire sizes to try to wick out heat from relays, all types of dumb stuff...

I'm convinced they started cheaping out on wire size in the winding increasing the temperature sensitivity and heat. We've confronted the relay manufacturers and no one will admit to anything...

In short, I get you on relays and wish I had anything constructive to add...
 
We are having relay issues at work, we've been using the same part number relays since '07 and didn't start having any issues until about 3 years ago and to this point we cannot buy a relay that will last worth a darn... unfortunately I can't get it through some peoples thick skulls at work that the heat in a relay is NOT caused by the contacts but by the electromagnet, especially when the heat in the relay is concentrated in the middle of the relay where the magnet is and not the end where the contact is... We've even gone as far as seeking alternators that make less voltage, upping wire sizes to try to wick out heat from relays, all types of dumb stuff...

I'm convinced they started cheaping out on wire size in the winding increasing the temperature sensitivity and heat. We've confronted the relay manufacturers and no one will admit to anything...

In short, I get you on relays and wish I had anything constructive to add...
What makes it more frustrating is that it took this long to narrow it down. They test fine when cold and cool off fast enough once they are out of the power distribution box that they test fine when hot (Those buggers are in a most awkward place to pull out).

I'm hoping the new OEM relays aren't a P.O.S. as well. Finding good, new parts is getting harder and harder. Factory or after market.
 
What makes it more frustrating is that it took this long to narrow it down. They test fine when cold and cool off fast enough once they are out of the power distribution box that they test fine when hot (Those buggers are in a most awkward place to pull out).

I'm hoping the new OEM relays aren't a P.O.S. as well. Finding good, new parts is getting harder and harder. Factory or after market.
Preaching to the choir bud... the last 6 years has been really crap with everyone selling off and discontinuing parts they've made for 50 years...
 
New wheels. 88-89 Jeep Comanche "Eliminator" rims, with 235/75R15s
 

Attachments

  • What did you do to your Ranger today? (Part Deux!)
    b4000.jpg
    71.4 KB · Views: 44
Interesting. I'll be following. I noticed this last fluid change that the shifting smoothness did not return like it did before with Mercon V. It's not horrible, but it could be better.
I used Redline D4 in the manual trans of my son’s old Mustang and it shifted much better.
 
Ziebart today for the annual inspection and touch-up. New car smell is back.
 
I may have actually fixed my air conditioner in the Road Ranger.
  • Didn’t work when I got it, but it was all there
  • A couple of you guys walked me through how to check it, fix the seals and charge it up. Early success a couple years ago. Tolerable
  • On a hot day on the road, just didn’t seem to be moving enough air, not cold enough, but better than nothing
  • I checked behind the glove box and found a cardboard patch, held on with masking tape, that (somehow) had come loose! I repaired it with the aluminum duct tape a year ago. Better, but not what it should be.
Before the Truck Nationals trip, I went through the whole thing. Charge was actually a little high, but I left that alone. I tinkered with this and that and made sure I had no vacuum leaks. Riding around here it seemed cool enough. I also added a second soup can vacuum reservoir because the blend door would start to close when I was climbing a steep hill with the 1,350# trailer. That worked pretty well on the trip.

But in the hot sun, 95°, running down the road full speed, it just wasn’t putting out enough air, and it just didn’t seem to be as cold as it should be. But it got me home.

Let me also throw out there that I posted a year or two ago, that I actually gently took my leaf blower and blew backwards through the vents if something was stuck in there, and it actually put a lot more air out after that. But still not what you’d expect.

So Friday and Saturday I dug in further. Not only did I pull the patch off the duct behind the glove box, I expanded it. It was about 2.5 x 5“, and I made it about 10 inches long towards the blend door. I did that so I could get to the evaporator coil.

I took the blower out. If you’ve done it, you can only see the bottom left-hand corner of the evaporator coil from under the hood. And that’s the side the air blows against. The inside seemed pretty clean, but there was a little bit of dirt, and a little crud down near the bottom corner. I took the coil cleaner you use on a home or industrial air-conditioning unit, made up a funky spray nozzle so I could spray the whole thing from the inside and from the outside, and I let that sit while I ate lunch.

Then I took a paintbrush, cut off about half the length of the bristles, so it was like a long handled, mild scrub brush, I got in the cab upside down and backwards, and I worked it as best I could. I did the same thing under the hood, but you could only get to that lower left corner. However…

When I was trying to work the paintbrush, I couldn’t get the paintbrush to go up or to the right half of the coil. I could barely put my fingers in there, but I felt a little bit of something, and I was able to wiggle out a few strands of pine straw. Eureka!

Maybe I should post this under new tools, but I fabricated a pine straw and leaf removal tool from my wardrobe closet.

IMG_8088.jpeg


Some of you might call it a bent up coat hanger. I doubled it so I had a double hook, and I worked it very gently nibbling away at the two bales of pine straw and leaves that were packed into that box. I always kept the points angled away from the coil so I wouldn’t scratch it open by accident. I couldn’t believe how much crap came out.

IMG_8079.jpeg
IMG_8078.jpeg
IMG_8077.jpeg
IMG_8076.jpeg


The pictures don’t do it justice, that little pile is only about half of it. It was the size of an apple pie plate laying upside down, and twice as tall.

I have one of those big Black & Decker 8 gallon shop vacs with a 3 inch hose on it, the kind that will suck the sheet rock off the walls. I worked that from the outside, and my leaf blower from the inside, and went back-and-forth and back-and-forth, and I heard stuff rattling in the vacuum hose for another 15 minutes.

I sprayed it all with the coil cleaner again, and let it sit for a half hour or more. Than I sucked it out and blew it out again. Then I cleaned the coil cleaner off with some regular 409 type stuff, and then I sprayed brake cleaner through it.

When I sit in the driver seat, I put my seatbelt on, force of habit. Always did it since I first started to drive. Continued to do it after I got my drivers license a few years later. It paid off this time. When I turned on the air conditioner, so much air came out of the dashboard. It almost pushed me in the backseat!

I hooked up on my gauges and the pressure was still reading in the red zone, so I actually bled off the Freon until it was reading about 2/3 the way across the green zone. It was icy cold. I think it was @sgtsandman at Ford Nationals who told me it could be overcharged, which doesn’t allow it to evaporate properly and you won’t get full cooling.

I haven’t taken it on a hard test drive, but it will get tested out tomorrow in the afternoon in the hot sun. I was getting high from all those chemicals, sitting in the driveway, blowing it out, I hope those are all dissipated by the time I hit the road.

Vacuum pump:
The replacement little vacuum pump came in also. When I was testing the vacuum, it seemed pretty good, but installing a little tiny electric vacuum pump for $10 seemed a good crutch for when I was climbing hills.

IMG_7601.png


The whole pump is about the size of a small prescription pill bottle. You have to solder on the two leads which is easy enough, but the little posts are very fragile and they’re actually part of the feather brush that goes to the rotor. Handling them the first time, I broke one off and there’s no way to fix it.

I was much more careful when I prepared them this time. I found a piece of rubber radiator hose about the right diameter of the nylon part of the pump, and cut it so it looked a little bit like a chair. I drilled a couple holes in the rubber up above where the wires were, so I could slip the pump in the rubber tube and route the wires in and out of those “ears” and zip tied them tight so they wouldn’t snap off. I slipped that into a block of high density foam that I drilled to accept it, and then I put a zip tie around that foam block to hold it onto one of the AC lines near the condenser coil for vibration insulation.

I didn’t want it running all the time, and I thought a lot about where to connect it. I ended up tapping into the two leads to the blower motor itself. The blower motor speed is controlled by resistors in the ground leg. By tying in there, the vacuum pump should work at different speeds to match the blower speed, but it will also go off when the heat and air is off. If that doesn’t work, I’m just going to ground it to the chassis, but still have the positive connected to the blower positive, which is full power on every level, again controlled by the ground resistors.

I attached it to where the low Freon switch is by the condenser coil and the dryer.
IMG_8085.jpeg
IMG_8084.jpeg


Wish me luck!!


🙏🙏 🤞🤞 😉😉
 
Last edited:
I may have actually fixed my air conditioner in the Road Ranger.
  • Didn’t work when I got it, but it was all there
  • A couple of you guys walked me through how to check it, fix the seals and charge it up. Early success a couple years ago. Tolerable
  • On a hot day on the road, just didn’t seem to be moving enough air, not cold enough, but better than nothing
  • I checked behind the glove box and found a cardboard patch, held on with masking tape, that (somehow) had come loose! I repaired it with the aluminum duct tape a year ago. Better, but not what it should be.
Before the Truck Nationals trip, I went through the whole thing. Charge was actually a little high, but I left that alone. I tinkered with this and that and made sure I had no vacuum leaks. Riding around here it seemed cool enough. I also added a second soup can vacuum reservoir because the blend door would start to close when I was climbing a steep hill with the 1,350# trailer. That worked pretty well on the trip.

But in the hot sun, 95°, running down the road full speed, it just wasn’t putting out enough air, and it just didn’t seem to be as cold as it should be. But it got me home.

Let me also throw out there that I posted a year or two ago, that I actually gently took my leaf blower and blew backwards through the vents if something was stuck in there, and it actually put a lot more air out after that. But still not what you’d expect.

So Friday and Saturday I dug in further. Not only did I pull the patch off the duct behind the glove box, I expanded it. It was about 2.5 x 5“, and I made it about 10 inches long towards the blend door. I did that so I could get to the evaporator coil.

I took the blower out. If you’ve done it, you can only see the bottom left-hand corner of the evaporator coil from under the hood. And that’s the side the air blows against. The inside seemed pretty clean, but there was a little bit of dirt, and a little crud down near the bottom corner. I took the coil cleaner you use on a home or industrial air-conditioning unit, made up a funky spray nozzle so I could spray the whole thing from the inside and from the outside, and I let that sit while I ate lunch.

Then I took a paintbrush, cut off about half the length of the bristles, so it was like a long handled, mild scrub brush, I got in the cab upside down and backwards, and I worked it as best I could. I did the same thing under the hood, but you could only get to that lower left corner. However…

When I was trying to work the paintbrush, I couldn’t get the paintbrush to go up or to the right half of the coil. I could barely put my fingers in there, but I felt a little bit of something, and I was able to wiggle out a few strands of pine straw. Eureka!

Maybe I should post this under new tools, but I fabricated a pine straw and leaf removal tool from my wardrobe closet.

View attachment 147482

Some of you might call it a bent up coat hanger. I doubled it so I had a double hook, and I worked it very gently nibbling away at the two bales of pine straw and leaves that were packed into that box. I always kept the points angled away from the coil so I wouldn’t scratch it open by accident. I couldn’t believe how much crap came out.

View attachment 147483View attachment 147484View attachment 147486View attachment 147485

The pictures don’t do it justice, that little pile is only about half of it. It was the size of an apple pie plate laying upside down, and twice as tall.

I have one of those big Black & Decker 8 gallon shop vacs with a 3 inch hose on it, the kind that will suck the sheet rock off the walls. I worked that from the outside, and my leaf blower from the inside, and went back-and-forth and back-and-forth, and I heard stuff rattling in the vacuum hose for another 15 minutes.

I sprayed it all with the coil cleaner again, and let it sit for a half hour or more. Than I sucked it out and blew it out again. Then I cleaned the coil cleaner off with some regular 409 type stuff, and then I sprayed brake cleaner through it.

When I sit in the driver seat, I put my seatbelt on, force of habit. Always did it since I first started to drive. Continued to do it after I got my drivers license a few years later. It paid off this time. When I turned on the air conditioner, so much air came out of the dashboard. It almost pushed me in the backseat!

I hooked up on my gauges and the pressure was still reading in the red zone, so I actually bled off the Freon until it was reading about 2/3 the way across the green zone. It was icy cold. I think it was @sgtsandman at Ford Nationals who told me it could be overcharged, which doesn’t allow it to evaporate properly and you won’t get full cooling.

I haven’t taken it on a hard test drive, but it will get tested out tomorrow in the afternoon in the hot sun. I was getting high from all those chemicals, sitting in the driveway, blowing it out, I hope those are all dissipated by the time I hit the road.

Vacuum pump:
The replacement little vacuum pump came in also. When I was testing the vacuum, it seemed pretty good, but installing a little tiny electric vacuum pump for $10 seemed a good crutch for when I was climbing hills.

View attachment 147487

The whole pump is about the size of a small prescription pill bottle. You have to solder on the two leads which is easy enough, but the little posts are very fragile and they’re actually part of the feather brush that goes to the rotor. Handling them the first time, I broke one off and there’s no way to fix it.

I was much more careful when I prepared them this time. I found a piece of rubber radiator hose about the right diameter of the nylon part of the pump, and cut it so it looked a little bit like a chair. I drilled a couple holes in the rubber up above where the wires were, so I could slip the pump in the rubber tube and route the wires in and out of those “ears” and zip tied them tight so they wouldn’t snap off. I slipped that into a block of high density foam that I drilled to accept it, and then I put a zip tie around that foam block to hold it onto one of the AC lines near the condenser coil for vibration insulation.

I didn’t want it running all the time, and I thought a lot about where to connect it. I ended up tapping into the two leads to the blower motor itself. The blower motor speed is controlled by resistors in the ground leg. By tying in there, the vacuum pump should work at different speeds to match the blower speed, but it will also go off when the heat and air is off. If that doesn’t work, I’m just going to ground it to the chassis, but still have the positive connected to the blower positive, which is full power on every level, again controlled by the ground resistors.

I attached it to where the low Freon switch is by the condenser coil and the dryer.View attachment 147488View attachment 147489

Wish me luck!!


🙏🙏 🤞🤞 😉😉

Afterthought/question: I’ve talked to several of you guys over the last couple years about all of this, and I’ve watched about a zillion of the videos. I suspect the reason the ductwork behind the glove box was originally cut open, was to clean the “screen” that that’s at the intake side of the blower kind of in line with the firewall. I mostly cut the hole bigger so I could get to the full face of the condenser coil to clean that out. But I don’t have any screen between the blend door and the blower wheel.

The videos show one there with some advice had to clean it. I suspect that’s why I had so much Pinestraw and crap against the evaporator coil. But when I was checking it all out, I couldn’t see any markings or frame or anything that looked like there was a screen there in the first place, or where one was taken out or cut out. Is it a separate piece that snaps in? Or is it built into that duct structure?

Is there supposed to be a screen there? Low priority now that I’ve got it cleaned out, but I think I’m going to put one in whether there was one there or not. Shouldn’t it be too hard to do? Is it a piece I can get out of a salvage yard?
 

Upcoming TRS Events

Featured Ranger Based Vehicle

TRS Latest Video

Official TRS Merchandise

Follow TRS On Instagram

Back
Top