What did you do to your Ranger today? (Part Deux!)


Ok, I hear you, and I’ve looked at the videos, but I still have a question on this. I did order the tool kit, and the synchronizer, and they should be here this weekend.

You said to get the engine to top dead center. I know how to do that and I can do that.

Then you said, just drop in the synchronizer with the tool on top and tighten it down, and then swap the tool for the cap/reader.

Maybe I’m a dummy, but with the helical gear on the synchronizer, can’t I just pick it up and turn it a few degrees and put it down in a different place? Won’t you have as many positions as there are teeth on that helical/spiral gear?

???
Yes, it does spin a little on the helical gear, but the tool holds the alignment of the synchro to the sensor, so as long as you can fit the sensor and plug it in, you’re good. Doesn’t matter exactly which way it’s facing as long as you can put the sensor on and plug it in, much like clocking a distributor with a TFI on it, as long as it’s not hitting anything and it’s in time, it’s good. The alignment tool make sure it’s in time relative TDC.
 
What did you do to your Ranger today? (Part Deux!)

Playing around in forscan i found hill descent control and activated it.


What did you do to your Ranger today? (Part Deux!)

I also played eith the offroad screen choices and series2 gives me buttons on the bottom of the screen but only the rear locker button lights up and does anything when i touch it. Now i can activate the rear locker eith the physical button or the screen button


What did you do to your Ranger today? (Part Deux!)

When messing around, dont activate selectable drive modes or you get the mustang screen and drive mod buttons. They do nothing on a ranger.


What did you do to your Ranger today? (Part Deux!)

That top one is the mustang one.

What did you do to your Ranger today? (Part Deux!)

Some things i avtivated on those two screen shots didnt do anything but i havent put them back to disabled till i actually drive and see it they work whole moving.

What did you do to your Ranger today? (Part Deux!)

I did figure out how to add the outside temp to the cluster. That was why i originally plugged in my laptop but i got distracted reading the options and turned on a bunch of stuff
 
That stuff is amazing. Star Wars to me.

How do I plug in my Commodore 64 into the 78 Mark V to get those options? Do you think it would work with the 87 and 88 town cars? The 87 Ranger? Or even the 97 ranger?

Can you load it with an eight track or a cassette tape?
 
I had someone ask me once to fax them an engine calibration update... I kindly explained that's not how it works...
 
I had someone ask me once to fax them an engine calibration update... I kindly explained that's not how it works...

Wasn’t me. My fax is broken.
 
Tonight I changed the O rings in the fitting that goes into the power steering pump on the '90, just used cheap ones but they'll last a while at least... I know it's been 15 years since the last time I was in there... it's an oily disaster under the hood, after a few more shop things that I deal with I might pressure wash under the hood... Also took the opportunity to fix the wire on one of the LED offroad lights that I had mounted out the front of the mount last time I had it off and moved it to the back. Also laid under the thing and checked over some things, realized I might have missed a step, I thought I capped both of the front ends of the radius arms but only did the drivers side, next time I get things apart I'll probably do that... A couple days ago ordered new U joints for the rear drieline since one of them is squeaky. Today I ordered some shackle mounts to weld onto my bumpers, they're up to the task so might as well be there, would save time and be helpful, when I get to the back bumper I need to add some support to keep it from rotating...
 
Yes, it does spin a little on the helical gear, but the tool holds the alignment of the synchro to the sensor, so as long as you can fit the sensor and plug it in, you’re good. Doesn’t matter exactly which way it’s facing as long as you can put the sensor on and plug it in, much like clocking a distributor with a TFI on it, as long as it’s not hitting anything and it’s in time, it’s good. The alignment tool make sure it’s in time relative TDC.

I wanted to give you a word of personal thanks on all this. All the guys are great and advice has been good, but every time you’ve given me a proper response that’s right on target. THANK YOU!

The synchronizer is here and the alignment tool is here, but the master bedroom shower has started dribbling hot water like it was free. I’ve been under the house four times to turn the water on and off, a mucky crawlspace, and nobody in the western Hemisphere has the seals that should cost $.50. I bought a new valve assembly, and I think I can modify the seals to work. If not, the custom built fiberglass surround in the bathroom wall has to come down for a new valve.

Understand that the valve assembly is like brand new. No corrosion, no dirt, looks as good as the day it was installed a few years ago, all that is wrong are the little bucket seals on a spring like a Delta faucet has.

When I called Kohler directly for the part, the seals, they started out asking me what part number was it? If I knew that I wouldn’t be calling them! Really very nice polite ladies on the other end of the phone, but the three I talked to know nothing about plumbing or plumbing fixtures, they just know how to type into a computer and read out what it says. But all three offered to sell me a new faucet and knock off 10%. When I asked for compensation for taking the bathroom wall apart….

Technology is saving us.
 
Last edited:
I was able to complete my first harness swap. I had never crimped before, so a bit of a learning curve but not too bad. I now have all four speeds on my blower for the first time in a decade. I swapped the resistor last week, but that harness was beyond shot.

Anyway, I did find a very small vacuum line from under the blower to the heater control bypass valve (?).

I couldn't get a picture, but with a mirror could see the rubber "L" that goes into the valve is no good. The line itself also seems to have broken short (image included). My question, is there a way to "splice" the line (it's so small), so I don't have to go rooting around the blower to replace the whole line?

Also, I suppose I should ask if I'm even right, is that where this line goes?
 

Attachments

  • What did you do to your Ranger today? (Part Deux!)
    vacuum hose.jpeg
    178.9 KB · Views: 6
I was able to complete my first harness swap. I had never crimped before, so a bit of a learning curve but not too bad. I now have all four speeds on my blower for the first time in a decade. I swapped the resistor last week, but that harness was beyond shot.

Anyway, I did find a very small vacuum line from under the blower to the heater control bypass valve (?).

I couldn't get a picture, but with a mirror could see the rubber "L" that goes into the valve is no good. The line itself also seems to have broken short (image included). My question, is there a way to "splice" the line (it's so small), so I don't have to go rooting around the blower to replace the whole line?

Also, I suppose I should ask if I'm even right, is that where this line goes?

Is this what you’re talking about?

What did you do to your Ranger today? (Part Deux!)


It’s hard to see in that picture. If you go on eBay, they make plastic couplings (tube to tube) for just about any size tubing from a few inches down to an eighth of an inch, or more/less. They’re dirt cheap, but you’ve got to wait a few days to get them. NAPA has a good selection, but they’re awfully proud of them. And a lot of times it’s a couple pennies more to buy a kit with all shapes and sizes than it is to buy a half a dozen of a particular size.

See if you can get a better close-up picture. I’m not sure what that is. For a repair, vacuum tubing tends to be very flexible and workable, and it has a thick wall, so when it comes to small diameters, you can make it work on a lot of stuff.

If the little piece of the elbow is broken off inside that tube, and the other half is still on that unit, you can slice the tube lengthwise with a razor to get the piece out. If you’re careful with some superglue, you can glue it back together. I would strongly advise splicing a piece of tubing in, and insert the broken piece, before you try try to glue it, so you don’t just snap it off again when you try to slip the tubing on the repair. On a piece like that, that doesn’t have any motion once it’s in place, a couple drips of superglue will hold it for 100 years unless somebody hits it. After you glue it together and it dries overnight, you can dribble more superglue over it from the outside to give it a little extra shield and strength. Better, super glue gel, but that takes a lot longer to cure.

Hope it helps
 
I hate when I have an uphill battle on stupid simple things.

The Missing Linc:

I ordered the parking brake switch, it’ll be here in a few days

I replaced the brake lights switch on the brake pedal, but I’m still having intermittent illumination. There’s a little play in the pedal, I’m wondering if something is worn in the linkage. Nothing I ever felt was unsafe, the truck stops fine, but I’m thinking that little wiggle might defeat the spring loaded part of the switch. If anybody has any wisdom on this item, I would love to hear it. I’m thinking I’m going to start with bleeding the brakes.

The Road Ranger:

Fuel pressure checks out, new plugs, new wires, new fuel pump, new fuel filter, and some other things. It’s still breaks up under power or when you just rev it high with no load.

So I bought the cam position sensor. Not the whole thing that goes down in the engine, just the sensor cap. When I finally got it off, the old one looked pretty rough.

What an incredible design, huh? The diabolical Ford designer (the one who has the witche’s kettle in his office) who put the smallest screws possible on this unit that is in the most inaccessible part of the engine, well, he has become number three on my list. Number one is the guy who invented speed bumps. Number two is the marketing genius who figured out how to make a two pack for those little items that you need once every 10 years.. That one was well thought out, because of course you put the spare one away, but sometime between seven and eight years you lose it, so the next time you need it, you have to buy two more of them. And now there’s this malicious idiot who works in a dark cubicle who designed this thing with the smallest screws possible, and puts it in the hardest place to reach or you can find without removing the top of the engine. I think we should put all three of them in a dumpster that we get from behind a fish store and roll them down the hill on the seventh layer of hell for all time. But I digress…

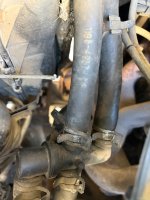
I took the main wiring harness cable off the firewall and a couple little things and folded them over to the driver side tire. You can’t see the unit at all, so I used my ham hock hands to reach around upside down and backwards, and feel the thing out with my railroad tie fingers.

I started trying to unscrew the screws with a quarter inch ratchet with no extensions, and I could actually get it onto the screw, but there was no swing room in any direction because of all the big wiring harnesses, and whatever down there. I say whatever, cause you can’t see it unless you remove the body of the truck or something.

Then I drew on the sum of my mechanical knowledge and tools, and I came up with this:

View attachment 140082View attachment 140083

That’s a quarter inch ratchet with about 15 or 16 inches of quarter inch extensions. There’s the socket, then a universal, then a couple of wobble end extensions, and then a long extension to get it high enough in the air that you could twist the ratchet without hitting the back of the engine or the firewall. With all that I could get a little bit of an S carve so you could work it around the back of the upper intake manifold. I finally learned to put a little masking tape on such things to hold them together after losing about 10,000 sockets somewhere down inside the engine department.

I had to lay on my stomach on the fender, and reach my left hand all the way down and around, so with that trial and error torture, I could eventually slip the socket on the head of the bolt. While the ratchet was free in the air, I was in such an awkward position, that you could barely work it back-and-forth. But I only knocked it off the screw about 10 times. And no, I did not lose the skin from my knuckles, it’s all still down there behind the engine.

Of course, the best part of this kind of a story is when it all works out. Well screw that, it didn’t fix squat. The thing still breaks up when you read it high, and it breaks up under any kind of a load.

I’ll tackle the coil pack and the fuel rail relief valve today.

Correct me if I’m wrong, but if that doesn’t fix it, the only thing left are the injectors themselves, yes/no?

Is there any kind of a throttle positioning sensor that might cause the problem?

F&@:%€n Brake Lights…

I put in the new switch, I took it out and put it in again after checking everything, I sprayed it all with WD-40, and I still have the original problem that came up with the old switch.

In the old days, you had a switch that rested on the front of the brake pedal stem, but wasn’t attached to the pedal, it was solid on the mount. These spring loaded Ranger switches move with the pedal motion. In the old days, if you touched the brake pedal, even if you didn’t actually apply the brakes, the light would come on and stay on until you took your foot off the pedal That’s what I want, and I’m pretty sure that’s the way it was working.

With this spring loaded switch assembly, if I apply the brakes lightly and continue to apply pressure until the truck stops, the brake lights stay on the whole time. That’s OK.

If I apply some pressure, and then ease off the pressure with the brakes still applied, often the lights go out. Then, as I press harder on the brake panel, so I am slowing down, the lights don’t come on unless I step on the brakes relatively hard, and they either come on, or they flash for a second and don’t come on until the brake pedal is all the way down and I stop moving, or worst, they don’t come on as I apply additional pressure, it may or may not come on when the pedal is all the way down.

There’s no unusual motion in the brake pedal, I don’t think there’s anything wrong with the mechanism or the master cylinder.

What’s going on or what am I doing wrong? Again, I expect the bright lights to come on the second I move the brake pedal a little bit and to stay on until I take my foot off the break.

I have been rear ended right into the hospital twice, an experience I have no desire to turn into a hat trick. I’m a conservative driver these days, but if the guy behind you doesn’t know you’re slowing down…

Any and all help is greatly appreciated.

Afterthought, I saw this the other day, and I’m thinking of using an appropriate shirt temporarily.

What did you do to your Ranger today? (Part Deux!)
 

Sponsored Ad

TRS Events & Gatherings

Featured Rangers

Want to see your truck here? Share your photos and details in the forum.

TRS Latest Video

Official TRS Merchandise

Follow TRS On Instagram

TRS Ranger Sponsors


Product Suggestions

Back
Top