
- Joined
- May 14, 2018
- Messages
- 2,059
- Points
- 601
- City
- Western Mass.
- Vehicle Year
- 1994
- Engine
- 3.0 V6
- Transmission
- Manual
- Tire Size
- 225/70/R15
- My credo
- If it's not broken Don't Fix It!
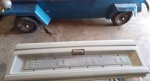
It was a dirty dirty little cough cough but I rectified that situation:
")
")
Gave it a bath... again. The dash rug makes it look really dirty still through the wind shield. Kid and I gave it a quick once over with Turtle wax Ice polish. I need to get some wax next time I hit a store because I must have ran out because I can seem to find any at home. It is way over due for a waxing.
Gave it a bath... again. The dash rug makes it look really dirty still through the wind shield. Kid and I gave it a quick once over with Turtle wax Ice polish. I need to get some wax next time I hit a store because I must have ran out because I can seem to find any at home. It is way over due for a waxing.
")
 Its a daily driver not a show truck.


