• Welcome Visitor! Please take a few seconds and Register for our forum. Even if you don't want to post, you can still 'Like' and react to posts.

The Rattling Ranger Part 2: Clutch Slipping after Oil Change


RJMacReady

Well-Known Member
Joined
Oct 7, 2020
Messages
67
City
Seattle
Vehicle Year
1984
Engine
2.3 (4 Cylinder)
Transmission
Manual
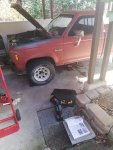
I've been asking questions in a few different threads, I'm going to keep them in one thread here where I'll detail my attempt to change my clutch. A huge adventure for a very simple man. I'm going to get some good pictures of everything disassembled and see if I can figure out what the other issues are while I have things apart.

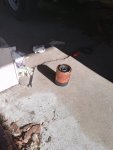
About the thread title. Yeah, I did my first oil change today! I went slow and step by step from my Haynes manual. Drain plug came out really easy, and the even the oil filter was easy to take off. Manual said to put in 4 quarts, but I thought it was low on the dipstick so I actually put in about 5. Looked at the dipstick again and realized I wasn't reading it right because my oil was actually clear now :D...Drained a little more out and then started the engine.

Starting was fine, I ran it for a few minutes, then checked the dipstick again. Filled a little more to bring it between ADD and SAFE, and things seemed good.

BUT, when I went to take a little lap around the block, I let out my clutch to go into reverse and it made an unusual and loud noise. It also did not "bite" at all. I'm pretty sure it got fluid on it and started slipping.

* Checking around my oil filter, there was no leaking oil.
* I'm pretty sure I didn't spill any oil when pouring into the top of the engine.
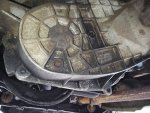
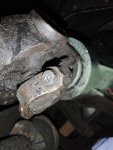
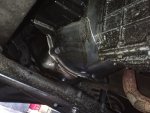
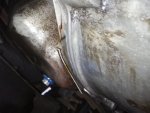
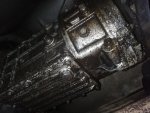
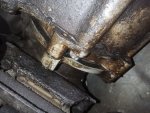
* Before I touched anything today, I noticed that at the bottom of the bell housing there were drips of oil. I figured that this means my rear main seal is leaking.

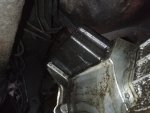
So, I've got a clutch kit. I already have a rear main seal kit because I was figuring I should do it while I'm under there. My transmission slimey, and my transfer case looks like its gasket is really blown out and may be leaky as well. The whole thing needs a good going over. We'll see how far I can get with books, internet, and too much time on my hands.

Attaching some pics.
 

Attachments

  • IMG_20210307_133615.jpg
    IMG_20210307_133615.jpg
    137.5 KB · Views: 136
  • IMG_20210307_142715.jpg
    IMG_20210307_142715.jpg
    155.1 KB · Views: 155
  • IMG_20210307_142726.jpg
    IMG_20210307_142726.jpg
    125 KB · Views: 125
  • IMG_20210307_151536.jpg
    IMG_20210307_151536.jpg
    169.8 KB · Views: 155
  • IMG_20210307_151546.jpg
    IMG_20210307_151546.jpg
    138.5 KB · Views: 128
  • IMG_20210307_151553.jpg
    IMG_20210307_151553.jpg
    153.8 KB · Views: 150
  • IMG_20210307_151559.jpg
    IMG_20210307_151559.jpg
    222.8 KB · Views: 126
  • IMG_20210307_151607.jpg
    IMG_20210307_151607.jpg
    232.1 KB · Views: 142
Bear in mind in the bellhousing pic, I did wipe it down very clean before I took the picture. There were a lot more drips there before I started. Here's a pic of my transfer case. It's a Borg-Warner 13-50.
 

Attachments

  • IMG_20210116_145615.jpg
    IMG_20210116_145615.jpg
    224.6 KB · Views: 121
This is the transmission jack I bought. A friend convinced me to try to go up a tier from the harbor freight one I was looking at. I like that the knob that lets it down is very controllable. I should be able to control the speed that it lowers instead of just dropping it.
 

Attachments

  • IMG_20210307_162415.jpg
    IMG_20210307_162415.jpg
    102.8 KB · Views: 128
A drive to your local car wash, jack up the one side & get under there with the high pressure wand to spray everything clean, then do the same to the other side. Now you can monitor where the leak is originating from.
 
Good idea. I'm probably not going anywhere with my clutch slipping but I have a nozzle for the garden hose. I'll hose it down and see how it looks after that!
 
Hot water works better than cold for moving grime, the *car wash* will also supply a source of *soap* in the mix.
 
I figured it out!

The rattle was 2 transmission housing bolts that were loose, and one starter mounting bolt that was loose. After tightening them up, things sound great now.

So there's that mystery.

Still no way around doing this clutch kit now, but I'm just about ready to dive into it.
 
Have a good laugh at me, my 4x4 lever was just slipped in the wrong spot. Clutch was working after that.

Turns out there were too rattles. Tightening the bolts fixed on of them. The other is related to throttle. I did a diagnostic test from my transmission rebuild book where you stop, put it in gear, and put the clutch all the way in, in order to totally stop the transmission from moving. There was a slight rattle (coming from the transfer case area) that got a bit louder when I throttled. Still sounds like somethings rattling. Anyway I'm still taking it off so I can inspect the area, replace the starter maybe, do my rear main seal, change my clutch etc.

Crazy ass month, my roommate got Covid and we all had to quarantine. Luckily we're all alright now.

I'm to the 'remove the driveshaft' portion of the process now. Trying to drain the transmission fluid before I pull it out. Drained the transfer case fluid today.

I can't find a section for changing the transmission fluid in a manual transmission in either my Haynes manual or my Chilton manual. But they both have a section on the automatic transmission fluid change? I'm I going crazy?
 
Well, I got it drained.

Got all the bolts off the driveshaft flange, had to give it some taps to get it loose on the back. Mine has another flange on the other side so I guess its not the kind you can just slip out. Those are 12 point bolts but smaller than my 10mm, so I assume their 9mms? I ordered a 9mm 12pt wrench that should be here tomorrow.

I'm really excited to see what the clutch plate/flywheel area looks like and see if my starter bendix is in fact loose or something as another user predicted.
 
All the companion flange bolts I've seen are 12mm, 12 point. Hopefully you index marked your companion flange and pinion flange before separating them, if not you should check the runout when you reinstall it and get it as low as possible'
By the way, the newest Ford to use a Bendix was a 1962, everything later has a starter drive. And it's not just another name for the same thing, a starter drive hits the flywheel teeth and then starts spinning, a Bendix is spinning when it his the teeth. That would only sound like a good idea if you'd had to crank your previous car.
 
There is a second flange where the driveshaft goes into the transfer case that has 12 point bolts on it that are smaller than 10mm. I guessed they're 9s. Probably should have measured.. we'll see when my wrench gets dropped off today.

I put some whiteout on the shaft so I could line it up the same. The book I'm going by is a Haynes manual. It says to do this.

Haha was just repeating what someone had said in another thread about the Bendix. I really don't know what is loose or grinding under there. It will be really satisfying to take some pics and videos and figure it out.
 
Rear driveshaft is indexed and removed, but the last bolt on my front driveshaft is totally rounded out.

It has a t-star shaped slot but that slot is also filled in with a broken off piece of metal.

I'm really struggling with what to do here. I tried

* Turning with an open ended wrench, but the bolt is too stripped.
* Drilling the broken metal out of the t-star slot, but the space is so small the drill can only come in at an extreme angle
* Hammering a socket onto the bolt to turn with a breaker bar, but the screw is so deformed against the bracket that there isn't room for it to go on. Also the support beam that's in the way only allows the hammer to swing for an inch or so.

What do I do? Maybe I should cut the whole thing apart with an angle grinder and buy a new driveshaft ...: )
 

Attachments

  • IMG_20210417_194110.jpg
    IMG_20210417_194110.jpg
    185.7 KB · Views: 122
  • IMG_20210417_195604.jpg
    IMG_20210417_195604.jpg
    130.9 KB · Views: 126
A small cold chisel. Hold the chisel as far as possible to 90° to the centerline of the shank and start hammering on the bolthead. It will take awhile but should come out.
If not then grind the head of the bolt off and with some heat and cooling and vise grips you can work the bolt shank out.
 
I'll definitely give it a try. Everything up to this point has been relatively easy. This is the first spot that's really made me feel totally stuck and started to test my resolve. I'm gonna keep trying though.
 
Also, as you are not now worried about damaging the bolt head, see if you can get a fairly straight hammer hit on the bolt head and give it a couple sharp raps. That can work to loosen the rust bind on the threads.
 

Sponsored Ad


Sponsored Ad

TRS Events

Member & Vendor Upgrades

For a small yearly donation, you can support this forum and receive a 'Supporting Member' banner, or become a 'Supporting Vendor' and promote your products here. Click the banner to find out how.

Recently Featured

Want to see your truck here? Share your photos and details in the forum.

Ranger Adventure Video

TRS Merchandise

Follow TRS On Instagram

TRS Sponsors


Sponsored Ad


Sponsored Ad


Amazon Deals

Sponsored Ad

Back
Top