Nice work! looks really sharp, will be following this for sure.

You are using an out of date browser. It may not display this or other websites correctly.
You should upgrade or use an alternative browser.
You should upgrade or use an alternative browser.
Picking up my next B2 Project
- Thread starter buck119fa
- Start date
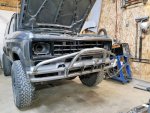
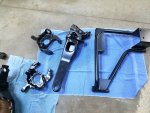
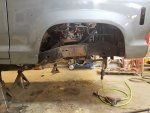
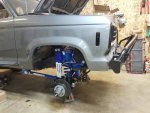
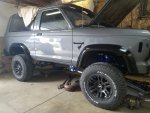
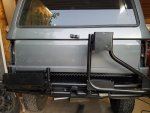
Update, Well we made a trip to James Duffs shop a couple weeks ago, got the new bumpers and suspension lift. starting the lift now, just got the bumpers fitted and powder coated. Figured since I'm putting in the D35 I'd rebuild that and get it powder coated also. progress... got the rear springs and shocks put on, tore out the front end last night. More pictures to follow but here are a couple of the bumper fitting and axle .
Attachments
since my plan is to keep this on the road as well as off road... Any suggestions for sway links that don't cost 70$, from another truck maybe an F150 or ??? the lift is 3.5in.
- Joined
- Oct 2, 2010
- Messages
- 422
- Points
- 3,101
- City
- Copperas Cove, TX.
- Vehicle Year
- 1984
- Engine
- 2.8 V6
- Transmission
- Manual
- Total Lift
- 3 inch body lift
- Tire Size
- 33
That looks really good. Is that the Duff Stage II? If so let me know if it was a pain to install and any pics you took of the install. Same one I want for my BII. Really like the front too.
yes, that's the Duff stage 2. didn't really take too many pictures during the install. I can take any you want for reference when you get ready to do yours. I upgraded the axle to the D35 while I was doing this also. the worst part of it was cutting off the factory rivets to pull the radius arm brackets and the spring buckets. Could have used a torch but elected to just use a cutting wheel. (took 8 4" wheels to do it). Measuring up the shock brackets and the new radius arms mounts took the most time, their install directions could be better. Each part of the kit had it's own directions but when you add this or that for the kit some of it didn't get explained. so research and figuring and it all worked out fine. just took my time and made sure measurements were correct. Nice kit though, rear is just add a leaf and new u-bolts with new shocks. I replaced the axle pivot bushing while I was at is also. I did elect to get the drop pitman arm and extended brake lines while I was ordering all of it. So far I'm pretty happy with it.
- Joined
- Oct 2, 2010
- Messages
- 422
- Points
- 3,101
- City
- Copperas Cove, TX.
- Vehicle Year
- 1984
- Engine
- 2.8 V6
- Transmission
- Manual
- Total Lift
- 3 inch body lift
- Tire Size
- 33
Hell, as much as it is you'd think they would've been better instructions then. So it doesn't use all the existing holes left over from taking off all the old stuff? Yeah, I'll probably be asking for pics and details when I start lol. Looks good though.
Yea you would think that...it uses a lot of the same holes but there were quite a few that I had to drill, most in the long link arm brackets. There were notes on some of the instructions that certain holes do or don't apply for some early years. Mine is early 84 and from the last 2 I owned there are differences in the frame and mounts. don't get me wrong the instructions were good for just about all of it, but a few things weren't there like trans mount connection to the long link arm bracket and bracket direction. easy enough to figure out but it should have been on there, same with the axle pivot mount and the extra hole that has to be drilled. all in all it went togeather good.
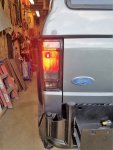
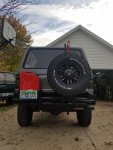
Updates, I decided to smoke out all the lights and run all LED bulbs in my markers, tail, stop, turn, reverse and front as well. As normal nothing goes as you figure it would. I started by reading posts and doing my research. Ordered the lights needed for the replacement from Amazon (JDM Star bulbs) and got the new flasher for them from E-bay (2-Prong LED compatible Flasher EF32RL).
The flasher is reverse wiring so I made an 8” pigtail flopped the connections and then grounded it to the body, turn signals work all around, good to go. NOPE! On the rear lights with the parking/head lights off the bulb was extremely dim light (should be off) but functioned with the flasher and brake, turn on the headlights and the tail lights will be bright like the brake is being pushed, so no brake light when the pedal is pushed. So little more research and nothing really talked about this that I could find. Here’s what I did to fix this issue.
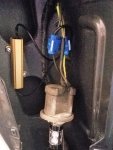
Bought 2 - 6 ohm resistors for the rear only. Tied these into the ground and the LG/Br wire reinstalled the bulbs and tested, everything now works as it should. Lights off, on, turn, brake, all functioning. I’ve read that a 3 ohm resistor is used on all 4 turn signals but also that the LED Flasher would work without the need for those. Come to find out that the rear would need them anyway for all lights to function properly. Thinking that after running it like this for a while and testing if there are any problems I’ll run the resistors at all 4 lights.
The flasher is reverse wiring so I made an 8” pigtail flopped the connections and then grounded it to the body, turn signals work all around, good to go. NOPE! On the rear lights with the parking/head lights off the bulb was extremely dim light (should be off) but functioned with the flasher and brake, turn on the headlights and the tail lights will be bright like the brake is being pushed, so no brake light when the pedal is pushed. So little more research and nothing really talked about this that I could find. Here’s what I did to fix this issue.
Bought 2 - 6 ohm resistors for the rear only. Tied these into the ground and the LG/Br wire reinstalled the bulbs and tested, everything now works as it should. Lights off, on, turn, brake, all functioning. I’ve read that a 3 ohm resistor is used on all 4 turn signals but also that the LED Flasher would work without the need for those. Come to find out that the rear would need them anyway for all lights to function properly. Thinking that after running it like this for a while and testing if there are any problems I’ll run the resistors at all 4 lights.
Attachments
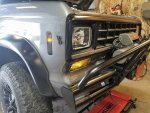
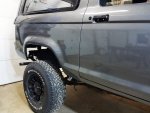
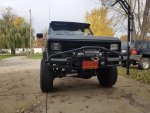
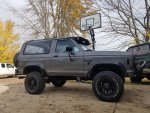
Lift is almost complete, need an alignment. Moon visor is on, fender flairs on, rear bumper and body lift gap covered. getting there. need to work on wiring done on the winch and 2nd battery and get a new front driveshaft made. Progress.
Attachments
- Joined
- Oct 2, 2010
- Messages
- 422
- Points
- 3,101
- City
- Copperas Cove, TX.
- Vehicle Year
- 1984
- Engine
- 2.8 V6
- Transmission
- Manual
- Total Lift
- 3 inch body lift
- Tire Size
- 33
Looks pretty sharp with all new additions. Ought to post up a pic in the dark so we can see if the LEDs really shine lol.
- Joined
- Oct 3, 2007
- Messages
- 157
- Points
- 3,101
- Age
- 39
- City
- California
- Vehicle Year
- 1990
- Transmission
- Automatic
My 2 cents about the swaybar is that you use the links from the stock rear swaybar. I did that for my BII and it seems to work well.
well is on the road. little timing adjustments but running good. only issue so far is the trans, short 1st gear, long second to third, no power in 2nd and 3rd, seems to pull down the motor, kick the throttle to get back to second and it hits but that's even short. Expressway drive and I'm lucky to hit 65/70 but nothing above 70.
Wondering if the valve body is gumming up from setting 4+ years? any ideas on this? I'm not a trans guy. has the C5 trans
Wondering if the valve body is gumming up from setting 4+ years? any ideas on this? I'm not a trans guy. has the C5 trans

85_Ranger4x4
Wallers in rivers
TRS Forum Moderator
TRS Event Staff
💻 TRS Socials
Article Contributor
TRS Event Participant
TRS 20th Anniversary
VAGABOND
OTOTM Winner
V8 Engine Swap
TRS Banner 2010-2011
- Joined
- Aug 7, 2007
- Messages
- 36,845
- Points
- 2,001
- City
- Frankfort
- State - Country
- IA- USA
- Vehicle Year
- 1985
- Engine
- 5.0
- Transmission
- Manual
well is on the road. little timing adjustments but running good. only issue so far is the trans, short 1st gear, long second to third, no power in 2nd and 3rd, seems to pull down the motor, kick the throttle to get back to second and it hits but that's even short. Expressway drive and I'm lucky to hit 65/70 but nothing above 70.
Wondering if the valve body is gumming up from setting 4+ years? any ideas on this? I'm not a trans guy. has the C5 trans
Might check to make sure you have good vacuum getting to the trans (there is a vacuum hose that goes from engine to the can on the PS rear of the trans.
Might also check to make sure the modulator is working right and is set correctly (the aforementioned can the vacuum hose goes to)
There is a huge article in the tech library on how to adjust and diagnose C5's.
Nice BII
Sponsored Ad

TRS Events & Gatherings

Featured Rangers
TRS Latest Video
Official TRS Merchandise
Follow TRS On Instagram


