• Welcome Visitor! Please take a few seconds and Register for our forum. Even if you don't want to post, you can still 'Like' and react to posts.

long term fuel trim bank 1 and 2 are high but not high enough to set a code.


So i hate when u search a forum and you find someone having the same problem but there is not final post with the outcome. so i am following back up so other may learn from what i did.

was able to get all the bolts and studs out using 13mm and wobbler extensions. i used a 1/2 socket on some of the very rusted ones as its tighter almost to tight u have to knock them off after.
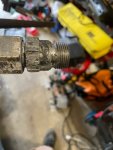
sprayed and heated the stud but it would still not come out. i put a bolt extractor on it and i though it was going to come out but it snapped just below the threads
unbroken stud.jpg


you can unbolt the evap coil box one bolt on the inside and 3 on the outside and pull the two heater core lines and push up the box to get a bunch more room. i was able to get direct access after doing that to drill the stud.

broken flush.jpg


i drilled the stud using left hand drill bits until i was close to getting to the threads and the bolt was thin. This is where i hope someone can learn from my mistakes. i should have drilled close to the threads and run my tap though to re tap it or drilled it out enough and put a though bolt as there is more then enough room behind the ears on the top.

drilling stud.jpg


instead i tried to use an easy out and i though it was coming until pop the edge of the ear broke off

broken ear before repair.jpg


when u had gone to advanced auto they did not list the bolts sale and amazon said these would not fit. they were half the price on amazon as other places they were an exact fit for the 3.0 2008 ranger.

IMG_7878.PNG

i ran a tap though all the holes to clean them up size M8- 1.25 and put all the bolts in and tightened them all to 23 Nm

i put JB welded extreme heat on the parts that snapped off. i put a longer bolt though the hole and a washer and nut on the other side. the point of Jb welding the parts that broke off was to make sure the larger fender washer laid flat. I was able to tighten it all down and was the best i was going to get with out pulling the head. I drove the truck around and checked everything after it cooled to make sure it was still 23 Nm. and everything held good

JB weld.jpg
 
on the the drivers side with the cracked manifold. i broke each bolt lose and then put them back in. then tried to loosen the EGR tube nut. its 1 1/16 wrench and the EGR tube nipple is 1" and it broke the manifold away. not so bad as i planed on replacing it anyway but the nipple was not coming off so i unbolted the other end of the tube from the EGR.

driver side origanal with EGR tube.jpg


driver side orignal.jpg


driver side off.jpg


i went the the junk yard to try and get a used manifold but all the 3.0s were older and none had EGR tubes. I bought a after market manifold from advanced auto parts and painted it with manifold paint from HD along with the passenger one while i had it off the fix the broken stud.

painted manafold.jpg


i called every auto parts store and Ford and they dont sell the EGR tube or the nipple and since the junk yards did not have it i had to get it apart with out destroying it.

EGR tube.jpg


i ended up soaking it in the ultrasonic cleaner over night and it still would not come free. i soaked it in muriatic acid, heated and hit it with the big impacts gun and it would not come apart. Finally i drilled a small hole in the center of the nut till i made it to the nipple. i filled the hole with muriatic acid and let it sit. then into the ultrasonic cleaner for heat and to vide then the impact gun and repeated about 20 times till it came apart.

after it came apart i cleaned the threds of the nipple and the side of the egr tube with a dap and die. M22 1.5 the big harbor freight set has them along with the O2 sensor if anyone needs them. I filled the 1/16 hole i drilled with JB weld

EGR tap.jpg


I bought all the nipples that advanced could get and none were the same side. I also check the gas fitting as HD and they would not fit.

EGR nipple.jpg


picture with it all back together.


driver all back togher.jpg
 

Attachments

  • IMG_7822.jpg
    IMG_7822.jpg
    95.6 KB · Views: 94
so after all that did fixing the leaks make a difference in my LTFT. the answer is a little but not as much as i had hopped. after putting about 50 miles on the truck here is what i pulled from the OBD.

before repairs i was around LTFT of 13 for bank 1 and 16 for bank two go back to my first posts to see the shots.

after replacing the O2 sensor and fixing the passenger side stud and replacing the driver side manifold the numbers dripped it around a LTFT of around 9 for both bank 1 and 2. It still seems high to me but maybe thats just what i should be for a 13 year old truck with 100,000 miles.

everyone that responded thanks for your help and if you have any other ideas of things i should look at let me know but the truck is back in service now working away.

after shot 2.jpg


after shot.jpg
 

Sponsored Ad


Sponsored Ad

TRS Events

Member & Vendor Upgrades

For a small yearly donation, you can support this forum and receive a 'Supporting Member' banner, or become a 'Supporting Vendor' and promote your products here. Click the banner to find out how.

Latest posts

Recently Featured

Want to see your truck here? Share your photos and details in the forum.

Ranger Adventure Video

TRS Merchandise

Follow TRS On Instagram

TRS Sponsors


Sponsored Ad


Sponsored Ad


Amazon Deals

Sponsored Ad

Back
Top