• Welcome Visitor! Please take a few seconds and Register for our forum. Even if you don't want to post, you can still 'Like' and react to posts.

Help, skyjacker is kicking my A**


USCGC130

Well-Known Member
U.S. Military - Active
Joined
Dec 1, 2018
Messages
104
City
sacramento
Vehicle Year
1997
Engine
4.0 V6
Transmission
Automatic
Total Lift
5.5"
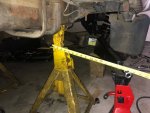
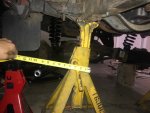
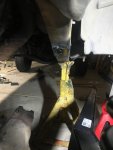
Hey all, im sorry to start another thread, but i finally got the SJ class 2 lift kit and the radius arms, got the drop brackets installed and radius arms onthe axles, but now when im trying to put the coils in, they dont really want to stay in after i twist them in to the buckets will this be way better with all the weight on them?, and the big thing is my radius arms look way out of wack and point way outside of the frame, the left one points about 9" outside the frame and the right side points 17" out of the frame!! When i try to push them towards where the mounting brackets would be they just want to bend the axles aft and that doesnt seem right either. the Arm with the R on the tag is on the right side and the L on the left Am i doing something wrong? or do you just have to muscle them into place? It really doesnt seem right doing that? i just feel like something isnt right. bellow are some pictures, mostly of the right side but 1 or 2 of the left, i really thought this was going to be easier than this, this kit is kicking my ass and im just ready to be done with it and driving the truck again.

Thank in advance fro any help
 

Attachments

  • IMG_0024.jpg
    IMG_0024.jpg
    158.4 KB · Views: 167
  • IMG_0020.jpg
    IMG_0020.jpg
    97.3 KB · Views: 160
  • IMG_0028.jpg
    IMG_0028.jpg
    142.8 KB · Views: 163
  • IMG_0022.jpg
    IMG_0022.jpg
    87.3 KB · Views: 159
Your Radius arms don't swing in towards the frame since they pivot at the axle? maybe loosen them at the axle and swing them in and tighten once lined up.
 
I have not installed aftermarket arms....
I would install the coils last with the proper tool. Loosen the bolts at the axles and swing the arms in. You may have to install the arm into the frame brackets first then swing the arms in to install the axle bolts.
 
UHHG lol i was dreading that, but it would be an easier answer than removing them, but those big bolts were a bear to break loose and torque. Nice credo Bgunner, i am starting to follow that more and more, last time i didnt follow that is when i replaced my rear main seal while replacing my transmission.... wasnt leaking until i put in a new one and i had to pull it all out and redo it again... should have just left it alone. thank you for the input on my radius arms too.

and Alwaysfloored, thank you as well, that makes 2 votes to pull the coils and loosen the RA to axle bolts and see if they swing in.
 
Let me preface by saying, I have no idea, as I've yet to wrench on my front suspension. However, it seems like youtube has a video about everything under the sun. Could find some helpful tips on there?
 
The arms will swing in after you loosen the bolts holding the radius arm to the beam. Once you have the ends in the brackets, then torque down the bolts on the axle.
 
Don't tighten the bolts that hold the radius arm to the axle beams until everything is together. Don't tighten the pivot bolts in the drop brackets either. Which hole did you use on the drop brackets? Should be the top one.
 
All of the above.

+

On mine, I had to grind off part of a lip on the driver side axle beam in order for the radius arm to swing completely into place. I think I put photos in my build thread and there is reference to it in a tech article somewhere here on this site.
 
Thank you guys, I will go ahead and work on re doing all that, at least the axles are back in and hanging, I did grind some of that lip down because I saw that it looked like it would interfere, but I may need more, ill check when I get home. I really do appreciate the input because I feel I am a pretty decent mechanic but doing this lift by myself is kicking my ass. Hopefully I can just get away with loosening the arms and not having to fully remove them.

Mr. Jim oaks, I had read your install a few times and know that you moved yours to the upper hole, do you think I should still try the top hole first since I am adding 1" of washers under it, I am anticipating my lift being at about 5.5 " up front. and BTW your 1996 TRS build I loved.

Thank you all for your time, ill report back once I get everything squared away
 
No way to know what's best till your close


With what your saying starting with the 4 in holes is prudent.

You always put it together loose and get it on its weight before final torque....loose meaning moveable with some effort not barely together of course.

On weight. If it's close enough for dial in snug the arm lowers then jack it up to unload and put the final torque to it
 
Even with the 1" of washers the 4" hole should work. I am using the 4" hole(superlift brackets) with my Skyjacker 6" coils, and my truck is lighter than yours.
 

Sponsored Ad


Sponsored Ad

TRS Events

Member & Vendor Upgrades

For a small yearly donation, you can support this forum and receive a 'Supporting Member' banner, or become a 'Supporting Vendor' and promote your products here. Click the banner to find out how.

Latest posts

Recently Featured

Want to see your truck here? Share your photos and details in the forum.

Ranger Adventure Video

TRS Merchandise

Follow TRS On Instagram

TRS Sponsors


Sponsored Ad


Sponsored Ad


Amazon Deals

Sponsored Ad

Back
Top