• Welcome Visitor! Please take a few seconds and Register for our forum. Even if you don't want to post, you can still 'Like' and react to posts.

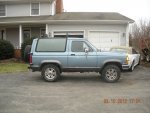
Before Ex leaf spring swap


Lpannell25

Well-Known Member
Joined
Nov 4, 2011
Messages
60
Vehicle Year
1989
Transmission
Manual
Pretty sure the original leafs are no good i know the bushings are shot but i think the actualy leafs themselves have seen better days! This is a pic of before i do the swap will take measurements and post them later but im pretty sure the front end is atleast 1.5-2 inches higher than the rear
 

Attachments

  • DSCN1710.JPG
    DSCN1710.JPG
    191 KB · Views: 195
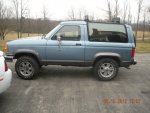
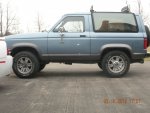
more pics you can really tell the difference in these
 

Attachments

  • DSCN1719.JPG
    DSCN1719.JPG
    203.2 KB · Views: 248
  • DSCN1720.JPG
    DSCN1720.JPG
    150.1 KB · Views: 252
snowboard racks. are the rear leaf shackles spring loaded? took the left side off would like to replace shackle but cant get the bolt off it seems to be kinda rounded off... but the shackle twisted towards the back and i can only pry it back a little bit then it returns all the way to the back like its spring loaded or something?
 
Probably rust. I just did a SPOA kit on a Samurai and I had to cut the nut end off and drive the bolts out. Just a guess here.
 
Definitley rust. No they are not spring loaded and if the spring moved a lot then you KNOW it's toast. Jundging by the way your's is sitting your springs are way done. I had to cut all the bolts on my 87, man what a pain. I replaced then with grade 8 bolts I got at NAPA. When I did my 88 all the bolts came out with just a bit of persuasion from my 3/4 drive gear and a 3 foot long pry bar, and that's after soaking a couple days with knock er loose, but I did not have to break out the cut off wheel. The explorer springs go right in. Now changing out the bushings is a whole 'nother issue. I have burned them out, used a ball joint press tool and a vise and have seen a large 3 jaw puller and an old socket used too. Good luck but the swap out of the springs is not too hard it just depends on how stubborn the bolts want to be.
 
The bolts can be a bitch. Don't bother trying to save them, just replace with grade 8 like alaskabII suggests, but I would buy from a bolt shop, should be a lot cheaper than napa. Like bloodbane suggests, driving through after cutting the head off is prob the easiest. Though I have also [gwaiis suggestion] cut the head off and after sticking washers and antisieze behind the nut, PULL through the bolt. I had a spring shop remove the bushings, but would definitely do it myself next time.... C$120.00 labor. Suggestions for removal include press, ready-rod and appropriate sockets to pull the bushing through, torch, drill out the rubber, all feasible depending on what you own. The bushing itself is made with an outer metal shell ~ 1/16", 'rubber', and an inner metal shell also `1/16" thick. That's why you're thinking it has a spring as the rubber is bonded to both metal sleeves. If you're getting new springs then I wouldn't bother worrying about the bushings as your new springs will have them, but used won't. As far as how your b-II is sitting, it can be decieving because the rear wheel well lip is actually a couple inches lower than the front, just measure from the lip to the body line. True level in my eyes is having the frame level, not how it looks to the eye.
Anyway, enough reading my babble, get to work,

Richard
 
Last edited:
thanks for the advice... with all that about the bushings i think i will leave the ex bushings in the springs they dont seem to be bad now the trick of the day is going to be getting that shackle back in place!
 
IIRC 9/16" grade 8 bolt. 9/16 " drill bit, cut very slow with lots of cutting fluid. If you can, change the angle on the tip of the bit so its more flat, that makes the bit slower cutting and less likely to grab. All you are doing is getting rid of the rust inside the bushing, so it shouldn't be too much trouble. Use lots of anti-sieze when putting it back together. Also you want the shank of the bolt to support the shackle as well as the bushing. I don't remember the exact length of bolt that accomplishes this but a tape measure is your friend. Slightly longer is better as you can use washers to make sure the bolt torques up properly IE; the nut doesn't stop against the shank before tightening against the shackle.

Richard
Edited for clarity, you'll see as you carry on reading.
9/16" is the closest replacement size for the original metric bolts.
 
Last edited:
I had to sawzall all my bolts out quickest and easiest way that I could find then I bought all new bolts and bushings from the stealership.
 
Are you going to post after pics? I got a explorer in the drive way right now and was thinking of doing the same swap!
 
spent the day painting the ex leaf springs lol...

after some bolt chasing of course...

got the ex leafs with new center bolts which arent the right size biggest anywhere i went was 3/8 slightly smaller then the ones that came out which i cut out by the way but hey they work...

got the back shackle ready to rock going to put that end of the leaf in first then push it slightly forward to get the front bolt in...

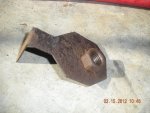
now the back bolts and nuts i bought will work the front nut doest seem to match the thread on the bolt i bout it will thread 90 percent on the nut then stops plus i need to weld the nut back onto the plate i took it out and it has small tac welds all the way around it which have come loose after i fiddled with it of course...

so once the nut is welded im going to attempt reassembly and hope the bolt just tightens onto the nut without breaking the weld or anything plan B is going to be to get a nut and bolt assembly and weld that nut to a fabricated piece of metal to fit into the mounting bracket... trying to avoid that! will take some pics as well....

also got more pb and have been spraying the other side hoping its going to take a fraction of the time this first one is taking which is usually the case lol
 
It sounds like the nut is a lock nut. Is it slightly crimped in on three of the flats? If so it's good to use.

Richard
 
nope not a lock nut... not crimped like you said and also doesnt have the little washer in it... here is a pic of it... maybe i should just go with plan B if i cant get this bolt to thread on the nut easily? i dont want to get it on there then break the weld on the nut because the threads dont match then have to cut out a brand new bolt and do something different... tried pb blaster and everything in the nut thinking it was just a little rust built up... what you guys think? i feel if it was the wrong threads then 1 thread wouldnt even thread onto the bolt...
 

Attachments

  • DSCN1728.JPG
    DSCN1728.JPG
    189.7 KB · Views: 161
Alright, if I have my facts straight, you bought a new bolt [sae] and are trying to use the old nut. The nut is metric.. Buy an sae crimp style lock nut, I can't remember the proper name. And then weld a similar bracket or the same one taken off your old nut. Just use three heavy tacks.
I'm re-thinking the crimp style nut, perhaps a regular grade 8 nut and some lock tight or a mechanical lock-washer would be better if you're welding on it. Depends on your welding ability.

Richard
Edit; I made an assumption that you would replace all the bolts, that sure made an ass-o-me AGAIN. I should have said that 9/16" is the closest replacement size for the original metric bolts.
 
Last edited:

Sponsored Ad


Sponsored Ad

TRS Events

Member & Vendor Upgrades

For a small yearly donation, you can support this forum and receive a 'Supporting Member' banner, or become a 'Supporting Vendor' and promote your products here. Click the banner to find out how.

Latest posts

Recently Featured

Want to see your truck here? Share your photos and details in the forum.

Ranger Adventure Video

TRS Merchandise

Follow TRS On Instagram

TRS Sponsors


Sponsored Ad


Sponsored Ad


Amazon Deals

Sponsored Ad

Back
Top