• Welcome Visitor! Please take a few seconds and Register for our forum. Even if you don't want to post, you can still 'Like' and react to posts.

2021 Ford Ranger FX4 TRS-3 Project Build


I called the alignment shop this morning and have an appointment for them to re-check the alignment on the 20th.

OIP.frNCQBkPa04u9wkEBKfwdgHaEI
 
Probably about what you get when you take a TTB truck in...
 
I got a new tape measure. I'll line it up for you.
61acAy1o90S._AC_UF894,1000_QL80_.jpg
 
Removing The 2019-2023 Ford Ranger Grill:

Before I could replace the bumper cover, I had to remove the grill.

Begin by removing the radiator support access cover (the plastic cover between the grill and the radiator). The cover is held in place by (5) plastic push pin clips and (2) T30 Torx screws that hold the air intake in place.

2019-2023_ford_ranger_grill_removal-100.jpg

Use a flathead screwdriver to lift the push pin in the center of the clip and then remove the clip from the mounting hole. Sometimes it’s easier to remove the clip from the hole after the center pin is completely removed.

2019-2023_ford_ranger_grill_removal-110.jpg

Remove the (2) T30 Torx bolts that hold the intake in place.

2019-2023_ford_ranger_grill_removal-115.jpg

Now you can remove the radiator support access cover.

2019-2023_ford_ranger_grill_removal-130.jpg

Remove the plastic hood latch cover from around the hood latch. The cover is held in place with a plastic mounting clip and an 8mm bolt.


2019-2023_ford_ranger_grill_removal-140.jpg

With that cover removed, you’ll have to remove the plastic air deflector that’s below it.

2019-2023_ford_ranger_grill_removal-150.jpg

2019-2023_ford_ranger_grill_removal-160.jpg

The air deflector is held in place by (4) 7mm bolts. (2) on the left and (2) on the right.

2019-2023_ford_ranger_grill_removal-170.jpg


2019-2023_ford_ranger_grill_removal-180.jpg


2019-2023_ford_ranger_grill_removal-190.jpg

With those (4) 7mm bolts removed, you should be able to slide the air deflector forward (towards the grill) and then slide it down towards the bumper to get it free and then lift it out.

2019-2023_ford_ranger_grill_removal-192.jpg

Next, remove the 10mm bolt at the left and right side of the grill. There’s a plastic tab that holds the grill in place as well. You’ll have to lift the grill up and over it.

2019-2023_ford_ranger_grill_removal-195-1.jpg


2019-2023_ford_ranger_grill_removal-198.jpg


2019-2023_ford_ranger_grill_removal-197.jpg

When you look down behind the grill, you’ll find (5) black plastic tabs sticking through the back of the bumper cover.

DO NOT GRAB THE GRILL AND TRY TO PULL IT LOOSE WITHOUT RELEASING THOSE TABS!

I’ve seen videos of people grabbing the grill and yanking it off. You could very easily break the plastic tabs that holds the grill in place.

2019-2023_ford_ranger_grill_removal-200-1.jpg

Below is a look through the slot in the bumper cover where the grill tabs mount. You can see that there is a tab in the top of that slot. When you slide the grill in place, that tab locks into the TOP of that black plastic mounting tab. So, to remove the grill, you have to push the black grill tab down to release it. Actually, you have to slide something between the top of the black plastic tab and the bumper cover to get it to unlock.

2019-2023_ford_ranger_grill_removal-210-1.jpg

To remove my grill, I used a screwdriver to create a gap between the top of the black plastic grill tab and the bumper cover, and then slid a toothpick in the gap to keep the tab from locking back in place. You can see the toothpicks in the photo below.

2019-2023_ford_ranger_grill_removal-220.jpg

There’s also (1) mounting tab on each side of the grill.

2019-2023_ford_ranger_grill_removal-250.jpg


2019-2023_ford_ranger_grill_removal-230-1.jpg

I used a small flathead screwdriver to release the locking tab on the right (drivers’ side) of the grill, and then started working it loose from the right to the left by pulling on the bottom of the grill. As I worked from the right to the left, I released the locking tab on the left side (passenger) of the grill and then completely removed the grill.

2019-2023_ford_ranger_grill_removal-240-1.jpg


2019-2023_ford_ranger_grill_removal-260.jpg

The yellow arrows in the photo below are meant to show you the locations where the grill clips to the truck.

2019-2023_ford_ranger_grill_removal-270.jpg
 
Last edited:
Removing The 2019-2023 Ford Ranger Bumper Cover:

First you have to remove these side marker lights in the front fender flare.

2019-2023_ford_ranger_bumper_cover_removal-105.JPG

Pull back the fender liner, squeeze the clip on the back of the light (near the front), and push the light out.

2019-2023_ford_ranger_bumper_cover_removal-100.JPG


2019-2023_ford_ranger_bumper_cover_removal-115.JPG

Removing the light will reveal a Torx bolt. Remove the Torx bolt.

Now you can pull the fender flare back far enough to access the 10mm bolt behind it. Remove that bolt.

2019-2023_ford_ranger_bumper_cover_removal-140.JPG

The bumper cover and front fender basically snap together.

2019-2023_ford_ranger_bumper_cover_removal-150.JPG

2019-2023_ford_ranger_bumper_cover_removal-160.JPG

Now repeat this on the other fender.

Looking on the back of the bumper cover in the area where the radiator was your see where the bumper is secured by black plastic tabs. Push those down with a small screwdriver

2019-2023_ford_ranger_bumper_cover_removal-170.JPG

Work all of these locking tabs loose and slide the bumper cover forward as you go.

2019-2023_ford_ranger_bumper_cover_removal-180.JPG

Time to replace the old cover with the new one.

2019-2023_ford_ranger_bumper_cover_removal-190.JPG

Here's the bumper cover resting on the bumper ready to be snapped in place.

2019-2023_ford_ranger_bumper_cover_removal-220.JPG

Line up the tabs on the bumper cover with the slots they clip into.

2019-2023_ford_ranger_bumper_cover_removal-230.JPG


2019-2023_ford_ranger_bumper_cover_removal-200.JPG

2019-2023_ford_ranger_bumper_cover_removal-210.JPG

With everything snapped in place, you can re-install the bolt behind the fender flare, then the Torx screw in the opening where the marker light will go, and then snap the light back in place.

With the bumper cover installed, reinstall the grill:

2019-2023 Ford Ranger Grill Removal - The Ranger Station

I'm glad to not have to look at that damaged bumper cover anymore.

2019-2023_ford_ranger_bumper_cover_removal-240.JPG

Next up, installing the ARB Snorkel.
 

Attachments

  • 2019-2023_ford_ranger_bumper_cover_removal-110.JPG
    2019-2023_ford_ranger_bumper_cover_removal-110.JPG
    103.1 KB · Views: 68
  • 2019-2023_ford_ranger_bumper_cover_removal-120.JPG
    2019-2023_ford_ranger_bumper_cover_removal-120.JPG
    143.3 KB · Views: 54
Installing The ARB Snorkel

I bought an ARB snorkel from Ford Accessories. Ford has them listed for $250.

This was NOT a one-day job. It pretty much took two days for me to install this.

Remove and discard the air intake duct.

2019-2023_ford_ranger_arb_snorkel-100.JPG

Reinstall the Torx bolts.


Remove the air cleaner assembly.

2019-2023_ford_ranger_arb_snorkel-110.JPG
2019-2023_ford_ranger_arb_snorkel-120.JPG
2019-2023_ford_ranger_arb_snorkel-130.JPG
2019-2023_ford_ranger_arb_snorkel-140.JPG
2019-2023_ford_ranger_arb_snorkel-150.JPG
2019-2023_ford_ranger_arb_snorkel-160.JPG
2019-2023_ford_ranger_arb_snorkel-170.JPG
2019-2023_ford_ranger_arb_snorkel-180.JPG
2019-2023_ford_ranger_arb_snorkel-190.JPG

2019-2023_ford_ranger_arb_snorkel-200.JPG

Cover the intake hose with a plastic bag to prevent anything from falling into the intake.

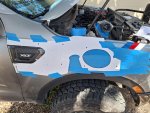
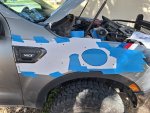
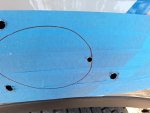
Cover the fender with masking tape

2019-2023_ford_ranger_arb_snorkel-210.JPG

And then use the fender template to mark the mounting holes and cutout.

2019-2023_ford_ranger_arb_snorkel-220.JPG
2019-2023_ford_ranger_arb_snorkel-230.JPG

Drilll out the mounting holes.

2019-2023_ford_ranger_arb_snorkel-240.JPG

And then increase the hole sizes to 16mm (5/8").

Drill holes inside the circle so you have a place to start the saw blade.

2019-2023_ford_ranger_arb_snorkel-250.JPG

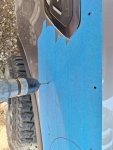
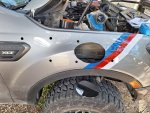
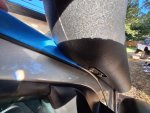
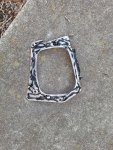
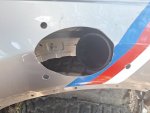
Now cut a hole in your $40K Ford Ranger.

2019-2023_ford_ranger_arb_snorkel-260.JPG

My only saw choices were a Sawzall or a jigsaw. I used the jigsaw.

The saw started to tear the tape, so I covered it in Gorilla tape.

2019-2023_ford_ranger_arb_snorkel-270.JPG
2019-2023_ford_ranger_arb_snorkel-280.JPG

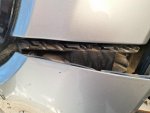
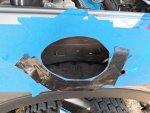
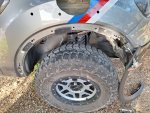
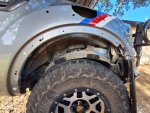
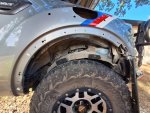
I had to remove the plastic clips that hold the fender liner in place.

I hate whoever the person is that invented these plastic clips with the stupid plastic Philips screw in the middle of them. The plastic screw in the middle almost never comes out and I end up having to remove them with a trim removal tool.

2019-2023_ford_ranger_arb_snorkel-290.JPG
2019-2023_ford_ranger_arb_snorkel-300.JPG

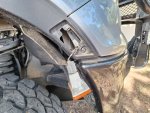
Anyway, you have to remove the marker light in the fender flare by squeezing the clip on the back of it and pushing it out, and then removing the bolt behind the light.

The remove the bolt at the bottom of fender flare at the rear of the fender opening.

2019-2023_ford_ranger_arb_snorkel-310.JPG
2019-2023_ford_ranger_arb_snorkel-320.JPG
2019-2023_ford_ranger_arb_snorkel-330.JPG
2019-2023_ford_ranger_arb_snorkel-340.JPG

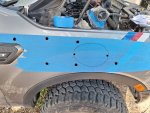
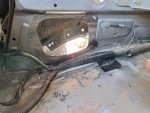
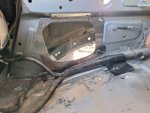
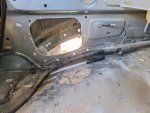
Once all of the clips are out you can drop the fender liner down, so you have access to the area behind the fender.

2019-2023_ford_ranger_arb_snorkel-350.JPG

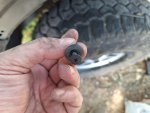
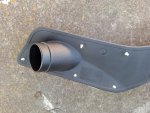
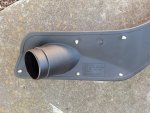
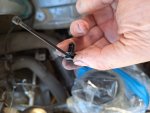
Apply Loctite 243 to each of the stainless-steel mounting studs and install them in the snorkel finger tight.

2019-2023_ford_ranger_arb_snorkel-360.JPG
2019-2023_ford_ranger_arb_snorkel-370.JPG

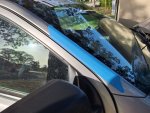
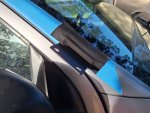
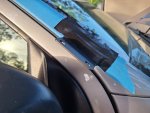
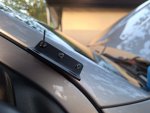
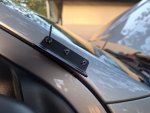
And install the upper mounting bracket.

2019-2023_ford_ranger_arb_snorkel-380.JPG

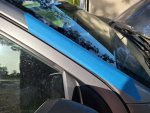
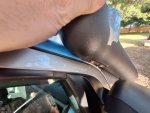
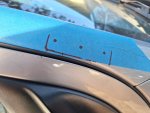
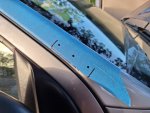
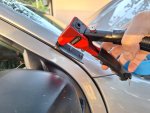
Cover the A-pillar with masking tape.

2019-2023_ford_ranger_arb_snorkel-390.JPG

Carefully install the snorkel body onto the fender and then mark the outline of the upper mounting bracket on the masking tape.

With the snorkel body positioned, open the door to make sure it clears.

2019-2023_ford_ranger_arb_snorkel-400.JPG

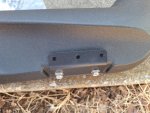
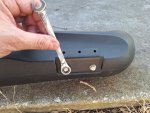
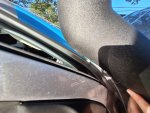
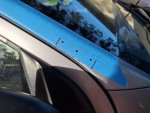
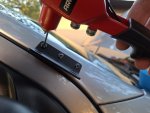
Then remove the snorkel, remove the upper mounting bracket, and use it as a template to mark the mounting holes.

2019-2023_ford_ranger_arb_snorkel-410.JPG

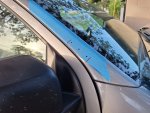
Now drill out the mounting holes with a 5mm (3/16") drill and install it with the supplied pop rivets.

2019-2023_ford_ranger_arb_snorkel-420.JPG

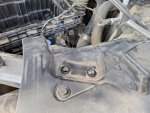
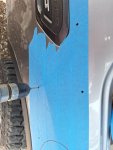
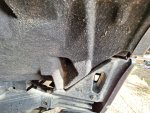
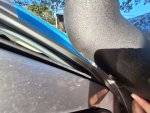
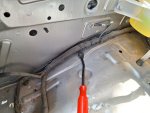
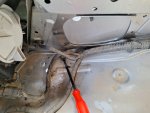
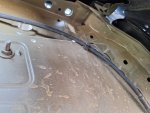
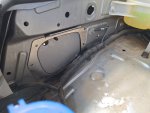
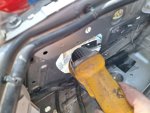
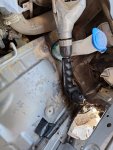
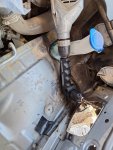
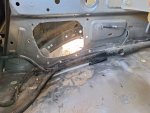
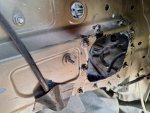
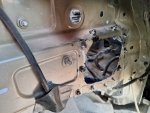
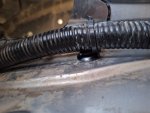
In the inside of the engine bay, you need to unclip this wire loom.

2019-2023_ford_ranger_arb_snorkel-430.JPG

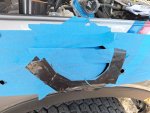
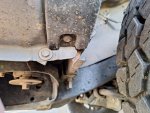
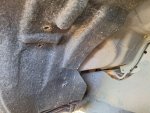
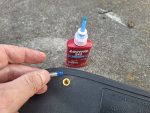
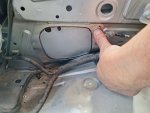
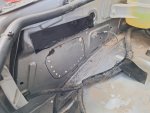
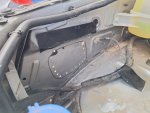
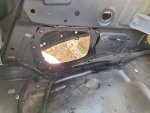
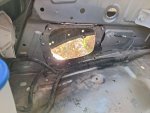
Position the inner support plate to the inner fender using the 6mm hole that's already there (above my thumb) and trace the opening with a marker.

2019-2023_ford_ranger_arb_snorkel-440.JPG

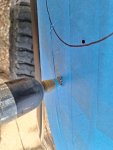
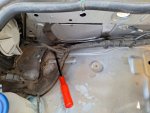
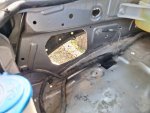
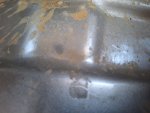
Now the fun is cutting the hole out. I tried cutting it with the jigsaw, and it was a pain. I found that if I drilled larger holes close together there was less metal to cut.

2019-2023_ford_ranger_arb_snorkel-450.JPG
2019-2023_ford_ranger_arb_snorkel-460.JPG

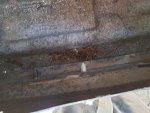
I cleaned the opening with a grinder.

2019-2023_ford_ranger_arb_snorkel-470.JPG

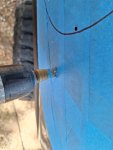
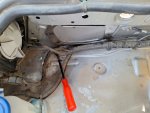
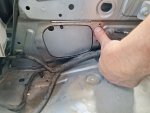
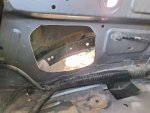
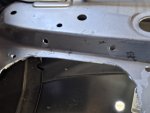
And then installed the support plate again with that 6mm hole so I could mark and drill the remaining mounting holes.

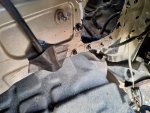
Sorry that the next pic is upside down.

2019-2023_ford_ranger_arb_snorkel-480.JPG

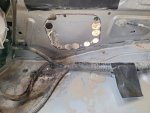
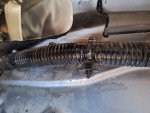
You need a 90-degree drill to drill out the (10) 5.5mm (3/16") mounting holes. I didn't have a 90-degree drill, so I picked up a
Milescraft Drill90Plus Right Angle Drill attachment for about $20. Works great.

2019-2023_ford_ranger_arb_snorkel-490.JPG
2019-2023_ford_ranger_arb_snorkel-500.JPG

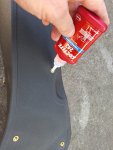
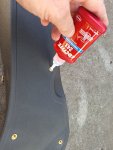
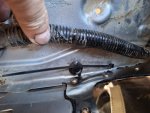
I had to apply Sikaflex 227 adhesive to the back of the inner fender support before bolting it on. This is basically a seam sealer.

2019-2023_ford_ranger_arb_snorkel-510.JPG

I really don't understand why ARB calls for Sikaflex to be applied to this support plate. It doesn't seal anything. It doesn't seal the snorkel.

2019-2023_ford_ranger_arb_snorkel-520.JPG

I broke the plastic retaining clip that held the harness where the support plate mounted. I had some plastic retaining clips and took (2) zip ties and made my own clip to hold the harness.

2019-2023_ford_ranger_arb_snorkel-530.JPG
2019-2023_ford_ranger_arb_snorkel-540.JPG
2019-2023_ford_ranger_arb_snorkel-550.JPG


Attachments

  • 2019-2023_ford_ranger_arb_snorkel-205.JPG
    2019-2023_ford_ranger_arb_snorkel-205.JPG
    191.9 KB · Views: 62
  • 20240702_171230.jpg
    20240702_171230.jpg
    236 KB · Views: 40
  • 20240702_171911.jpg
    20240702_171911.jpg
    234.9 KB · Views: 58
  • 20240702_171909.jpg
    20240702_171909.jpg
    216.4 KB · Views: 46
  • 20240702_171923.jpg
    20240702_171923.jpg
    139.9 KB · Views: 51
  • 20240702_171925.jpg
    20240702_171925.jpg
    144 KB · Views: 56
  • 20240702_172551.jpg
    20240702_172551.jpg
    150.2 KB · Views: 52
  • 20240702_172553.jpg
    20240702_172553.jpg
    141.1 KB · Views: 50
  • 20240702_173229.jpg
    20240702_173229.jpg
    124.3 KB · Views: 55
  • 20240702_173232.jpg
    20240702_173232.jpg
    115.5 KB · Views: 54
  • 20240702_173627.jpg
    20240702_173627.jpg
    242.1 KB · Views: 56
  • 20240702_173631.jpg
    20240702_173631.jpg
    202.1 KB · Views: 58
  • 20240702_174300.jpg
    20240702_174300.jpg
    156 KB · Views: 54
  • 20240702_175109.jpg
    20240702_175109.jpg
    212.1 KB · Views: 58
  • 20240702_175001.jpg
    20240702_175001.jpg
    226 KB · Views: 49
  • 20240702_175359.jpg
    20240702_175359.jpg
    255.4 KB · Views: 55
  • 20240702_175402.jpg
    20240702_175402.jpg
    257.1 KB · Views: 58
  • 20240702_175639.jpg
    20240702_175639.jpg
    309.2 KB · Views: 54
  • 20240702_175858.jpg
    20240702_175858.jpg
    240.5 KB · Views: 51
  • 20240702_180608.jpg
    20240702_180608.jpg
    223.1 KB · Views: 52
  • 20240702_180855.jpg
    20240702_180855.jpg
    197.7 KB · Views: 57
  • 20240702_181000.jpg
    20240702_181000.jpg
    234.2 KB · Views: 42
  • 20240702_182044.jpg
    20240702_182044.jpg
    304.9 KB · Views: 55
  • 20240702_182051.jpg
    20240702_182051.jpg
    115.9 KB · Views: 51
  • 20240702_182938.jpg
    20240702_182938.jpg
    297 KB · Views: 56
  • 20240702_183227.jpg
    20240702_183227.jpg
    242.1 KB · Views: 57
  • 20240702_183229.jpg
    20240702_183229.jpg
    240.4 KB · Views: 52
  • 20240702_185537.jpg
    20240702_185537.jpg
    197.2 KB · Views: 54
  • 20240702_185539.jpg
    20240702_185539.jpg
    199.7 KB · Views: 48
  • 20240702_185739.jpg
    20240702_185739.jpg
    219.3 KB · Views: 48
  • 20240702_190013.jpg
    20240702_190013.jpg
    202.1 KB · Views: 50
  • 20240702_190022.jpg
    20240702_190022.jpg
    332.2 KB · Views: 51
  • 20240702_190929.jpg
    20240702_190929.jpg
    268.7 KB · Views: 45
  • 20240702_190922.jpg
    20240702_190922.jpg
    261.1 KB · Views: 49
  • 20240702_191000.jpg
    20240702_191000.jpg
    214.4 KB · Views: 48
  • 20240702_191005.jpg
    20240702_191005.jpg
    207.5 KB · Views: 51
  • 20240702_191019.jpg
    20240702_191019.jpg
    200.8 KB · Views: 49
  • 20240702_191345.jpg
    20240702_191345.jpg
    221.2 KB · Views: 62
  • 20240702_191348.jpg
    20240702_191348.jpg
    213.9 KB · Views: 53
  • 20240702_191358.jpg
    20240702_191358.jpg
    209.2 KB · Views: 50
  • 20240702_191411.jpg
    20240702_191411.jpg
    165.2 KB · Views: 52
  • 20240702_191825.jpg
    20240702_191825.jpg
    173.4 KB · Views: 52
  • 20240702_192346.jpg
    20240702_192346.jpg
    192 KB · Views: 56
  • 20240702_191835.jpg
    20240702_191835.jpg
    184.7 KB · Views: 51
  • 20240702_193713.jpg
    20240702_193713.jpg
    165.1 KB · Views: 57
  • 20240702_193728.jpg
    20240702_193728.jpg
    200.5 KB · Views: 55
  • 20240702_193732.jpg
    20240702_193732.jpg
    198.6 KB · Views: 50
  • 20240702_201919.jpg
    20240702_201919.jpg
    118.7 KB · Views: 50
  • 20240702_201922.jpg
    20240702_201922.jpg
    143.9 KB · Views: 49
  • 20240702_201923.jpg
    20240702_201923.jpg
    142.8 KB · Views: 47
  • 20240703_154554.jpg
    20240703_154554.jpg
    186.1 KB · Views: 60
  • 20240702_201933.jpg
    20240702_201933.jpg
    154.9 KB · Views: 51
  • 20240703_155329.jpg
    20240703_155329.jpg
    185.2 KB · Views: 54
  • 20240703_155333.jpg
    20240703_155333.jpg
    171.8 KB · Views: 52
  • 20240703_155336.jpg
    20240703_155336.jpg
    196.3 KB · Views: 65
  • 20240703_155612.jpg
    20240703_155612.jpg
    176.5 KB · Views: 51
  • 20240703_155722.jpg
    20240703_155722.jpg
    118.5 KB · Views: 52
  • 20240703_155902.jpg
    20240703_155902.jpg
    165.2 KB · Views: 47
  • 20240703_155905.jpg
    20240703_155905.jpg
    166.9 KB · Views: 52
  • 20240703_155914.jpg
    20240703_155914.jpg
    163.2 KB · Views: 51
  • 20240703_161837.jpg
    20240703_161837.jpg
    184.6 KB · Views: 55
  • 20240703_161840.jpg
    20240703_161840.jpg
    183.9 KB · Views: 52
  • 20240703_161848.jpg
    20240703_161848.jpg
    188.8 KB · Views: 59
  • 20240703_163844.jpg
    20240703_163844.jpg
    213.5 KB · Views: 49
  • 20240703_171448.jpg
    20240703_171448.jpg
    130.5 KB · Views: 49
  • 20240703_171452.jpg
    20240703_171452.jpg
    127.2 KB · Views: 54
  • 20240703_171620.jpg
    20240703_171620.jpg
    133.2 KB · Views: 50
  • 20240703_172553.jpg
    20240703_172553.jpg
    160.8 KB · Views: 46
  • 20240703_173349.jpg
    20240703_173349.jpg
    191.7 KB · Views: 48
  • 20240703_175656.jpg
    20240703_175656.jpg
    158.8 KB · Views: 52
  • 20240703_173353.jpg
    20240703_173353.jpg
    170 KB · Views: 49
  • 20240703_175659.jpg
    20240703_175659.jpg
    156.9 KB · Views: 53
  • 20240703_175704.jpg
    20240703_175704.jpg
    148.9 KB · Views: 52
  • 20240703_182857.jpg
    20240703_182857.jpg
    198.7 KB · Views: 54
  • 20240703_182900.jpg
    20240703_182900.jpg
    201.9 KB · Views: 46
  • 20240703_182910.jpg
    20240703_182910.jpg
    125.6 KB · Views: 51
  • 20240703_182918.jpg
    20240703_182918.jpg
    99.8 KB · Views: 53
  • 20240703_184130.jpg
    20240703_184130.jpg
    348.3 KB · Views: 58
  • 20240703_193140.jpg
    20240703_193140.jpg
    168.6 KB · Views: 54
  • 20240703_193356.jpg
    20240703_193356.jpg
    207.1 KB · Views: 57
  • 20240703_193143.jpg
    20240703_193143.jpg
    173 KB · Views: 57
  • 20240703_193555.jpg
    20240703_193555.jpg
    207.6 KB · Views: 53
  • 20240703_193601.jpg
    20240703_193601.jpg
    204.4 KB · Views: 55
  • 20240703_194405.jpg
    20240703_194405.jpg
    159.6 KB · Views: 54
  • 20240703_194434.jpg
    20240703_194434.jpg
    116.2 KB · Views: 52
  • 20240703_194626.jpg
    20240703_194626.jpg
    183.9 KB · Views: 49
  • 20240703_194708.jpg
    20240703_194708.jpg
    155.4 KB · Views: 50
  • 20240703_194715.jpg
    20240703_194715.jpg
    140.3 KB · Views: 49
  • 20240704_155758.jpg
    20240704_155758.jpg
    135.5 KB · Views: 51
Last edited:
Wished I was better about documenting and taking pictures on my projects. I get caught up in it and forget about recording the progress.
 
Good lord.. you apply as much threadlocker as I do lol. One day I'll learn my lesson.
 
Good lord.. you apply as much threadlocker as I do lol. One day I'll learn my lesson.
Yeah I used some red thread locker. Hope I never have to take it off haha
 
Yeah I used some red thread locker. Hope I never have to take it off haha

Ohhh you really did it now haha.

Isn't there another step above red as well? Purple or green or something?
 
Ohhh you really did it now haha.

Isn't there another step above red as well? Purple or green or something?
There is. Green is for tight fitting cylindrical parts. Don't use green! It is a bear to get loose. Green is not intended for threaded fasteners. Blue should be fine for 90% of what you do. Red should be considered almost permanent and often requires heat to soften and remove.

I actually had a seminar once, led by a rep from Loctite company. He told us a tiny drop is all you need. That's a company rep, interested in selling the product telling us we use too much. It was an interesting seminar covering their products. The stuff works in the absence of air. It is an anaerobic solution. So, cleanliness and close tolerances make it work better. That one picture above shows at least 5 times more loctite than needed.
 
There are a dozen or so different formulas. Like 242 vs 243. 243 doesn't require a "clean" (alcohol bathed? IDK) thread. Supposedly it works even on oily bolts.

There is another grade of red too. I don't think it was a Loctite brand. I have a bottle here somewhere. It's for super high temperatures. Guaranteed up to like 2000F. I ordered it for the spark plug insert on my motorcycle. I figured at that point the insert had melted out of the threadlocker.

81zu+IUc4KL._AC_SL1500_.jpg
I should mention that seminar was back in the late 80's. Their product line has most certainly expanded since then. But the principles are the same.
 
There is. Green is for tight fitting cylindrical parts. Don't use green! It is a bear to get loose. Green is not intended for threaded fasteners.

Green threadlocker is medium strength and it wicks so it spreads out more. Kind of weird, probably not at your local parts store.

LOCTITE, 290, Green, Wicking Medium-Strength Threadlocker - 5E216|233731 - Grainger

The nasty green is sleeve retainer which is probably on the same shelf as the traditional blue/red but isn't thread locker.

LOCTITE, 620, 0.3 fl oz, Retaining Compound - 4KM32|234772 - Grainger
The sleeve retainer is the green I was talking about.
 

Sponsored Ad


Sponsored Ad

TRS Events

Member & Vendor Upgrades

For a small yearly donation, you can support this forum and receive a 'Supporting Member' banner, or become a 'Supporting Vendor' and promote your products here. Click the banner to find out how.

Recently Featured

Want to see your truck here? Share your photos and details in the forum.

Ranger Adventure Video

TRS Merchandise

Follow TRS On Instagram

TRS Sponsors


Sponsored Ad


Sponsored Ad


Amazon Deals

Sponsored Ad

Back
Top