• Welcome Visitor! Please take a few seconds and Register for our forum. Even if you don't want to post, you can still 'Like' and react to posts.

2.3t BUILD#2


gabes2.3project

Active Member
Joined
Apr 21, 2011
Messages
43
City
Greater Boston Area
Vehicle Year
1992
Transmission
Automatic
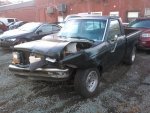
So I've decided to reclaim the previous glory that i once knew being the only person that i know of in MA with a Turbo Ranger.

what i have

-1992 4.0 2wd ald4 with a 3.08:1 (only needs rear cab mount brackets :}
-My entire other project 1990 2wd stick with the 88 2.3 complete still runs after smashing :|

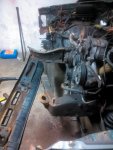
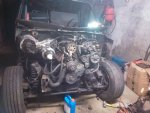
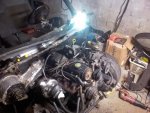
I wanted to try the auto for a bit since what i hear the 4.0 version for this year is a bit tougher than previous ones, so i found a bell housing for the 2.3 with a pump. I will have to find a flex plate, torque converter, and shim.

Other than computer, repin, and messing with the DIS wiring to mate with the TFI Should i have any other concerns?
 
just some tear down progress

more to come
 

Attachments

  • KIMG0181.jpg
    KIMG0181.jpg
    109.4 KB · Views: 112
  • KIMG0191.jpg
    KIMG0191.jpg
    81.9 KB · Views: 121
  • KIMG0212.jpg
    KIMG0212.jpg
    70.9 KB · Views: 115
  • KIMG0213.jpg
    KIMG0213.jpg
    84.3 KB · Views: 115
What is up with the rubber piece on the front of the turbo? It looks like it's stretched WAY too much to create a good seal.

Also, the bracket for power steering and the alternator, is that from the Thunderbird as well? I did the turbo swap, but I kept the alternator on the passenger side of the engine. Now that I see how open this makes the engine compartment, I'm going to find that same bracket.
 
bell housing

bell housing came in yesterday, i believe i got a park pawl with the bag of hardware, i'll cross that bridge when i get there, pump gears look in good shape but according to the A4LD service guide the larger gear was backwards, im gonna find a good trans shop to have it re aligned.
 
lost a little weight

frame, twist and crunch
 

Attachments

  • KIMG0226.jpg
    KIMG0226.jpg
    99.3 KB · Views: 113
  • KIMG0223.jpg
    KIMG0223.jpg
    80.1 KB · Views: 114
  • KIMG0225.jpg
    KIMG0225.jpg
    84.4 KB · Views: 120
  • KIMG0224.jpg
    KIMG0224.jpg
    74.3 KB · Views: 116
engine inspection

This morning I decided to start going through the engine to see what could be repaired while waiting for the warmer weather. Another ps bracket, engine mount, dizzy cap which I am super amped broke other wise the engine would have lost all its oil becuase the filter busted open when the engine mount tore through. Also discovered a leak I wasnt aware of before and need a suggestion, looks like a lower intake gasket just under the coolant port the gasket has turned into a thick sticky substance and on cylnder 4 oil is present on both manifold and gasket allowing a sepage to look like an external HG. And here are some pics

One last thing I took a picture of the part # of the bracket I use for the ALT
 
pics

here we are
 

Attachments

  • KIMG0194.jpg
    KIMG0194.jpg
    94.7 KB · Views: 107
  • KIMG0193.jpg
    KIMG0193.jpg
    89.8 KB · Views: 111
  • KIMG0191.jpg
    KIMG0191.jpg
    96.4 KB · Views: 106
  • KIMG0190.jpg
    KIMG0190.jpg
    74.7 KB · Views: 124
  • KIMG0189.jpg
    KIMG0189.jpg
    53.3 KB · Views: 109
  • KIMG0188.jpg
    KIMG0188.jpg
    78.3 KB · Views: 108
So after looking deeper its time for the head gasket, decided to take the exhuast manifold off and one of the bolts snapped, damn. Tried to drill it out and my carbide bit snapped 3/4 of the way in, and attempted to drill it out but it was not having it. So I have the ol 90 head and planning on using that one I still have all the accessories to run it. Other than that we're looking good, :icon_thumby:
 
Also, the bracket for power steering and the alternator, is that from the Thunderbird as well? I did the turbo swap, but I kept the alternator on the passenger side of the engine. Now that I see how open this makes the engine compartment, I'm going to find that same bracket.

I think the engine bay looks so open because the parts that define the edges of the engine bay are gone.:icon_rofl:
 
I've been using and abusing an alternator/PS mount like that for several years (IE no support bar to the intake like it's supposed to have) and haven't had any issues...

If you use the '90 head, you'll have to switch to distributorless ignition as the intake will interfere with the distributor... the wiring changes are easy (I just wish I remembered what I figured out needed to be done to keep the tach working) as the stock Ranger harness can be used completely with just adding the turbo specific sensors and moving a few wires at the computer... making the crank sensor from the '90 fit on the older engine is easy too if you make a template off of the '90 engine and drill the 3 holes for the crank sensor, for the locating pin tap it to 6mm and use a 6mm bolt with a shank and cut it off, that's what I did and it works great. For the front seal housing, the one from the '90 needs to be used, and it lines up just fine except for one bolt is a little bit off, you can slot that hole in the cover.
 
I think the engine bay looks so open because the parts that define the edges of the engine bay are gone.:icon_rofl:

Yeah, I suspected that would have something to do with my thought. :icon_thumby:

However, when I install my front mount intercooler, I'll put the alternator on the driver's side with that bracket so that I will have more room for piping between turbo and throttle body.
 
thanks for the imput scotts90. So the more i think about the head swap the more i would like to keep things simple, I'm going to try to save the 88 head and have a worked up a little plan on doing so. I'm using the 90 ex manifold as a guide I'm gonna go in and grind that non ferrous * * out of there with a carbide bur grinder. Once its out and clean i'll tap new threads and clean up the rest on the head and get new bolts. By the way does anyone know what the exhaust manifold bolts are made of on these engines?, i have to drill quite slowly with moderate pressure other wise it has nearly no effect with the carbide drill set i have.
 
Last edited:
thanks for the imput scotts90. So the more i think about the head swap the more i would like to keep things simple, I'm going to try to save the 88 head and have a worked up a little plan on doing so. I'm using the 90 ex manifold as a guide I'm gonna go in and grind that non ferrous * * out of there with a carbide bur grinder. Once its out and clean i'll tap new threads and clean up the rest on the head and get new bolts. By the way does anyone know what the exhaust manifold bolts are made of on these engines?, i have to drill quite slowly with moderate pressure other wise it has nearly no effect with the carbide drill set i have.

The bolts are probably just a decent grade (8 or higher)

Are you using a left handed drill? That helps a lot, sometimes you get lucky and the remaining bolt will start to twist out with the drill.
 
i'll keep an eye out for left hand cutting bits next time i need a set thanks man never would have thought to try it, the drill i have can be used for either
 
People keep saying they want to keep a distributor for simplicity, I kept the DIS for simplicity... If I was going to do it again with what I know now I would have done things differently and swapped more parts between the DIS and older engine, but back when I did the swap I was intimidated by going internal...

The manifold bolts should be grade 5, but after that long are probably heat cycled to be fairly hard...
 

Sponsored Ad


Sponsored Ad

TRS Events

Member & Vendor Upgrades

For a small yearly donation, you can support this forum and receive a 'Supporting Member' banner, or become a 'Supporting Vendor' and promote your products here. Click the banner to find out how.

Recently Featured

Want to see your truck here? Share your photos and details in the forum.

Ranger Adventure Video

TRS Merchandise

Follow TRS On Instagram

TRS Sponsors


Sponsored Ad


Sponsored Ad


Amazon Deals

Sponsored Ad

Back
Top