FliesLikeABrick
Member
Another writeup of some shop work from the 1998 utility-outfitted Ranger I was working on.
The power steering rack leaked quite badly, with the power steering fluid (ATF) coming out the rack via the rack/pinion side, washing the grease out of the rack to the boot and then the ground.
Got the vehicle on blocks to remove the rack which was fairly straightforward and easy. Didn't know how long this would take me so I specifically left it outside instead of sitting in the garage.

Got the patient out, gave it a once over on the bench to figure out what rebuild kit I may need and look for any issues before committing to tearing it down for rebuild. Also pulled the intermediate steering shaft that needed lube

Then fixed the rack in the vise and started taking it apart, starting with the plug that covers the back of the pinion.

Disassembly took me a bit, I didn't have any manuals or anything to give hints on order of operations. I eventually got everything off.
I bought a complete rebuild kit for it, but knew the most important part was also the most difficult to access - the seal in the middle of the housing that separates the hydraulic side from the mechanical side of the rack.


It took me a while to come up with a way to pull that seal out. I didn't have a pick that long, so I tried improvising one with a piece of round stock and spring steel, but that just folded over

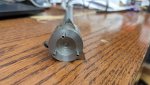
So I set on going further overkill, at the lathe I turned a groove into a small steel round, then pinned three teeth into it. The idea was that this would get mounted on a shaft with a handle, and as you rotate the handle the 3 teeth bite the rubber. By pulling at the same time, hopefully it would pull the seal out


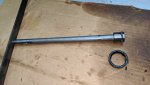
Here it is in the rack, with the teeth set and ready to twist in for a bite

Would you believe this worked on only the second try? versus well over an hour of futzing around with other potential solutions in the day or two prior.


Cleaned everything up, including the rack for new un-diluted grease and inspected for any teeth damage

Now ready for rebuild


Putting all the new seals and stuff on was fairly straightforward, not unlike other hydraulic parts where you need to stretch the sealing rings just enough but not too much
The next challenge again had to do with the center seal - this time reinstalling the new seal. I tried dropping it down the tube and using a set-up of sockets and extensions to press/tap it into place... however unsurprisingly it did not want to start straight and kept cocking sideways.
At the lathe I turned an installation tool that could be drawn in with 3/8 threaded rod that I had on the shelf. The other benefit of this approach is that the hub off the tool was sized just right to have the seal "snap" onto it, holding the two pieces of the seal as well as the spring in place. During my prior attempt to drive it with a hammer and socket/extensions, I had to constantly check if any of those pieces was coming dislodged.

Tapped for 3/8-16 so that the threaded rod would go right into this, instead of a nut that might spin unhelpfully.


Put a large washer over the end of the housing with a nut and started drawing the seal in


worked great, I could clearly feel when it bottomed out fully seated and stopped drawing further.
Now just putting the assembly itself back together, boots, and new seals on the plumbing.


Then got the alignment close enough with a tape measure to drive it to a shop for a fully alignment.
Thanks for reading
The power steering rack leaked quite badly, with the power steering fluid (ATF) coming out the rack via the rack/pinion side, washing the grease out of the rack to the boot and then the ground.
Got the vehicle on blocks to remove the rack which was fairly straightforward and easy. Didn't know how long this would take me so I specifically left it outside instead of sitting in the garage.
Got the patient out, gave it a once over on the bench to figure out what rebuild kit I may need and look for any issues before committing to tearing it down for rebuild. Also pulled the intermediate steering shaft that needed lube
Then fixed the rack in the vise and started taking it apart, starting with the plug that covers the back of the pinion.
Disassembly took me a bit, I didn't have any manuals or anything to give hints on order of operations. I eventually got everything off.
I bought a complete rebuild kit for it, but knew the most important part was also the most difficult to access - the seal in the middle of the housing that separates the hydraulic side from the mechanical side of the rack.
It took me a while to come up with a way to pull that seal out. I didn't have a pick that long, so I tried improvising one with a piece of round stock and spring steel, but that just folded over
So I set on going further overkill, at the lathe I turned a groove into a small steel round, then pinned three teeth into it. The idea was that this would get mounted on a shaft with a handle, and as you rotate the handle the 3 teeth bite the rubber. By pulling at the same time, hopefully it would pull the seal out
Here it is in the rack, with the teeth set and ready to twist in for a bite
Would you believe this worked on only the second try? versus well over an hour of futzing around with other potential solutions in the day or two prior.
Cleaned everything up, including the rack for new un-diluted grease and inspected for any teeth damage
Now ready for rebuild
Putting all the new seals and stuff on was fairly straightforward, not unlike other hydraulic parts where you need to stretch the sealing rings just enough but not too much
The next challenge again had to do with the center seal - this time reinstalling the new seal. I tried dropping it down the tube and using a set-up of sockets and extensions to press/tap it into place... however unsurprisingly it did not want to start straight and kept cocking sideways.
At the lathe I turned an installation tool that could be drawn in with 3/8 threaded rod that I had on the shelf. The other benefit of this approach is that the hub off the tool was sized just right to have the seal "snap" onto it, holding the two pieces of the seal as well as the spring in place. During my prior attempt to drive it with a hammer and socket/extensions, I had to constantly check if any of those pieces was coming dislodged.
Tapped for 3/8-16 so that the threaded rod would go right into this, instead of a nut that might spin unhelpfully.
Put a large washer over the end of the housing with a nut and started drawing the seal in
worked great, I could clearly feel when it bottomed out fully seated and stopped drawing further.
Now just putting the assembly itself back together, boots, and new seals on the plumbing.
Then got the alignment close enough with a tape measure to drive it to a shop for a fully alignment.
Thanks for reading