• Welcome Visitor! Please take a few seconds and Register for our forum. Even if you don't want to post, you can still 'Like' and react to posts.

1988 Ranger XLT 302 5.0 AOD Carb Swap, Ol’ Dirty Blue


in the parts list I had listed that I got this steel fuel line as well.

I also finally got a response from the fuel sending unit seller, they stated that the in tank pump is 4-6 psi. I am not sure it will lose too much pressure from there to the front so I won’t know until it’s together if I will need to install a in line fuel sending unit. I may install a brake from steel to rubber there just to leave room for the addition later on.

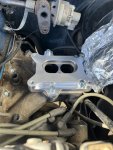
Yesterday I took off the thermostat housing to swap thermostats and it was caked with some goopy antifreeze. So instead of just changing the thermostat I will also need to change the housing as well just to be safe. Good thing I checked the thing was about half the size for flow then normal and the thermostat was toast.

Just going to add it to the parts pile.
Great, I didn't notice the steel line. 4-6 psi should work fine for a carb.
 
the stock low psi pump is perfect psi and volume to 400 hp for holley and edelbrocks/Rochester... you will likely have to lower it for the weber style units. most are sub 4 psi.
 
the stock low psi pump is perfect psi and volume to 400 hp for holley and edelbrocks/Rochester... you will likely have to lower it for the weber style units. most are sub 4 psi.

Yeah from what I read they like 2-2 1/2 psi to the carb.

Yesterday my adapter came in for the carb. Good news is it WOULD work, if not for it being too thick on an edge.

IMG_2821.jpegIMG_2822.jpegIMG_2823.jpegIMG_2824.jpegIMG_2825.jpeg

so I need to get a spacer for the Weber to work with the adapter for the adapter since it’s hitting the throttle stop.

I also swapped out the thermostat
IMG_2826.jpegIMG_2827.jpeg

replaced the housing thermostat and gasket.

And finally tore out the rest of the fuel lines
IMG_2834.jpeg

and installed the new tank
IMG_2813.jpegIMG_2814.jpeg
The tank is larger even though I got the right part. It fit correctly though. I got one for 108 wheelbase as per rock auto part numbers but it’s a 17 gallon which previously was maybe a 14-15?

also the new sending unit has the doodads facing the wrong way. I’ll just loop the line long enough with a 90 as to not kink it so I won’t let it stop me.

Here’s some updated pics with the mirrors on as well
IMG_2829.jpeg
IMG_2833.jpeg


and lastly for craps and giggles I ordered an Amazon special 2100 Holley to see if all these adapters were even worth the hassle of doing a Weber. That will be in tomorrow along with the fuel lines
 

Attachments

  • IMG_2828.jpeg
    IMG_2828.jpeg
    220.5 KB · Views: 69
  • IMG_2829.jpeg
    IMG_2829.jpeg
    220.8 KB · Views: 75
  • IMG_2831.jpeg
    IMG_2831.jpeg
    170.3 KB · Views: 73
I’ll just loop the line long enough with a 90 as to not kink it so I won’t let it stop me.

I could see that as actually helping you in the future if you have to drop the tank; there'll a bit more slack in the lines.

Might a good idea to look at running the longer lines through some sections of water pipe insulation (looks like "pool noodles") to keep the lines from chaffing on stuff with vibration.

I will see how the lines end up working with the stock clips from the truck in terms of distance from the frame. If not I will definitely look into that.
 
Since I’m waiting on fuel lines I decided to start with the wiring.

managed to get it to crank!


Since I tore out all the ecm engine wiring I’m going to have to make my own. Started with the crank and wanted to make sure that was still good.

Red and light blue to a jumper wire I tossed between the connectors did the trick.

IMG_2855.jpeg

So now I know the starter and solenoid are working. At first it wouldn’t crank because the starter was seized. Gave it a percussion tuneup with a brass hammer and it started working. May end up swapping it later on just to be safe. Will end up making my own harness with the stock connectors, or use some custom ones. We will see.

Still waiting on delivery for the fuel lines and carb spacer, so going to start tackling other stuff looming around.
 
Sunday was pretty slow. Only got some wiring done out of the truck for the hei module.

Setting most of it up out of the truck to make it a swap in and go affair.

IMG_2859.jpeg
 
On the point about fuel line material, since it doesn't look like it's done yet:
I would strongly suggest that you do what the OEM did - nylon has significant advantages over other materials and is very easy to work with. At the very least, do steel lines for the easy straight runs and then transition to nylon for the flexible bits at both ends.
Factory carb Rangers had a mixture of steel and nylon as well (I EFI swapped my carb truck).

Even ethanol-compatible rubber fuel line will degrade rapidly (possibly a single-digit number of years) compared to nylon, which lasts literal decades. It's not even clear from your photos that there was anything wrong with your old lines, which I likely would have reterminated to go where I wanted and otherwise reused, if it was my project.

I re-ran 100% of the fuel lines on my station wagon, using nylon for a large amount of it, and the stuff is really great to work with and crimp. I only wish I'd done all of the lines that way instead of starting with steel in sections like I did.
 
Lots of little updates over the last few weeks.

Made fuel lines but had the wrong fitting so waiting on those. were for nylon to steel not rubber to steel so didn’t fit.
IMG_2935.jpegIMG_2900.jpeg

carb is installed. Also made a bracket for the throttle cable and pressure regulator.

IMG_2882.jpegIMG_2883.jpegIMG_2887.jpegIMG_2888.jpeg

Almost finished the wiring. Installed the distributor e coil and hei module. Also ran wiring in the cab for the radiator temp and new o2 sensor to keep an eye on air fuel.

IMG_2937.jpegIMG_2938.jpeg

still have to mount gauges and grab a wire for 12v in the cab for power to the gauges.

also have to wire up the fuel pump and relay. As well as wire a ground from the pump. I’ll be using the wiring from the stock pump and ground from there since the in tank fuel pump is enough and don’t need the in line fuel pump.

Parts coming in today to hopefully pull vacuum from the intake, as well as correct fuel ends for the steel lines.

Hopefully almost there. Was trying to get it running before the new year but wanted to get everything right and not half arse it.
 

Attachments

  • IMG_2899.jpeg
    IMG_2899.jpeg
    139.4 KB · Views: 77
Still have to re run fuel lines properly since the steel lines I made are too janky for my liking. Got nylon to replace just have to get some fittings and figure out how to combine them without a vice.

Also gauges are in and working. As well as other misc stuff done.

Got it started for the first time yesterday as well!


Timing was off. Had it running after that nice and well timed. As well as fuel pressure adjusted to 2.5 psi. Had to swap regulators previously and no longer am using a return line.

One big issue I tried to start it with 4 gallons in the tank and it wasn’t pulling fuel. Checked the filler hole with the bed off and the tube off for filler and turns out the stupid pump assembly I got doesn’t even reach the bottom of the tank. I now have about 7 gallons in and now it finally pulled fuel and was allowing me to start it.

So I either need to swap sending units or do the inline fuel pump instead and just run a hose to the bottom of the tank removing the in tank sending unit. Only issue is it won’t read proper fuel amount with the gauge if I only add a line instead of fix the main problem.

So as a heads up don’t buy this part:

Next update will hopefully be first drive with some more pics of my work and the interior and whatnot
 
Hey all,

Haven’t been posting many updates lately.

I had it running but couldn’t figure out an overheating issue. Did both a radiator flush and a head gasket fix that didn’t fix the issue. Ended up having to pull the head and found out the head gasket was toast in cylinder one.

I did get about two short rides In it. One of them picking up a 1978 Kawasaki KZ750 that I’ll do a restoration on eventually.

Now the head is pulled I have decided to sell the 2.3 with the carb swap and do what I’ve always wanted to do, a 5.0 302 swap. Picked up the engine and transmission yesterday for that to get things going. With that I’m also going to be doing carbed.

If anyone in az is interested in the 5speed and engine with everything I’m selling it. Will also come with a new head gasket kit.

Here’s some updated pictures I took.

IMG_3155.jpegIMG_3159.jpegIMG_3201.jpegIMG_3247.jpegIMG_3250.jpegIMG_3252.jpegIMG_3253.jpegIMG_3278.jpegIMG_3279.jpegIMG_3281.jpegIMG_3282.jpegIMG_3284.jpegIMG_3285.jpegIMG_3286.jpegIMG_3287.jpegIMG_3292.jpegIMG_3293.jpegIMG_3297.jpegIMG_3299.jpegIMG_3301.jpegIMG_3302.jpeg
 
Here’s the engine and trans I got. 400 dollars for both.

Going to have to do a gasket reseal with it since it’s been sitting as well as repaint.

IMG_3359.jpeg
IMG_3360.jpeg
IMG_3362.jpeg
IMG_3363.jpeg
IMG_3364.jpeg
IMG_3365.jpeg
 
An overheating issue can be frustrating. I had a head gasket that did not have one of the water ports punched out. Basically blocking any coolant cooling the motor. An older guy found it for me.

I too want to eventually do a 302 swap into a two wheel drive. Will be interested in following your build.
 
This is officially the end of the carb swap build.

IMG_3371.jpeg
IMG_3372.jpeg
IMG_3373.jpeg
IMG_3374.jpeg


Next up the 302 build begins.
 
Changed the thread from 2.3 to 5.0 since that’s what I’m doing now.

Got the engine and trans pulled yesterday, and today setup the engine stand. Put the 5.0 onto the stand and pulled most the accessories off.

IMG_3371.jpegIMG_3372.jpegIMG_3373.jpegIMG_3374.jpegIMG_3377.jpegIMG_3378.jpegIMG_3379.jpegIMG_3380.jpegIMG_3381.jpegIMG_3382.jpeg

also ordered a bunch of parts. Got everything for the engine first to get that cleaned up and rebuilt.
 

Attachments

  • IMG_3372.jpeg
    IMG_3372.jpeg
    303.4 KB · Views: 49
  • IMG_3373.jpeg
    IMG_3373.jpeg
    271.3 KB · Views: 57
  • IMG_3374.jpeg
    IMG_3374.jpeg
    267.2 KB · Views: 48

Sponsored Ad


Sponsored Ad

TRS Events

Member & Vendor Upgrades

For a small yearly donation, you can support this forum and receive a 'Supporting Member' banner, or become a 'Supporting Vendor' and promote your products here. Click the banner to find out how.

Latest posts

Recently Featured

Want to see your truck here? Share your photos and details in the forum.

Ranger Adventure Video

TRS Merchandise

Follow TRS On Instagram

TRS Sponsors


Sponsored Ad


Sponsored Ad


Amazon Deals

Sponsored Ad

Back
Top