• Welcome Visitor! Please take a few seconds and Register for our forum. Even if you don't want to post, you can still 'Like' and react to posts.

08 FX4 SAS


Well I'm back. Been super busy with work so I haven't had a lot of time for the truck.

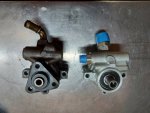
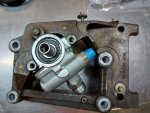
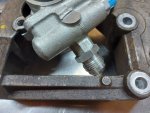
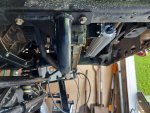
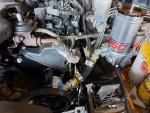
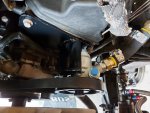
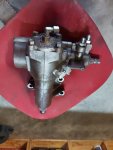
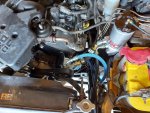
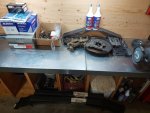
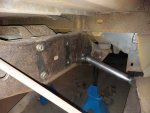
But I got the clutch issue fixed. Ended up being a failing master cylinder not allowing fluid to return, which was maintaining pressure on the slave and causing the clutch to slip. Of course I didn't find that out till I pulled the trans out. So I just changed the master, slave, throw out bearing and pilot bearing while I was in there. Clutch and flywheel looked perfect so I just reinstalled those.

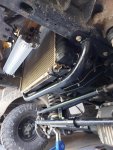
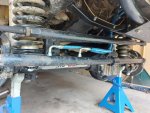
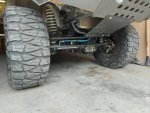
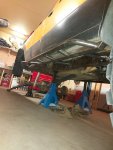
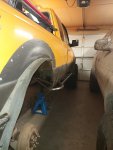
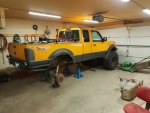
Now the truck is up on jack stands. I decided to get new tires while the truck is down. It takes like 2 months to get these tires so might as well wait while the truck is broken anyways. Exact same tires just a fresh set. Hopefully I'll have them in June.

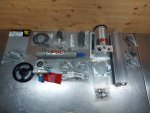
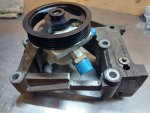
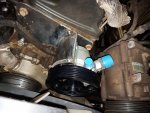
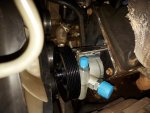
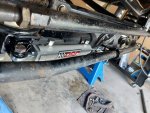
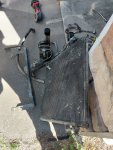
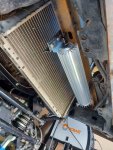
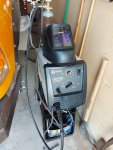
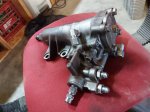
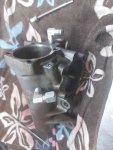
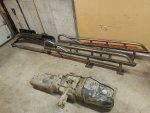
And the steering stuff has arrived! Nice big shipment from PSC. Pump, ram, reservoir, cooler and some other accessories. So next I'll be figuring out how to fit all that up.
 

Attachments

  • PSC Hydro Assist Parts.jpg
    PSC Hydro Assist Parts.jpg
    189.2 KB · Views: 199
That's a pretty pricey looking pile-o-parts Mr. Bossley... Rock On man
 
First off I got myself a welder finally. I got tired of using a friends all the time. Liking it so far. I don't know why I didn't get one sooner. And I'm glad I got the bigger 210A. This thing rips!

Now an update on the hydro assist project.

I started off by trying to make the new pump work in the stock bracket. It bolted in but there wasn't enough room for the massive -12 feed. I tried notching the stock bracket but it was still a bit tight. I could have cut out more but I decided to just build a new bracket from scratch and delete the A/C. This frees up so much space for the new reservoir and also allows me to rotate the pump so the feed comes in the side. I don't like how Ford mounts the pump fed from the bottom. I think this setup is going to work much better.

Then I went on to mounting the ram and cooler. I used some of the old condenser brackets to mount the cooler. And just welded on the PSC brackets for the ram along with the Trail Gear tube clamp.

Next I have to figure out how to mount the reservoir just right for good flow into the pump. I'll have to make a bracket for that as well.

Then it will be on to drilling/tapping the steering box, making all the hoses and getting a new belt. Coming along nicely.
 

Attachments

  • 186553358_378759410207508_2017551929279770770_n.jpg
    186553358_378759410207508_2017551929279770770_n.jpg
    181.7 KB · Views: 171
  • 192332821_1912539048887168_2873364811858486373_n.jpg
    192332821_1912539048887168_2873364811858486373_n.jpg
    188.7 KB · Views: 171
  • 186522426_253166316582594_7256057326676847414_n.jpg
    186522426_253166316582594_7256057326676847414_n.jpg
    228 KB · Views: 180
  • 187234230_468055907628215_6105375846356213411_n.jpg
    187234230_468055907628215_6105375846356213411_n.jpg
    199.4 KB · Views: 169
  • 188567297_986248402113072_304866513727853888_n.jpg
    188567297_986248402113072_304866513727853888_n.jpg
    214.9 KB · Views: 159
  • 191673636_975553072985050_5300342561074755468_n.jpg
    191673636_975553072985050_5300342561074755468_n.jpg
    170.2 KB · Views: 181
  • 186556722_1699862463533123_4177180487284879181_n.jpg
    186556722_1699862463533123_4177180487284879181_n.jpg
    210.3 KB · Views: 169
  • 191791810_308949414029479_3366079777454814581_n.jpg
    191791810_308949414029479_3366079777454814581_n.jpg
    246.9 KB · Views: 176
  • 188056370_132439392199393_7091701029554920471_n.jpg
    188056370_132439392199393_7091701029554920471_n.jpg
    175.3 KB · Views: 185
  • 188015922_233261934834095_8960972137549550454_n.jpg
    188015922_233261934834095_8960972137549550454_n.jpg
    205.6 KB · Views: 178
  • 188084270_484047576144324_319407471342180511_n.jpg
    188084270_484047576144324_319407471342180511_n.jpg
    201.5 KB · Views: 175
  • Welder.jpg
    Welder.jpg
    133.9 KB · Views: 183
Pump and Reservoir are all mounted. And I picked up the new belt today. Getting there.
 

Attachments

  • 189824286_1125956994558706_4997680736815369030_n.jpg
    189824286_1125956994558706_4997680736815369030_n.jpg
    258.8 KB · Views: 158
  • 195780764_256691389566642_9055654480800274216_n.jpg
    195780764_256691389566642_9055654480800274216_n.jpg
    188.2 KB · Views: 162
Got the box drilled and tapped for the ram yesterday. Reinstalled it, connected all the lines & started to bleed the system. But I ran out of fluid before I could finish. It took a full 2 litres and I haven't even started the truck yet! So I'll be getting more today and hopefully have this thing driving again.
 

Attachments

  • 197473994_544238706578412_2846620769383991290_n.jpg
    197473994_544238706578412_2846620769383991290_n.jpg
    72.2 KB · Views: 152
  • 200926229_318601456637084_4722104177814299056_n.jpg
    200926229_318601456637084_4722104177814299056_n.jpg
    100 KB · Views: 156
  • 194618327_654528762608773_7985210250680487219_n.jpg
    194618327_654528762608773_7985210250680487219_n.jpg
    79.1 KB · Views: 160
Great looking truck and pictures. Hopefully they will open the border soon if they haven't yet. Still need to do some exploring in BC. Bucket list item.
 
Great looking truck and pictures. Hopefully they will open the border soon if they haven't yet. Still need to do some exploring in BC. Bucket list item.

Thank a lot! I've actually wanted to go check out some trails in WA lol. Some videos I've seen look decent.
 
Well it's done. Got it all wrapped up today. I haven't even taken it for a test drive yet but I messed around in the driveway a bit and it seems to work.

What a project. It all went pretty smooth but still was a ton of work. Can't wait to test it out. Hopefully next weekend.
 

Attachments

  • 193928542_189614039630401_6220537552919825677_n.jpg
    193928542_189614039630401_6220537552919825677_n.jpg
    130.5 KB · Views: 192
  • 193593997_1959901707495957_4860370746516339084_n.jpg
    193593997_1959901707495957_4860370746516339084_n.jpg
    105 KB · Views: 182
  • 193161305_1954927781327654_6333815085508635015_n.jpg
    193161305_1954927781327654_6333815085508635015_n.jpg
    102.1 KB · Views: 182
  • 196478406_187675836617950_2300396804428715906_n.jpg
    196478406_187675836617950_2300396804428715906_n.jpg
    110.3 KB · Views: 192
First off I got myself a welder finally. I got tired of using a friends all the time. Liking it so far. I don't know why I didn't get one sooner. And I'm glad I got the bigger 210A. This thing rips!

Now an update on the hydro assist project.

I started off by trying to make the new pump work in the stock bracket. It bolted in but there wasn't enough room for the massive -12 feed. I tried notching the stock bracket but it was still a bit tight. I could have cut out more but I decided to just build a new bracket from scratch and delete the A/C. This frees up so much space for the new reservoir and also allows me to rotate the pump so the feed comes in the side. I don't like how Ford mounts the pump fed from the bottom. I think this setup is going to work much better.

Then I went on to mounting the ram and cooler. I used some of the old condenser brackets to mount the cooler. And just welded on the PSC brackets for the ram along with the Trail Gear tube clamp.

Next I have to figure out how to mount the reservoir just right for good flow into the pump. I'll have to make a bracket for that as well.

Then it will be on to drilling/tapping the steering box, making all the hoses and getting a new belt. Coming along nicely.
Just wondering what welder you got?
 
So the steering and clutch have been working awesome but more parts are piling up. Must be time for a rear diff swap lol

I was hearing a some squeaking coming from the rear end so I checked the drum brakes and found a broken tensioner cable and a bent shoe. Something must have bound up in there. But instead of rebuilding the drums I figured I might as well put the explorer diff in finally. And while I'm at it put in some 5.5" Chevy leaf springs. Hopefully they give me the ride height I'm going for with no lift blocks.

Getting started on it this weekend. Should be fun.
 

Attachments

  • 20210716_161238.jpg
    20210716_161238.jpg
    191.9 KB · Views: 149
  • 20210716_161230.jpg
    20210716_161230.jpg
    189.6 KB · Views: 150
Here's my progress. I got the springs and hangers removed. Removing those frame rivets was kind of a pain but I got them with a combination of grinding, drilling and air-hammering. Did it all without removing the box so that's nice.

Then I decided I want to do my sliders while I'm in here. I've been tripping over them in my shop so they need to go. And I also decided to make it a bit more difficult on myself by making them bolt-on/removable. So I've spend the last few shop sessions fabbing the mounts and cleaning the frame for paint.

I have the sliders hanging by the middle mount for now. Still need to finish the front and rear mounts then gusset everything. After that I'll resume the spring/diff swap lol.

But this morning I'm leaving for a week long vacation on Vancouver Island. :cool:
 

Attachments

  • 218405671_231647185494662_5341399213373385827_n.jpg
    218405671_231647185494662_5341399213373385827_n.jpg
    114.2 KB · Views: 179
  • 224734729_860268351584507_4885344679692560799_n.jpg
    224734729_860268351584507_4885344679692560799_n.jpg
    99.1 KB · Views: 162
  • 222634718_344735573778448_5136720833983518614_n.jpg
    222634718_344735573778448_5136720833983518614_n.jpg
    79.6 KB · Views: 170
  • 218320756_534170321161830_1922430890861748847_n.jpg
    218320756_534170321161830_1922430890861748847_n.jpg
    97.3 KB · Views: 164
Well I'm back from the island. Did the full tour from top to bottom. What a beautiful place. Now its back to work..

I got the gas tank removed so I can drill the holes on the driver side. Those fuel line connectors were kicking my ass for a while but I managed to get them off without breaking. Cleaned probably a few pounds of dirt from inside the frame and crossmembers. I found some reducer spacers for the spring hangers and got them welded in. These shrink the hole size to 9/16" to match the chevy leafs. Stock ranger hole was 5/8". Then got both spring hangers mounted. Now I need to finish the last mounts for the sliders, weld some nuts inside the frame where the tank sits, paint the frame, then throw the tank and new springs in.

I decided I'm going to get the truck back on the road with the stock diff for now. Just test out the new leafs, see how everything sits, and do some wheeling. My buddy and I are itching to go out so I'll build the new diff as much as I can while the truck is usable. Then it should be a fairly quick swap once it's ready.
 

Attachments

  • 218165677_2618988465071919_7025264420897171893_n.jpg
    218165677_2618988465071919_7025264420897171893_n.jpg
    129.7 KB · Views: 169
  • 221665722_1220902515001380_4655196885008732145_n.jpg
    221665722_1220902515001380_4655196885008732145_n.jpg
    247.5 KB · Views: 166
  • 223646635_265538891672903_2404454806331244868_n.jpg
    223646635_265538891672903_2404454806331244868_n.jpg
    213.1 KB · Views: 157
  • 228924721_241262014513804_1920382032647365177_n.jpg
    228924721_241262014513804_1920382032647365177_n.jpg
    173.2 KB · Views: 151
  • 232040677_825647524982923_3095743052556837731_n.jpg
    232040677_825647524982923_3095743052556837731_n.jpg
    184 KB · Views: 155
  • 226513968_4311708815617160_2473564459564420081_n.jpg
    226513968_4311708815617160_2473564459564420081_n.jpg
    175.8 KB · Views: 149
  • 228301157_329365405599121_2385001728934928129_n.jpg
    228301157_329365405599121_2385001728934928129_n.jpg
    63 KB · Views: 148
  • 231324929_501548704478066_4385785823204824352_n.jpg
    231324929_501548704478066_4385785823204824352_n.jpg
    181.7 KB · Views: 154
  • 234442712_931938990721852_7586470832945622286_n.jpg
    234442712_931938990721852_7586470832945622286_n.jpg
    150.2 KB · Views: 147
Why did you move the front leaf spring hangers forward? The Chebby leafs longer?

Also. where did you find those reducer bushings? I really could have used those on my 2001 when I swapped in the FR34 leafs.

Are they these 5/8" to 9/16" - https://www.ballisticfabrication.com/products/reducer-spacer?variant=32409791332427

Yes the Chevy leafs are about 6" longer. This should position the axle close to stock and keep the shackle angle right. In theory.

I got mine from barnes 4wd. Called repair washers. They are 3/4" to 9/16"


Sponsored Ad


Sponsored Ad

TRS Events

Member & Vendor Upgrades

For a small yearly donation, you can support this forum and receive a 'Supporting Member' banner, or become a 'Supporting Vendor' and promote your products here. Click the banner to find out how.

Recently Featured

Want to see your truck here? Share your photos and details in the forum.

Ranger Adventure Video

TRS Merchandise

Follow TRS On Instagram

TRS Sponsors


Sponsored Ad


Sponsored Ad


Amazon Deals

Sponsored Ad

Back
Top