• Welcome Visitor! Please take a few seconds and Register for our forum. Even if you don't want to post, you can still 'Like' and react to posts.

Project "Slippery Slope" - 2011 FX4


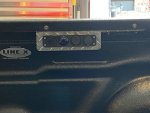
Pics of the "Anti-Theft" sticker showcased the blistery black metal piece under the window. . .

So. . .
Door Funnies (APR 22).jpg


Lots of newspaper for a 20" by 2" strip of metal, but happy with the results. Both doors done, but just pics of driver's side.
Door Trim News (APR 22).jpg


Maybe it'll need a touch-up in the future, but was going for the "textured" look, sort of matches the the Line-X in the bed (at a much reduced price).
Door Trim Paint (APR 22).jpg


Paul
 
Swapped out the clear OEM fog lights for yellow “euro” styled ones…
A1381F81-C78E-4FB8-8E40-A04937969D6D.jpeg

Literally a 10 minute job….

Paul
 
Been a hot minute since I posted any updates, so here's a few. . . The Ranger still performing great - - not my daily driver, but gets plenty of use hauling stuff, road trips, and projects.

One of the big purchases I wanted to add to this rig was a DiamondBack 270 tonneau cover - - even as the last model year (2011) of the old Ranger, there's only so long that some manufacturers will provide these products.

Test fit:
Diamondback.1 (OCT 24.JPG


Once I mocked up the attachment points for the new cover, I was able to add a few options for the bed. First up, some under-bed LED lights that I've had sitting around since Wuhan.
LED (OCT 24).jpg
1728945658291.png


Then, a 12v and USB power port in order to charge devices and run the ARB 37L fridge that fits under the DiamondBack cover.
Bed Acc.2 (SEP 24).jpg
1728946074189.png

Bed Acc.3 (SEP 24).jpg


Inside the cab got an upgrade as well - - already have some USB ports on the shelf visor switch panel, but since I'm the last guy in America with an iPod, needed something on the lower part of the cab.
Cab USB.2 (OCT 24).jpg


Paul
 

Attachments

  • Bed Power.2 (OCT 24).jpg
    Bed Power.2 (OCT 24).jpg
    96.5 KB · Views: 56
Last edited:
Next project was actual mounting the DiamondBack 270 cover. Needless to say, this is an impressive piece of kit - - expensive, but a real quality product. Like mentioned, not sure how much longer DiamondBack will continue to produce these for a model nearly 15 years past its "best by" date.

Since I opted for the more expensive (but more practical) "270" version, with the forward hatches that open outboard instead of the normal clamshell style, it requires a few more mounting points. . .

High quality well-nuts to hold the brackets:
Well-Nuts.1 (OCT 24).jpg

Three brackets along the back of the bed.

Nice fit:
Diamondback.3 (OCT 24.JPG


Previously wired LED under-bed lighting works pretty well with the cover closed:
Bed Light.3 (OCT 24).jpg


Have a slew of magnetic USB-chargeable puck style lights that I can mount to the inner side of the covers:
Bed Light.4 (OCT 24).jpg

Multiple color options for the puck lights, or could just buy the DiamondBack light bar. . .

Paul
 
Corbeaus ! ! !

Bought these 10 years ago for my trail rig (1st Gen Explorer Sport) and really enjoyed them until that rig was totaled in a rare commuting episode 7 years ago. . . So they sat in the hulk of that rig until I found a replacement trail rig. Well, long-story-short, after finding a replacement trail rig, with a very clean interior, changed course, making a slight upgrade to those OEM seats (new thigh bolsters, near-matching upholstery and heat), so these have been sitting in my garage waiting for the chance to mount them in the Ranger.

Luckily live close to a real Ranger enthusiast, who just happened to have a set of Ranger-specific Corbeau seat brackets.

Here's the result:
Corbeaus.3 (OCT 24).jpg

Black and gray fabric almost identical to OEM.

And HEAT!
Seat Wire.1 (OCT 24).jpg


Much more "planted" in these seats as opposed to OEM, and really happy with the result. . .

Paul
 
Last edited:
Corbeaus ! ! !

Bought these 10 years ago for my trail rig (1st Gen Explorer Sport) and really enjoyed them until that rig was totaled in a rare commuting episode 7 years ago. . . So they sat in the hulk of that rig until I found a replacement trail rig. Well, long-story-short, after finding a replacement trail rig, with a very clean interior, changed course, making a slight upgrade to those OEM seats (new thigh bolsters, near-matching upholstery and heat), so these have been sitting in my garage waiting for the chance to mount them in the Ranger.

Luckily live close to a real Ranger enthusiast, who just happen to have a set of Ranger-specific Corbeau seat brackets.

Here's the result:
View attachment 119561
Black and gray fabric almost identical to OEM.

And HEAT!
View attachment 119562

Much more "planted" in these seats as opposed to OEM, and really happy with the result. . .

Paul
Yes. These actually look like they could have been made by Ford. Original Ranger seats are not exactly the most comfortable either. Good seats are a worthwhile upgrade especially on longer trips.
 
Wiring clean-up…
IMG_0495.jpeg


Control enthusiast, me ? ? ?

IMG_0494.jpeg

Paul
 
Couple of other small projects with the Ranger. . . No kids and most friends no where near malleable enough to fold themselves into the jump seats - - figured it was time to remove them. Have designs on some type of storage unit on the floor, but that can wait for another day.

Never used seats:
Seats.1 (JAN 25).jpg


More room already:
Seats.3 (JAN 25).jpg


Had some blackish carpet scraps and used four of the seat bolts to hold the carpet in place. . . (bottle jack and carrier also on top of the new carpet):
Seats.4 (JAN 25).jpg


Took a trim piece off each of the rear seats, and carved out some of the excess to partially fill the voids in the corners of the cab.
Seats.2 (JAN 25).jpg


Overall pretty pleased with the end result. . .
Seats.5 (JAN 25).jpg


Paul
 
The reason for the seat removal (other than the fact that they’ll never be used…) is that I needed a pass-thru for rear mounted camera and didn’t have enough cable to route the wiring through the firewall and then all the back to the rear bumper.

Pretty easy to route the cable through…
IMG_0696.jpeg

. . . passenger jump-seat hole, plastic hose for chafe protection.

Under the cab and into some wire loom that I had running aft for back-up LEDs in the bumper.
IMG_0710.jpeg


Maybe not the best camera location, but should work for now.
IMG_0707.jpeg


Neat feature is that the camera has a forward camera as well as the back-up. Have this set up in the trail rig (1st Gen Explorer Sport), so made sense to run it in this one too.
IMG_0711.jpeg


Instead of running the provided 12v cigarette plug power cord, used one of my USB ports for a cleaner look from the switch panel I have mounted on the visor shelf.

IMG_0712.jpeg


Simple project, and the unit works well, but now I have no excuse if I back into anything. . .
 
Last upgrade was getting the bed tray that I ordered from DiamondBack when I bought the cover modified to fit as that item was a bit too wide. . .
Tray Fit.2 (SEP 24).jpg


Had it cut down and re-welded so now it fits as it should. . .
Tray.4 (JAN 25).jpg


Put some carpet in the outer sections.
Tray.3 (JAN 25).jpg


Happy with the results. . .
 
Last edited:
Added a few Molle panels where the jump-seats used to be. . .
Molle - Driver (FEB 25).jpg


Used 2" bolts with some larger washers to support the panels from the backside of the panel.
Molle - Backing (FEB 25).jpg


Molle panels need some room so the straps can be secured on the pouches, so added some spacers to provide some stand-off between the molle racks and the panel. Also thought it'd smart to secure the molle racks with wingnuts, as it'll be easier to swap out pouches if I take each rack off to modify the layout. . .
Molle - WingNut (FEB 25).jpg


Decent use of the space. . .
Molle - Passenger (FEB 25).jpg

Paul
 
Last edited:
Even with the added Molle panels (from February). . .
Molle - Driver (FEB 25).jpg

. . .still a lot of empty space.

So, more Molle. . .
Molle.1 (APR 25).jpg


Mounted in a similar fashion, offset aluminum flat stock with wingnuts for easy access to the Molle panels, also relocated the FAK to the upper aluminum bars for easier access. Holes in the jack cover plugged with black plastic plugs.


Molle.2 (APR 25).jpg


Happy with the results, also added some Kilmat sound deadener when I had the rear panel off.
Kilmat (APR 25).jpg


Paul
 
Very rich in detail. Thanks for this chronicle.
Is the Wolfbox system working well?
I ask because Wolfbox came up when shopping for a dash cam.
 
Is the Wolfbox system working well? I ask because Wolfbox came up when shopping for a dash cam.

Very pleased with my Wolfbox G850 Pro, but not really qualified for comparative analysis as it was recommended by a fellow enthusiast that had done the research, so in that aspect I'm not the guy to say why it's better than anything else on the market.

Worth noting that I don't use all the features - - specifically the GPS linked speedometer option (use a stand-alone Garmin), or tie it into my smart phone for photo downloads, etc. That aside, the features I use are great, the system fairly intuitive, and in my opinion well worth the purchase price.

It took a minute to get used to the screen "on" all the time, even with it at the dimmest level, but now it's barely noticed. There are newer models out since I bought this one, would buy again . . .

Paul
 
I didn't even know i wanted a Wolfbox 850 pro...
 

Sponsored Ad


Sponsored Ad

TRS Events

Member & Vendor Upgrades

For a small yearly donation, you can support this forum and receive a 'Supporting Member' banner, or become a 'Supporting Vendor' and promote your products here. Click the banner to find out how.

Latest posts

Recently Featured

Want to see your truck here? Share your photos and details in the forum.

Ranger Adventure Video

TRS Merchandise

Follow TRS On Instagram

TRS Sponsors


Sponsored Ad


Sponsored Ad


Amazon Deals

Sponsored Ad

Back
Top