• Welcome Visitor! Please take a few seconds and Register for our forum. Even if you don't want to post, you can still 'Like' and react to posts.

1993 supercab Drivers Door Falling Apart from the inside out


Josh B

Well-Known Member
Supporting Member
TRS 20th Anniversary
Joined
Aug 15, 2019
Messages
4,004
City
Oklahoma
Vehicle Year
1993
Engine
4.0 V6
Transmission
Manual
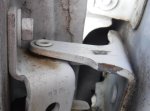
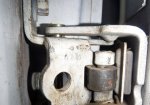
I'm not sure how long this been going on but been a while.

The door sagged, not sure when this either but near the begining.... sagged noticeably enough the door had to be shut hard while lifting up

It is rather daunting because I believe the dash needs removed to access the doors top hinge bolt

also now the door needs dismantled and put back together on the inside too

ANY tips or suggestions at approaching and addressing this problem will be greatly appreciated
 
The cause of the door sagging and an issue to close is a clear answer is the door pins are bad and need replaced. Don't need to remove the hinges from the cab for this. There are alot of YouTube videos that show how to do it, sure others here can tell you more in depth of the job.
Man that is some good news, I had no clue, and will certainly be looking for some of those videos ;)
 
Yeah, the hinges can stay on the cab, the door can unbolt at the door side... easy, when I got my '97 the previous owner put on a white door on a red Ranger... and didn't put a door panel on it or wire up the speaker or light switch for whatever reason... You can find the hinge pin kits in the Help! section of most auto parts stores, just listed as Ford door hinge pin kit or something... youtube should have some videos on it on something with heavier doors like a Lincoln or something... same pins I think :).

Getting in the door panel is easy but ya gotta do it right... there's a screw in the bottom rear corner, upper front corner (I think...), one in the door pull handle, one in the door latch handle area I think and one for the window crank (that one is a T27). From there the door panel slides UP an inch or so then comes off, it does NOT pull out with snaps like most other Ford door panels of the '90's... as I found out the hard way breaking a couple of the deals on the door panel...
 
Thanks Scott, I have the pins and am looking to get on it tomorrow, I appreciate your information'

I have a better set of speakers in an Explorer and will look at starting to swap those while I'm in there too
 
Good info. My driver's side is starting to sag just a tiny bit. I'll give the pins a closer look. I've already replaced the passenger door because of deer damage, so I am familiar with the process.
Heads up if there are any power accessories like mirrors, windows or locks. That power connection will have to be unplugged and is a bit of a pain to get to. It's not in the door, but extends forward through the front. Also with the power accessories, the small panel where they are located can be popped out -- do this first -- and the buttons can be unscrewed so the door panel can be completely removed.

20211112_160554.jpg Inside door panel rivets.jpg

Here's what you're looking at. Left image shows the hook inserts that Scott mentioned and yes there are three screws. I did a lot of work on my window regulators, so am intimately familiar with door panel removal :rolleyes:
 
Thanks RC I got the pins and am looking at maybe today getting started.
I'm considering propping the door up with a crate and maybe some boards and doing the top one. Got nice weather so the door won't blow around.
I'm hoping the little Ryobi oscilating cutter tool will cut the end off the hinge pin. Mine don't look like the ones I saw on Youtube, mine are driven in from the bottom and need to be cut or released from the top
 

Attachments

  • DSCF8515.JPG
    DSCF8515.JPG
    123 KB · Views: 85
If you can get at the head with a big enough drill bit, it might be better to drill it out than cut it. With the way the door curves, that might not be possible unless you have a 90 degree adaptor. Worth a look before you really dig into it.
 
Take door off, grind off the top flange and pound it out with punch.Then u can get to the bushings pretty easily.
 
I didn't have any help handy when I did mine. I suspended the door with a come-along from a garage rafter (or your favorite shade tree). And then I also used a floor jack under it to help line it up when putting it back together. The door is a little heavy, and can get real floppy once the hinge are disconnected.
 
I propped me a rafter up there ;) It did the job but was still a pain to balance and install. at least it didn't end up in the dirt. I got it all done but the adjustment still needs tweaked and I haven't quite got the hang of getting the door panel to drop into place as it should. the speaker and accessory connectors fit right up though
 

Attachments

  • DSCF8536.JPG
    DSCF8536.JPG
    244.5 KB · Views: 94
I see from the door panel you have roll-ups -- makes it a bit easier I would think.
The lock button can be an problem. Line up the door panel. Try to keep it fluch against the door and use your shin to force the bottom edge in as you drop the panel into place. You'll get it. Just keep at it.
 
Any suggestions on making final adjustments to that door would be greatly appreciated :)

I broke the rain guard when it was hard to hold in place and I didn't realize that was all I had a grip on, it just shattered, not sure if I can find another one of those or not
 

Attachments

  • DSCF8536.JPG
    DSCF8536.JPG
    67 KB · Views: 92
Last edited:
I propped me a rafter up there ;) It did the job but was still a pain to balance and install. at least it didn't end up in the dirt. I got it all done but the adjustment still needs tweaked and I haven't quite got the hang of getting the door panel to drop into place as it should. the speaker and accessory connectors fit right up though
I just used a floor jack with a cushion on it.Lifted it just enough to hold pressure on bottom of door and unbolted 1 bolt at a time.When it came to the last bolt I held door with other hand and took off last bolt.I marked where hinge was aligned B4 I took off door so I had a start when it came with realignment
 
Last edited:
I don't have any jacks tall enough but stacked some fire brick under it and used some wood shims to hold it up tight and still can't get it to align with that door latch, no matter what it still has to be shut briskly (although not quite as much as before) with an upward lift for it to latch, and the top is still not as high as it should be after closing. I did nothing to the inside hinges, and the door side hinges have no adjustment (unless it would be to add a washer on the door pin under the door side hinge to ride it up a bit). ATM I'm not certain which way to tweak it onward so I'll think it over for a while ;)

Also I wonder about that wheel on the bottom hinge that locks it in at certain points, is there anything to help that such as grease or anything?
 

Attachments

  • DSCF8566.JPG
    DSCF8566.JPG
    167.4 KB · Views: 97
I don't have any jacks tall enough but stacked some fire brick under it and used some wood shims to hold it up tight and still can't get it to align with that door latch, no matter what it still has to be shut briskly (although not quite as much as before) with an upward lift for it to latch, and the top is still not as high as it should be after closing. I did nothing to the inside hinges, and the door side hinges have no adjustment (unless it would be to add a washer on the door pin under the door side hinge to ride it up a bit). ATM I'm not certain which way to tweak it onward so I'll think it over for a while ;)

Also I wonder about that wheel on the bottom hinge that locks it in at certain points, is there anything to help that such as grease or anything?

I spray them and the hinge pins where the hinge comes together with white lithium grease.
 

Sponsored Ad


Sponsored Ad

TRS Events

Member & Vendor Upgrades

For a small yearly donation, you can support this forum and receive a 'Supporting Member' banner, or become a 'Supporting Vendor' and promote your products here. Click the banner to find out how.

Latest posts

Recently Featured

Want to see your truck here? Share your photos and details in the forum.

Ranger Adventure Video

TRS Merchandise

Follow TRS On Instagram

TRS Sponsors


Sponsored Ad


Sponsored Ad


Amazon Deals

Sponsored Ad

Back
Top