• Welcome Visitor! Please take a few seconds and Register for our forum. Even if you don't want to post, you can still 'Like' and react to posts.

'85 Bronco II Paint & Body Thread


My DA came in and I think it's a great budget option. Works well.

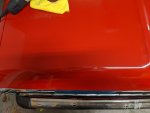
I've definitely got some orange peel. I can probably get it all out if I wanted to go to that far, but it is polishing up pretty good.

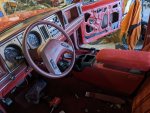
I'll keep working at it this weekend. I found a pad option that can remove more orange peel on auto geek that I might try. But here is a sneak peak of what I'm getting now.

Also with this being a single stage, I doubt I ever get the depth of a Base Coat/Clear Coat job.
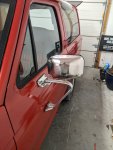
 

Attachments

  • PXL_20220325_010254203.jpg
    PXL_20220325_010254203.jpg
    87.5 KB · Views: 111
Well you gotta be happy with that…..🙂

-Jazzer
 
That looks great!

I've seen more orange peel in some of the factory-applied paint jobs from that era. I'd be as happy as a puppy with two peters with that paint job, as it is after just the polishing that you've done.

I don't know if I'd try to wet-sand or polish until it's perfectly flat. Over time, the thickness of the paint and keeping it out of the sun as much as you can will make the most difference in it staying nice. In the years to come, oxidation and waxing will gradually thin the paint layer. Sun exposure will fade it, and that'll just make you wax it more often. The more paint thickness that you have on it, the better.

You going back with adding the white for the 2-tone, or keep it all red? I'd have a hard time with that one myself; that shiny red is kick-ass gorgeous.

Agreed on leaving the paint thicker. The more the better. I hope to be able to keep this thing waxed, but going to give it a few more weeks before I actually apply the first wax.

I'll keep polishing this weekend. To get it where I want it. If I feel like I have a problem spot, I can use other products later.

I'm leaving it red for now. If I do the two tone, it won't be painted as I would never get those lines straight! I would have the white wrapped in vinyl.

I'll probably start on the aluminum wheels this weekend and finish the rest of the exterior assembly.

If I'm really feeling brave, I might start putting my newer interior in too.
 
One other question, anyone have any tips for polishing old chrome?

I've read about aluminum foil working. I'm going to get some metal polish this weekend and work on them as well.
 
That looks awesome! I kinda giggled at your base/clear comment, I am the other way around, pretty comfortable with that but I've never shot single stage. I am planning on using it on my F150 though.

As far as polishing chrome - I have always just used the liquid chrome polish stuff on a rag. It really works pretty well unless the chrome is really rusty, then power tools may be necessary.
 
Another little sneak peak of some of the work going on.

I ordered new mirrors from Jeff's bronco graveyard a while back, just got them out to put one on today. The swing arm did not fit the stock mounting holes. Luckily I have the OEM's still, so I swapped the mirror and glass assembly to the old swing arm. The arms should polish up well.

Still debating on my polishing and if I should wet sand a little more of the orange peel. I'll sleep on it for a while. Can always sand more later.
 

Attachments

  • PXL_20220325_223407063.MP.jpg
    PXL_20220325_223407063.MP.jpg
    70.9 KB · Views: 111
  • PXL_20220325_224702841.jpg
    PXL_20220325_224702841.jpg
    112.3 KB · Views: 125
Well.... I had a roller coaster of a day. Made a lot of progress on the interior, put my headliner back in, swapped the dash, swapped to my newer rear seats, did some spray painting on a few things, cleaned the carpet, and installed my explorer center console.

All was going well until I was putting trim in around the passenger side rear quarter glass and the self tapping screw did what self tapping screws do, it slipped and landed my driver's bit right into the glass..... A loud pop and you guessed it. Shattered. I barely even tapped it, but that Phillips head concentrates a lot of force I reckon. I was shocked.... Literally my jaw dropped and I just stared. This has been one of my biggest fears because I know that glass is no longer made.

I had to sit down gather myself and make some phone calls to calm down.

So, yeah it's a mess, I broke it, I can't glue it back together. I'm still upset.

I did luck into a used window on eBay for an "ok" price. Since mine are the early glued in style I went ahead and bought it. I'm not sure how easy it would be to remove the glass in a yard without breaking it.

Text with my glass guy and he said that would probably be the best and told me to let him know when it comes in and they'll install it.

I'm bummed. It sucks, but it happened. At least I have a glass on the way.

It's just money right??

But I won't let it hold me up much. I'm going to swap in my new front seat tomorrow. Some pics to help tell the story.
 

Attachments

  • PXL_20220326_151610120.jpg
    PXL_20220326_151610120.jpg
    116.6 KB · Views: 124
  • PXL_20220326_151624840.jpg
    PXL_20220326_151624840.jpg
    227.6 KB · Views: 136
  • PXL_20220326_180222266.jpg
    PXL_20220326_180222266.jpg
    185.6 KB · Views: 114
  • PXL_20220326_210833183.jpg
    PXL_20220326_210833183.jpg
    133.7 KB · Views: 122
  • PXL_20220326_212038235.jpg
    PXL_20220326_212038235.jpg
    270.2 KB · Views: 117
  • PXL_20220326_232437968.MP.jpg
    PXL_20220326_232437968.MP.jpg
    197.6 KB · Views: 118
  • PXL_20220326_232454447.MP.jpg
    PXL_20220326_232454447.MP.jpg
    215.9 KB · Views: 140
Man... that is a total bummer.

I'd just as soon get kicked in the nads...
 
That does suck a big one, but good on you for working your way past it.

The interior is looking sharp, and kudos on keeping a stock radio. It just looks "right". That console also looks like it belongs there; good upgrade.

Before you put the door panels on (the "cards"), are you going to put the inner liner back on?
If the original liners are trashed, it's easy enough to make replacements. '85s may have had paper (as my '84 did), but later ones were plastic. The liner protects the back of the card, reduces drafts and helps on the road noise, too. Worth having.

Thank you for posting your progress; I'm enjoying following it. Seriously, you're actually doing a great job, in resurrecting this truck and turning it back into a gem example of the classic that it is.

Keep up the good attitude, and just keep your eyes on the prize.

I'll replace the liners with something I'm sure. Thinking just some heavy mil plastic.

I have the XLT door panels that go all the way up to the glass, but they are faded some. I'm going to try and die them back to a respectable condition. Then I'll put them on.

I did order some 4" speakers for the dash as my stock one crumbled lol.

Also ordered some floor mats.

I'll just keep on trucking and keep screw drivers bits away from any glass. Lol
 
Dying the card's fabric should work. I'd think clean the fabric beforehand. If that doesn't work out, I think it likely that you could find close fabric and recover just the upper parts. I haven't had to deal with that yet.


Heavy mil plastic would be good for the liners. Here are some pics from my zoo and comment, in case it helps.

Here is my '84, which is probably what yours is originally:

74088


Note that a first-gen has a decompression vent in the lower rear corner. Yours should be in good shape, as in the rubber flap being good, and more on this below.

On my '84 the paper liners are good enough so I kept them. Later on, I'll replace them with plastic, if needed.

Not sure of what model year, but later on Ford changed to using thick plastic sheet themselves for door liners. Here is how I replaced some torn ones on one of my Explorers.

Here's one of my original torn liners:
74092


And here is some thick-mil plastic replacing it:
74093


I used spray adhesive to stick the edges, and reinforced needed openings with tape. I can just peel it for future access, and spray glue it back.

On yours, you'll want to mimic the original shape, and leave the opening for the decompression vent.

Before you close it up, clean out any trash in the door bottom, and clean all of the window's moving parts, then lightly lube all of the contact points. I used white lithium.

If you haven't yet, but are going to replace the beltline felts, do that too before closing up the door.

Keep on truckin'!
 

Sponsored Ad


Sponsored Ad

TRS Events

Member & Vendor Upgrades

For a small yearly donation, you can support this forum and receive a 'Supporting Member' banner, or become a 'Supporting Vendor' and promote your products here. Click the banner to find out how.

Recently Featured

Want to see your truck here? Share your photos and details in the forum.

Ranger Adventure Video

TRS Merchandise

Follow TRS On Instagram

TRS Sponsors


Sponsored Ad


Sponsored Ad


Amazon Deals

Sponsored Ad

Back
Top