• Welcome Visitor! Please take a few seconds and Register for our forum. Even if you don't want to post, you can still 'Like' and react to posts.

What did you do to your Ranger today? (Part Deux!)


My point was there isn't a manufacturer on earth that's immune to common, annoying failures scattered throughout their lineup. Whether the vehicles made by USA, Japan, Britain, or dirty ol south korea.. chances are it's going to have issues. Especially if it's a brand new model/motor/trans/whatever.

Christ.. something like 93% of Bentleys sold need warranty repair done in the first year of ownership lol.

You aren’t wrong and no manufacturer is immune from bad vehicles and parts. Ford has had their share of bad vehicles as well.
 
1116211923_HDR.jpg

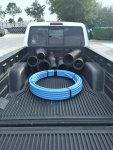
Well that's not the right intake to be under the hood of a Bronco II...
 
Changed out the battery. The old one was from 2017.
 
Got some plumbing supplies with it.
 

Attachments

  • 20211117_150709.jpg
    20211117_150709.jpg
    159.5 KB · Views: 127
drove the kid to and from school/ABA each day this week.

Blew more leaves out of the bed driving it :)

More leaves fell into the bed while sitting in the driveway between uses.

Not sure if I am winning the battle of leaves by driving it yet...

AJ
 
"Project Dashboard Clock" w/Sweep Second Hand - Fun Project !

Got tired of the phony vent in the center after 13 yrs & made the space useful by adding a clock. Came out pretty good.
The vents pop out pretty easy with a plastic spudging tool & a small screwdriver.
I bought a $3 travel alarm clock & took it apart to remove the snooze/light button & bulb. Also the alarm hand. Removed the white dial from the movement &
took it to a FedEx printing center to print the dial inverted (45¢ a copy). First I had to blacken the green dots on the dial with a fine point Sharpie & trace the edge
& center hole on an index card so they would come out white. I also had to paint the hands.
I didn't use the front trim of the clock. Instead, using a piece of scrap plastic I cut a plate using the fake vent as a template. Then I cut a hole in the plate for the clock window.
The movement mounted well with 3M mounting tape & some scrap plastic & epoxy to raise the movement so the dial would be centered up & down.
The front of the dial & movement butts up with the back of the clock window which I pressed through from the back of the plate. I went to my local hardware store &
picked up an O ring to use for trim around the clock window.

Right now its running on a AA battery & thats ok but I have a DC buck step down converter on the way & I'll give that a try so the truck can power the clock.
I also have some 12v 3mm blue LEDs on the way & I'll put 1 in & tie in to the dash light circuit. If it's too bright I'll figure something out, maybe a different resistor.
I'm not sure if the LEDs I'm getting are dimmable with the light circuit but I really never dim the gauge lights anyway.
I can't adjust the time from the front of course, but it's a quartz movement & as I mentioned the vent panel comes out fairly easy.
As for replacing the battery, let's hope the converter works out ok.
I have some improvements in mind but this will do for now. I wish I took more pics but I was too busy having fun with this !

Cheers !! View attachment 67205

View attachment 67202View attachment 67203
View attachment 67206View attachment 67208
View attachment 67210View attachment 67212View attachment 67213

"Project Dashboard Clock" Finished !!
I got the buck converter in along with 2 LEDs @ 12 & 6 o'clock. Clock runs very well & keeps good time. LEDs dim with the headlight switch (Tied into Instrument Panel Illumination circuit).
To run the wire I straightened a coat hanger & poked it through the hole for the FWD switch harness end (Battery disconnected, of course) toward the left toward the steering column & then
worked the end to the fuse box. No restrictions ! I Attached the wire to the coat hanger then pulled the wire up to the hole.
For powering the buck converter/clock movement I used a piggy-back fuse holder with a 1 amp fuse for it along with the 15 amp on the Premium Radio Amp circuit.
I guess back in the day you could order a premium stereo package (
Blue Ques..gif
) & that's what the circuit is for, but it is 12v constant.
I mounted the converter to the left of the square hole where the FWD switch harness end stuck out. I used the ground wire on the harness for both circuits.
The harness seems pretty secure where it is so I covered the end & tucked it back in the hole just a little.
Ranger Fuse Box.JPG


This is about how the clock looks illuminated with 2 LEDs (In the photo only 1 lit LED @ 12 o'clock. My lousy phone camera lets in too much light).
Ranger Clock for The Ranger Station.jpg


Looks a lot better in person. I'm pleased. CHEERS !!
Cheers !!.gif


Front end shot o' my Ranger

009 - Copy.JPG
 
Last edited:
Well I didn't even realize it until yesterday, but the Rough Country lift poked a hole in my front diff.
1116212047_HDR.jpg
I did not know they could damage the smaller d28 pumpkin. I will be changing out the RC lift (installed by P/O) for a better one once I swap in the d35.
 
Can't do this with a Saab. Free firewood. Comes from across the street, but how hard would that be to move without the truck. Probably only impressive to me since I never had a pickup.
IMG_2860.JPG
 
Can't do this with a Saab. Free firewood. Comes from across the street, but how hard would that be to move without the truck. Probably only impressive to me since I never had a pickup.
View attachment 68446
Trucks are great to have. Think how many times you would have crossed the street pushing a wheelbarrow to move that wood.
 
Ordered the gasket set and head bolts for the 302 Ranger project. Going to try and start chipping away at that project again
 
My right blinker blinks double time...
 

Sponsored Ad


Sponsored Ad

Overland of America

TRS Events

Member & Vendor Upgrades

For a small yearly donation, you can support this forum and receive a 'Supporting Member' banner, or become a 'Supporting Vendor' and promote your products here. Click the banner to find out how.

Recently Featured

Want to see your truck here? Share your photos and details in the forum.

Our Latest Video

TRS Merchandise

Follow TRS On Instagram

TRS Sponsors


Sponsored Ad


Sponsored Ad


Amazon Deals

Sponsored Ad

Back
Top