
By Craig T Evers
Over a period of time, rubber wears out. This is important to us because rubber is used extensively to keep our trucks under control when we drive. The suspension is linked together with rubber bushings that, over time, lose their flexibility or their stiffness and change the way they act under load. The change is subtle and creeps up without dramatic symptoms. But after 130,000 miles, it was time to replace the bushings in my 1993 Ranger 4×4. This project got a little more involved than I had planned by the time I was done, but it was well worth it. I will cover it completely in three installments (sway bar bushings, springs and suspension bushings, and body mounts and lift kit.)
I noticed that some of the rubber was looking … well, I guess you’d say it wasn’t quite right. Hard to describe exactly, but I worked for awhile once with a company that made suspension bushings, and I got used to what they are supposed to look like. These in my truck had tiny cracks in the surface, and the surface was dull. The real giveaway was that I could sink my thumbnail into the rubber. If it was that soft (from fatigue over millions of shock cycles), it couldn’t be doing much for the ride when the weight of the truck was bouncing on it.
In addition to the look and feel, there was the issue of ride quality. My wife told me that she wouldn’t ride with me any more because the truck rode so rough. Some of the roads out here are concrete slabs, with wicked bumps and drops between slabs, and poorly patched repairs. It felt like the truck was hitting each bump several times. Actually, it was. When the truck hits the bump, the wheels are forced up suddenly, putting forces into the bushings. Soft bushings just let the force pass through, so that the force hits the next link in the suspension with full force, then it can reflect back through the other way like a ball rebounding off a wall. The result is that the force of one bump was still rattling around the suspension when the next bump came up. Rough ride!
Replacing the shocks made a little difference, as did changing the tires, but it was still awfully uncivilized. So I had Duff send me a package of assorted suspension bushings in polyurethane. Rubber is a compromise material, with properties suited for road use, and it is inexpensive. Poly is tougher, wears like iron, and it costs more than rubber, but for spare parts, it’s about the same to a little less than buying bushings at the Ford parts counter. I decided that I had to replace all the bushings in the suspension. If you don’t, the forces will make themselves known at the weakest point in the system. If I had tried to debug some of the symptoms that cropped up during this project instead of just going ahead and finishing it, I would have gotten really confused as to what was happening (more on that later in the body mount section.) Once a teacher, always a teacher, I guess, and even though I don’t do it for a living any more, I can’t stop teaching, so I decided I’d write articles about my experience with each set’s installation. Maybe my mistakes and the problems I encounter can help someone else with their rig.
Before you start, buy new fasteners to put in place of the old ones you will remove, break, or cut out. If your truck is more than a couple of years old, the fasteners are probably beyond saving. Get replacements before you dive in and disable the only wheels you have. In my case, I had a local spring shop make me new U-bolts for the rear sway bar blocks that mount on the axle, and I got new bolts, nuts, and washers. I also had to replace one of the frame mounts, as I will discuss a little further down the page. I repeat, forget about saving those old fasteners. It just isn’t worth the pain and aggravation. Get new ones before you start on your project and then just break or cut the old ones. (It feels sooo good!)
Another thing to consider before you start is that you ought to spray all the fasteners with WD-40 or similar penetrating fluid a day or so (or even every day for a week) before you start. It’s going to be tough, so give it lots of time to sink in before you get the tools out. It sure saved my bacon there at the end of the body lift. The bed mount bolts were so badly corroded that they would have broken off if I hadn’t, and that would have been highly frustrating!
Allow lots of time for this type of repair. If you’ve never done it before, you will probably take more than you think you’ll need. If you’ve done it before, you are under no illusions, and you know what I’m talking about. It gets easier the more you do, but there are no guarantees it’ll ever be easy.

Allow lots of room to work. As you can see, I have the front end here up on ramps, and the rear is on jack stands (yes, those are railroad ties the stands are on!) That gives me room to slide around on a creeper if I want, and I have room to swing a socket handle with a cheater pipe on it. You will need to be able to apply lots of force. My 1/2″ air impact wrench ran out of power before it loosened anything on this job beyond the lug nuts, so I had to do it the old fashioned way. Brute force!!
The sway bars are pretty easy to do. All you have on each side of the truck are a support block bushing and a dog bone link fastening the bar to the vehicle. On the rear, the block is on the rear axle and the link attaches to the frame. On the front, the block is on the frame and the link attaches to the axle.
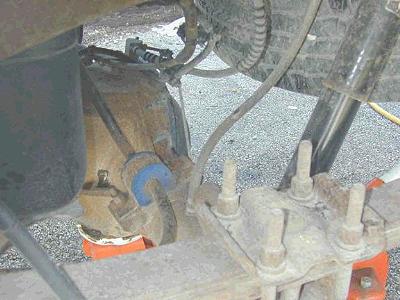
Here you see the new bushing block (pretty blue poly) attached to the axle. A U-bolt slips under the axle and holds the clamp. I did get one U-bolt off without breaking it, so I used it for a pattern when the spring shop bent me a couple of replacements. The threads were not in good shape, and I didn’t feel safe re-using it. The other U-bolt I cut off with a grinder after the nut stopped turning and I couldn’t break the bolt. (Did I mention you might want to consider replacing all the fasteners anyway?)
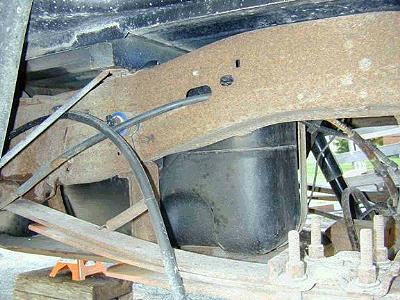
This was the worst part of the whole job. Here you see the left top rear mount where the link attaches to the frame. The link itself is hidden behind the emergency brake cable, but you can see the sway bar curving over the differential on the right side of the picture. The bar curves forward and hooks to the bottom of the link just behind the leaf spring. The problem here was that there is really no room to work. The suspension is installed early in the assembly line, before the gas tank. There is less than an inch of room between the gas tank (that large black thing on the inside of the frame rail) and the rail. Short of dropping the tank, there is no way to get the top mount loose. I did get the whole mount bolt to turn, but that’s no help. I ended up cutting the mount bolt off with a grinder. Be careful here! Gas tanks are tricky things to work around!!
In this case I could have left the old bushing in, but once I got in this close, I could see that it was in pretty sad shape, with large cracks and rubber starting to chunk out. It would have defeated the purpose of replacing the bushings to leave an old one in. Besides, with the other bushings in the linkage passing more load, it would have drastically increased the load on this old one, so it would have failed the rest of the way much faster, and then I’d be fixing it anyway. So I figured I might as well do whatever it took to make it right.
After I cut the mount bolt off, I had to get a new one in its place. I tack-welded a piece of steel wire to the tip of the new bolt and threaded it through over the top of the tank from the back side, then after I pulled the bolt through, I welded it to the frame from this side, keeping in mind that I was only a few inches from something that doesn’t like flames or sparks. After I was done, I covered the end of the bolt with tape and a tie-wrap to protect the cables that rub in that area. Then it was time to do the front bar.
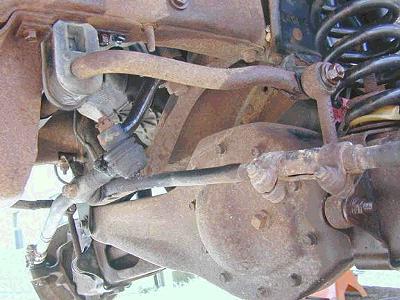
Here you see the left end of the front sway bar. The old rubber block is hooked to the frame, and the link hooks to the front of the axle. You can see the other end of the sway bar over on the left side of the picture where it hooks to the right axle. Notice I’ve been using lots of WD-40 here. I was able to get all the fasteners in the front free, but the pivot bolts were not re-usable, so I put new in.
HINT: when replacing the bolts, whether you use new or re-use the original, coat the body (NOT the threads) with anti-seize compound. There is a steel sleeve in the bushings. If the bolt rusts into that sleeve, you will never get it out, no matter how hard you swear at it!! It’ll take a mighty big hammer, properly aimed, to make any headway if that happens. If you are the next guy taking it apart in a year, you’ll be very unhappy with yourself if you forget this step!
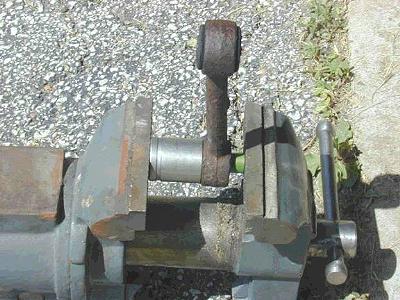
Here’s the easy way to get the old bushings out. I used a 1 1/8” socket on one side to press the bushing into, and a small socket in the middle to push on the steel sleeve. Worked much better than the “hammer-the-hell-out-of-it” approach I used on the rears! Just turn the handle and the bushing slides right out. (I was pretty pleased with myself when I came up with this idea!)
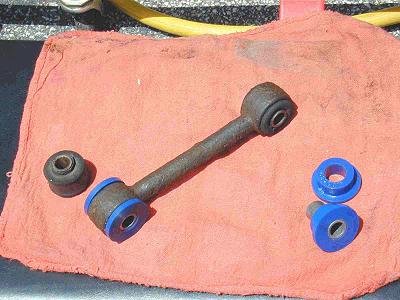
Here you can see the difference between the old and new bushings. The rubber in the old can be squeezed between your fingers with little resistance. The new bushing is extremely hard polyurethane. Makes things a lot firmer in the suspension. Notice that there is an angle in the link shaft. It makes a difference which way this angle points when putting it all back together. It’s little things like this that’ll make you glad you only took one side apart at a time so you can look at the other to see which way it should go back together!
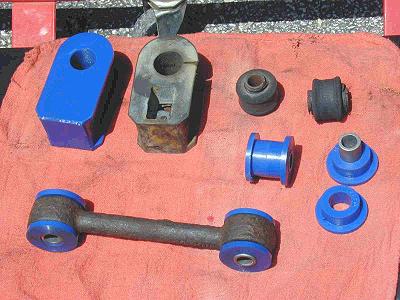
Here’s a comparison of the old and new bushings. Notice in particular the geometry of the frame block. Which do you think will hold things together with more authority, the old, weak rubber with no center or … you get the picture. I have replaced many bushings on many different vehicles over the years I’ve been twisting wrenches, and I won’t put rubber in if poly is available. We are fortunate that poly bushings were developed for the 4×4 market first, so availability is higher than it is for cars.
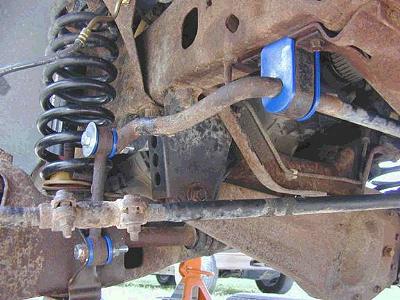
Here’s what it looks like when you’re done. I stuck a large fender washer on the top outside to back up the bolt, but I don’t suppose it’s really needed. Doesn’t cost a lot though, and it makes me feel better. Notice which way the angle on the link goes?
After I got done, I took it out for a ride. I could tell an immediate difference in ride quality, particularly in curves. With no sway bar, in a curve the body rolls to the outside of the turn. This makes one side of the axle move up and the other side move down. The sway bar ties both sides together and transmits forces so that the vehicle tracks through with less body roll. Of course, if the sway bar moves, it doesn’t do its job very well. With the new bushings, I was able to take some curves 5 – 10 miles an hour faster due to the difference in body roll and handling. It also smoothed out bumps a little, but there are other things I have planned (check out my article on the springs and suspension bushings) that will make a bigger difference there.
Basically, this is the easiest set of bushings on the truck to replace. Prepare well, give yourself lots of time, and it’ll make a major improvement in your truck’s behavior.
About The Author
Jim Oaks is the founder of TheRangerStation.com, the longest-running Ford Ranger resource online since 1999. With over 25 years of hands-on experience building and modifying Ford Rangers — including magazine-featured builds like Project Transformer — Jim has become one of the most trusted authorities in the Ford Ranger off-road and enthusiast space.
Since launching TheRangerStation.com, Jim has documented thousands of real-world Ranger builds, technical repairs, drivetrain swaps, suspension modifications, and off-road adventures contributed by owners worldwide. TheRangerStation.com has been referenced in print, video and online by enthusiasts, mechanics, and off-road builders looking for practical, and experience-based information.